A Smart Power Distribution Unit For Home Automation

Power distribution units, as the name implies, are indispensable tools to have available in a server rack. They can handle a huge amount of power for demands of intensive computing and do it in a way that the wiring is managed fairly well. Plenty of off-the-shelf solutions have remote control or automation capabilities as well, but finding none that fit [fmarzocca]’s needs or price range, he ended up building his own essentially from scratch that powers his home automation system.

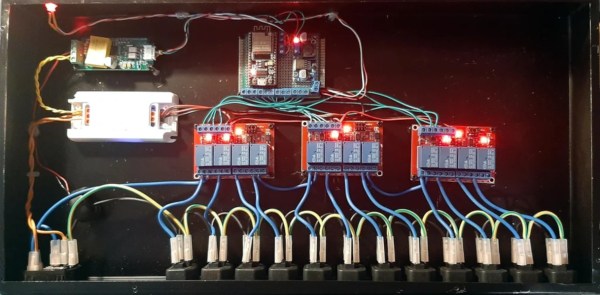
Because it is the power supply for a home automation system, each of the twelve outlets in this unit needed to be individually controllable. For that, three four-channel relay boards were used, each driven by an output on an ESP32. The ESP32 is running the Tasmota firmware to keep from having to reinvent the wheel, while MQTT was chosen as a protocol for controlling these outlets to allow for easy integration with the existing Node-RED-based home automation system. Not only is control built in to each channel, but the system can monitor the power consumption of each outlet individually as well. The entire system is housed in a custom-built sheet metal enclosure and painted to blend in well with any server rack.

Adding a system like this to a home automation system can simplify a lot of the design, and the scalable nature means that a system like this could easily be made much smaller or much larger without much additional effort. If you’d prefer to keep your hands away from mains voltage, though, we’ve seen similar builds based on USB power instead, with this one able to push around 2 kW.

Automating The Most Analog Of HVAC Equipment

Burning wood, while not a perfect heating solution, has a number of advantages over more modern heating appliances. It’s a renewable resource, doesn’t add carbon to the atmosphere over geologic time scales like fossil fuels do, can be harvested locally using simple tools, and it doesn’t require any modern infrastructure to support it. That being said, wood stoves aren’t something that are very high-tech and don’t lend themselves particularly well to automation as a result, at least with the exception of this wood stove from [jotulf45v2].

While this doesn’t automate the loading or direct control of a modern pellet stove, it does help [jotulf45v2] know when the best times are for loading more wood into the stove and helps keep the stove in the right temperature range to avoid the dangerous formation of creosote on the inside of his chimney caused by low temperature burns. Two temperature sensors, one on the stovetop and the other on the stove pipe, monitor the stove exhaust temperature. They feed data to a Node-RED system running on a Raspberry Pi which automatically notifies the user by text message when certain stove temperatures are reached.

For anyone heating with wood, tools like this are indispensable to help avoid spending an otherwise unnecessary amount of time getting a fire up to temperature quickly without over-firing the stove. Modern pellet stoves have some more modern conveniences like this built in, but many of the perks of using cord wood are lost with these devices. There are plenty of other ways to heat with wood too; take a look at this custom wood boiler which serves as a hot water heater.

Farm Data Relay System: Combine LoRa And 2.4 Ghz Networks Without WiFi Routers And Cloud Dependence

Setting up a wireless sensor network over a wide area can quickly become costly, and making everything communicate smoothly can be a massive headache, especially when you’re combining short range Wi-Fi with long range LoRa. To simplify this, [Timm Bogner] created Farm Data Relay System which simplifies the process of combining LoRa, 2.4Ghz modules and serial communications in various topologies over wide areas.

The FDRS uses a combination of ESP32/8266 sensor nodes for short range, and LoRa nodes for long range. The ESP nodes use Espressif’s connectionless ESP-NOW peer-to-peer protocol on which allow multiple ESP boards to communicate directly without the need for a Wi-Fi router. The ESP modules can have one of 3 roles, nodes, repeaters or gateways, and gateways and repeaters share the same code. Nodes take sensor inputs, and are configured to each have a unique READING_ID.

Relays just retransmit ESP-NOW packets to extend the network range, while gateways convert packets between ESP-NOW, MQTT over Wi-Fi, LoRa or serial messages as required. Repeaters and gateways each have a unique UNIT_MAC for addressing. The code that handles communication for the ESP devices is simple and well documented, so you only need to set a few configuration values, and then can focus your efforts on the code required for your specific application.

The hub of the system is a Raspberry Pi running Node-RED which acts as the final MQTT gateway and connects to the ESP MQTT gateways. This means that all the action happens in the local network, without being dependent on an internet connection and cloud service. However, it can still send and receive data over the internet using MQTT or any other protocol as required. Node-RED makes it particularly easy to build custom automations and interfaces.

In the video after the break, Andreas Spiess, the man with the Swiss accent, who also has a hand in the project, goes over all the features, setup and caveats.

Continue reading “Farm Data Relay System: Combine LoRa And 2.4 Ghz Networks Without WiFi Routers And Cloud Dependence”

Remote MQTT Temperature Sensor Shows How It’s Done

First of all, there are definitely simpler ways to monitor remote temperatures, but [Mike]’s remote MQTT temperature sensor and display project is useful in a few ways. Not only does it lay out how to roll such a system from scratch, but it also showcases system features like solar power.

After all, if one simply wants to monitor temperature that’s easily done, but once one wishes to log those temperatures and use them to trigger other things, then rolling one’s own solution starts to get more attractive. That’s where using someone else’s project as a design reference can come in handy.

[Mike’s] solution uses two Wemos D1 boards: one with a DS18B20 temperature sensor for outdoors, and one with a small OLED screen for an interior display. The external sensor relies on a rechargeable 18650 cell and a solar panel for a hassle-free power supply, and the internal sensor (of which there can be many) has a cute enclosure and is powered by USB. On the back end, a Raspberry Pi running an MQTT gateway and Node Red takes care of the operational side of things. The whole system has been happily running for over two years.

What is MQTT? It is essentially a messaging protocol, and takes care of the whole business of reliably communicating data back and forth between IoT devices. It scales very well and doesn’t need to be hard or intimidating; our own [Elliot Williams] can tell you all about implementing it.

Scratch Built Tracked Robot Reporting For Duty

Inspired by battle-hardened military robots, [Engineering Juice] wanted to build his own remote controlled rover that could deliver live video from the front lines. But rather than use an off-the-shelf tracked robot chassis, he decided to design and 3D print the whole thing from scratch. While the final product might not be bullet proof, it certainly doesn’t seem to have any trouble traveling through sand and other rough terrain.

Certainly the most impressive aspect of this project is the roller chain track and suspension system, which consists of more than 200 individual printed parts, fasteners, bearings, and linkages. Initially, [Engineering Juice] came up with a less complex suspension system for the robot, but unfortunately it had a tendency to bind up during testing. However the new and improved design, which uses four articulated wheels on each side, provides an impressive balance between speed and off-road capability.

Internally there’s a Raspberry Pi 4 paired with an L298 dual H-bridge controller board to drive the heavy duty gear motors. While the Pi is running off of a standard USB power bank, the drive motors are supplied by a custom 18650 battery pack utilizing a 3D printed frame to protect and secure the cells. A commercial night vision camera solution that connects to the Pi’s CSI header is mounted in the front, with live video being broadcast back to the operator over WiFi.

To actually control the bot, [Engineering Juice] has come up with a Node-RED GUI that’s well suited to a smartphone’s touch screen. Of course with all the power and flexibility of the Raspberry Pi, you could come up with whatever sort of control scheme you wanted. Or perhaps even go all in and make it autonomous. It looks like there’s still plenty of space inside the robot for additional hardware and sensors, so we’re interested to see where things go from here.

Got a rover project in mind that doesn’t need the all-terrain capability offered by tracks? A couple of used “hoverboards” can easily be commandeered to create a surprisingly powerful wheeled platform to use as a base.

Continue reading “Scratch Built Tracked Robot Reporting For Duty”

Automate Your Life With Node-RED (Plus A Dash Of MQTT)

For years we’ve seen a trickle of really interesting home automation projects that use the Node-RED package. Each time, the hackers behind these projects have raved about Node-RED and now I’ve joined those ranks as well.

This graphic-based coding platform lets you quickly put together useful operations and graphic user interfaces (GUIs), whether you’re the freshest greenhorn or a seasoned veteran. You can use it to switch your internet-connected lights on schedule, or at the touch of a button through a web-app available to any device on your home network. You can use it as an information dashboard for the weather forecast, latest Hackaday articles, bus schedules, or all of them at once. At a glance it abstracts away the complexity of writing Javascript, while also making it simple to dive under hood and use your 1337 haxor skills to add your own code.

You can get this up and running in less than an hour and I’m going to tackle that as well as examples for playing with MQTT, setting up a web GUI, and writing to log files. To make Node-RED persistent on your network you need a server, but it’s lean enough to run from a Raspberry Pi without issue, and it’s even installed by default in BeagleBone distributions. Code for all examples in this guide can be found in the tutorial repository. Let’s dive in!

Continue reading “Automate Your Life With Node-RED (Plus A Dash Of MQTT)”

Node-RED Laser Shooting Gallery Goes Anywhere

When you think of a shooting gallery, you might envision a line of tin cans set up along a split-rail fence, or a few rows of ducks or bottles lined up at a carnival. But what do these have in common? You, standing in one spot, and shooting in the same general direction. You’re exposed! If those targets could shoot back, you’d be dead within seconds. Wouldn’t it be more fun if the targets were all around you in 360°? We think so, too.

So how could you possibly set up a shooting gallery this way? [Another Maker] already solved that problem for you with ESP32s and Node-RED (YouTube). Each target has an ESP32, a laser sensor, and an LED that lights up when the target is ready, and turns off once it’s been hit. They all make an enticing ‘shoot me’ sound that goes with their graphics, and a second mp3 plays upon direct hit.

The PVC gun houses an ESP8266, a laser module at the end of the barrel, and runs on a cylindrical USB battery slipped down in the secondary grip. [Another Maker] can spread the targets out far and wide, as long as they all stay in range of the localized WiFi access point.

The best part is that the Node-RED system is target-agnostic — it doesn’t care how many you have or how they’re made, and it can juggle up to 250 of them. Because of the way the target objects are programmed, it would be quite easy to add actuators that make them drop down or fall backward when hit. You could also implement [Another Maker]’s fantastic suggestion of hitting arcade buttons with NERF darts instead. Charge those lasers and fire at the break button to see the demo and walk-through video.

If you plan to knock the targets down or over in your implementation, you’ll want an easy way to reset them. Here’s a scrap-built shooting gallery that uses a windshield wiper motor to set ’em back up.

Continue reading “Node-RED Laser Shooting Gallery Goes Anywhere”