FLOSS Weekly Episode 773: NodeBB — Don’t Do The Math

This week, Jonathan Bennett and Jeff Massie talk with Julian Lam about NodeBB! It’s modern forum software that actually has some neat tricks up its proverbial sleeves. From forking of forum threads when conversations differ, to new integration with ActivityPub and Mastodon. It’s forums like you’ve never quite seen them.

Continue reading “FLOSS Weekly Episode 773: NodeBB — Don’t Do The Math”

RP2040 picture on left by Phiarc, CC BY-SA 4.0, via Wikimedia

Kaluma Puts JavaScript On The RP2040

With a simple firmware update, Kaluma puts a lightweight JavaScript runtime on the Raspberry Pi Pico (which uses the RP2040 microcontroller), providing handy modules for file systems, graphics, networking, and more. Code for a simple LED blink can then look like:

// index.js
const led = 25;
pinMode(led, OUTPUT);
setInterval(() => {
digitalToggle(led);
}, 1000);

Development can then be done using tools that are very familiar to JavaScript developers, such as npm and flashing new code to a USB-connected Pico with the (Node.js-based) Kaluma command-line interface. Take a look at the GitHub repository for the project, or browse some of the projects made with Kaluma.

Much like with MicroPython, there’s value to be had in putting implementations of high-level languages on microcontrollers. Each new language opens embedded programming to a whole new group of coders. But it’s not just languages making their way to the RP2040. Wonderful projects such as emulating the ZX Spectrum on an RP2040 also happen.

Thanks to [Shri Hari Ram] for the tip!

Gesture Controlled Filming Gear Works Super Intuitively

Shooting good video can be an arduous task if you’re working all by yourself. [Pave Workshop] developed a series of gesture-responsive tools to help out, with a focus on creating a simple intuitive interface.

The system is based around using a Kinect V2 to perceive gestures made by the user, which can then control various objects in the scene. For instance, a beckoning motion can instruct a camera slider to dolly forward or backwards, and a halting gesture will tell it to stop. Bringing the two hands together or apart in special gestures indicate that the camera should zoom in or out. Lights can also be controlled by pulling a fist towards or away from them to change their brightness.

The devil is in the details with a project that works this smoothly. [Pave Workshop] lays out the details on how everything Node.JS was used to knit together everything from the custom camera slider to Philips Hue bulbs and other Arduino components.

The project looks really impressive in the demo video on YouTube. We’ve seen some other impressive automated filming rigs before, too.

Continue reading “Gesture Controlled Filming Gear Works Super Intuitively”

Hamster Goes On Virtual Journey

Hamsters are great pets, especially for those with limited space or other resources. They are fun playful animals that are fairly easy to keep, and are entertaining to boot. [Kim]’s hamster, [Mr. Fluffbutt], certainly fits this mold as well but [Kim] wanted something a little beyond the confines of the habitat and exercise wheel and decided to send him on a virtual journey every time he goes for a run.

The virtual hamster journey is built on an ESP32 microcontroller which monitors the revolutions of the hamster wheel via a hall effect sensor and magnet. It then extrapolates the distance the hamster has run and sends the data to a Raspberry Pi which hosts a MQTT and Node.js server. From there, it maps out an equivalent route according to a predefined GPX route and updates that information live. The hamster follows the route, in effect, every time it runs on the wheel. [Mr Fluffbutt] has made it from the Netherlands to southeastern Germany so far, well on his way to his ancestral home of Syria.

This project is a great way to add a sort of augmented reality to a pet hamster, in a similar way that we’ve seen self-driving fish tanks. Adding a Google Streetview monitor to the hamster habitat would be an interesting addition as well, but for now we’re satisfied seeing the incredible journey that [Mr Fluffbutt] has been on so far.

Counter-Strike Gets The RGB LED Treatment

Inspired by the over-the-top stage lighting and pyrotechnics used during e-sport events, [Hans Peter] set out to develop a scaled-down version (minus the flames) for his personal Counter-Strike: Global Offensive sessions. It might seem like pulling something like this off would involve hacking the game engine, but as it turns out, Valve was kind enough to implement a game state API that made it relatively easy.

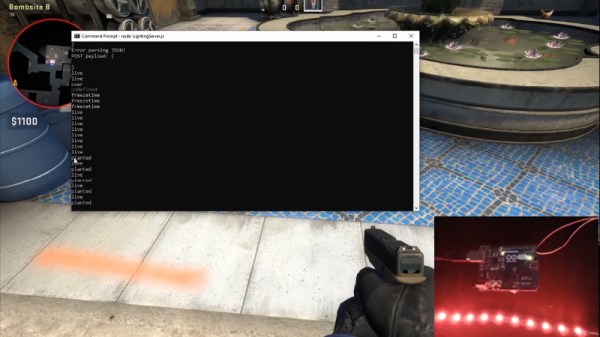
According to the documentation, the CS:GO client can be configured to send out state information to a HTTP server at regular intervals. It even provided example code for implementing a simple state server in Node.js, which [Hans] adapted for this project by adding some conditional statements that analyze the status of the current game.

These functions fire off serial commands to the attached Arduino, which in turn controls the WS2812B LEDs. The Arduino code takes the information provided by the HTTP server and breaks that down into various lighting routines for different conditions such as wins and losses. But things really kick into gear when a bomb is active.

[Hans] wanted to synchronize the flashing LEDs with the beeping sound the bomb makes in the game, but the API doesn’t provide granular enough data. So he recorded the audio of the bomb arming sequence, used Audacity to precisely time the beeps, and implemented the sequence in his Arduino code. In the video after the break you can see that the synchronization isn’t perfect, but it’s certainly close enough to get the point across in the heat of battle.

With the special place that Counter-Strike occupies in the hearts of hackers and gamers alike, it’s little surprise people are still finding unique ways to experience the game.

Continue reading “Counter-Strike Gets The RGB LED Treatment”

Automate Your Life With Node-RED (Plus A Dash Of MQTT)

For years we’ve seen a trickle of really interesting home automation projects that use the Node-RED package. Each time, the hackers behind these projects have raved about Node-RED and now I’ve joined those ranks as well.

This graphic-based coding platform lets you quickly put together useful operations and graphic user interfaces (GUIs), whether you’re the freshest greenhorn or a seasoned veteran. You can use it to switch your internet-connected lights on schedule, or at the touch of a button through a web-app available to any device on your home network. You can use it as an information dashboard for the weather forecast, latest Hackaday articles, bus schedules, or all of them at once. At a glance it abstracts away the complexity of writing Javascript, while also making it simple to dive under hood and use your 1337 haxor skills to add your own code.

You can get this up and running in less than an hour and I’m going to tackle that as well as examples for playing with MQTT, setting up a web GUI, and writing to log files. To make Node-RED persistent on your network you need a server, but it’s lean enough to run from a Raspberry Pi without issue, and it’s even installed by default in BeagleBone distributions. Code for all examples in this guide can be found in the tutorial repository. Let’s dive in!

Continue reading “Automate Your Life With Node-RED (Plus A Dash Of MQTT)”

Auto-Trickler Gently Doles Out Powder To Assist Reloading

Do you even trickle?

[Eric] does, and like everything else about reloading, trickling is serious business. Getting an exact charge of powder to add to a cartridge is not a simple task, and very tedious when done manually. This smartphone-controlled auto-trickler is intended to make the job easier, safer, and more precise.

Reloading ammunition is a great way for shooters to save money and recycle the brass casings that pile up at the end of a long day at the range. It can be a fairly simple process of cleaning the casings, replacing the spent primers, adding the correct powder charge, and seating a new bullet. It’s all pretty straightforward, but the devil is in the details, especially with the powder charge. A little too much can be a big problem, so tricklers were invented to allow the reloader to sneak up on the proper charge. [Eric]’s auto-trickler interfaces to a digital powder scale and uses a standard cell phone vibration motor to gently coax single kernels of powder from a hopper until the proper charge has accumulated. It’s easier to understand by watching the video below.

The hardware behind the trickler is pretty standard — just a Raspberry Pi Zero to talk to the smartphone UI via Bluetooth, and to monitor and control the scale via USB. [Eric] has made all the code open source so that anyone can build their own auto-trickler, which we applaud; he did the same thing with his rifle-mounted accelerometer. This project might have applications far beyond reloading where precision dispensing is required.

Continue reading “Auto-Trickler Gently Doles Out Powder To Assist Reloading”