Over the last few years, we’ve seen a steady improvement in the sort of custom hardware a dedicated individual can produce. With affordable desktop 3D printers and PCB fabrication services, the line between store bought and home built can get very blurry. This slick MQTT-connected thermometer created by [Martin Cerny] is a perfect example.
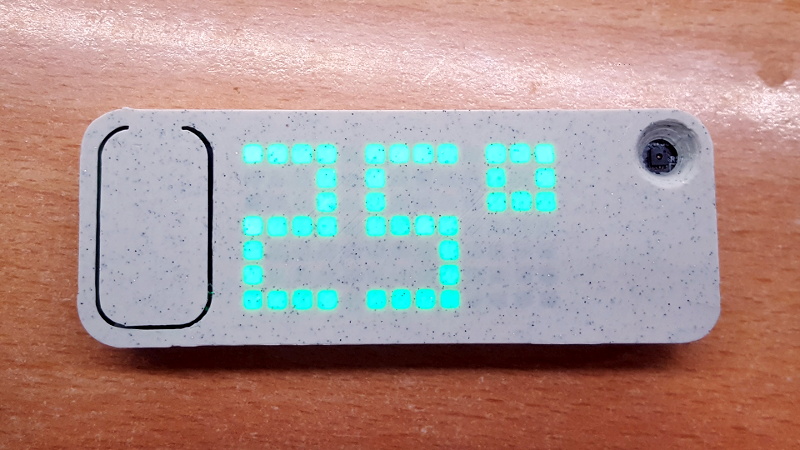
The case for the device, which [Martin] calls Temper, is printed in a stone-look PLA filament and has been carefully designed so that LEDs shining behind it illuminate perfect square “pixels” on the front. There’s a living hinge button on the left side, and on the right, an opening for the SHT30 temperature and humidity sensor. Some may say that the look of the sensor aperture could be improved with a printed grille, but there was likely a concern about reduced airflow.
Inside the case is a 13×7 array of SMD LEDs, a few 74HC595 shift registers, a TP4054 charging chip to keep the internal 250 mAh battery topped off via USB, and some passives to round out the party. The ESP-12E module that brings it all together and the battery are on the flip side of the PCB. At a press of the button, the display fires up for 5 seconds and Temper publishes temperature, humidity and battery percentage through MQTT. If you’re looking for more granular data, it can also be configured to publish regular updates at the cost of increased energy consumption.

The physical product is gorgeous on its own, but we’re happy to report that the firmware and documentation have been handled with a similar attention to detail. The project’s GitHub repo has a Wiki to help others build and configure their very own Temper, and the device’s web configuration portal is easily just as nice as anything you’d find in a piece of modern consumer electronics (if not moreso).
We’ve seen plenty of ESP8266-based environmental monitoring devices here at Hackaday, but we think this one really pushes the state-of-the-art forward. This is a device that wouldn’t be out of place on the shelf at a Big Box electronics retailer, and while [Martin] says he has no interest in building and selling them himself, we don’t doubt that folks out there will be spinning up their own Temper clones before too long.


Very nice design. Though the SHT30 should be mounted a bit away from everything generating “heat”.
And if on the same board should be separated by two or more cuts in the PCB to thermally decouple it from the other components.
If it made any difference at all it would just be a calibration issue. Just subtract 9/1000 of a degree.
Have you used the TP4054 which sits not far from the sensor? I guess in case of charging it’d be more like 1 degree or more, especially adding the heat accumulation in the case “charging” the PCB.
Btw, just found out he mentions it here: https://github.com/mcer12/Temper-ESP8266/wiki/Some-notes-and-considerations. It can swing +/- 5°C!
Not +/- just + but that is pretty bad. At the charging current specified the little tp405 would be dissipating half a Watt. I don’t know what the intended use of this thing is, I guess if it’s for sitting around on a shelf most of the time and blasting a charge once a week it doesn’t matter too much, hence his “ignore temperature while charging” configuration.
Hi, autor here :) It will sit on a shelf much longer than a week, actually it should last months (~35uA in deep sleep). Having the TP4054 at the opposite side of the board would help but the temperature would still swing a degree or two since it’s enclosed so still useless. Hence the Ignore temperature while charging option. But I think skipping one or two reportings when it’s charging is not that big of a deal honestly.
So you’re saying I should just repurpose my socket A boards with a thermistor in the CPU socket as a room temperature sensor, just have to calibrate them?
I was thinking that the sht30 should be mounted on the bottom edge so that it is not visible and would be protected from light shining on it like from an open window. I love the display and over all it is a very nice looking build.
No temperature sensor should be placed in direct sunlight, it will heat up the case and will mess with the measurement regardless if the sensor itself is hidden or not ;)
Correct placement would be at the bottom of the case behind a vent. Another vent at the top would evacuate any heat generated by the other components and create a small convection current to draw in ambient air at the sensor.
That would make sense but only if the device was ON all the time. But since it’s sleeping and only wakes up for a second or two to send the measurements, there is zero heat to care about. Unless you consider the 30uA deep sleep current significant enough heat source ;)
Apparently, we CAN have NiceThings.
Just to clarify, the device is made to do scheduled wake-ups so it will post the values regardless if the button was pushed or not. Pushing a button forces immediate data publish as well as it lights up the display with current temperature. Regular scheduled wake-ups won’t light up the display and just send the data silently.
Nice work. Stylish.