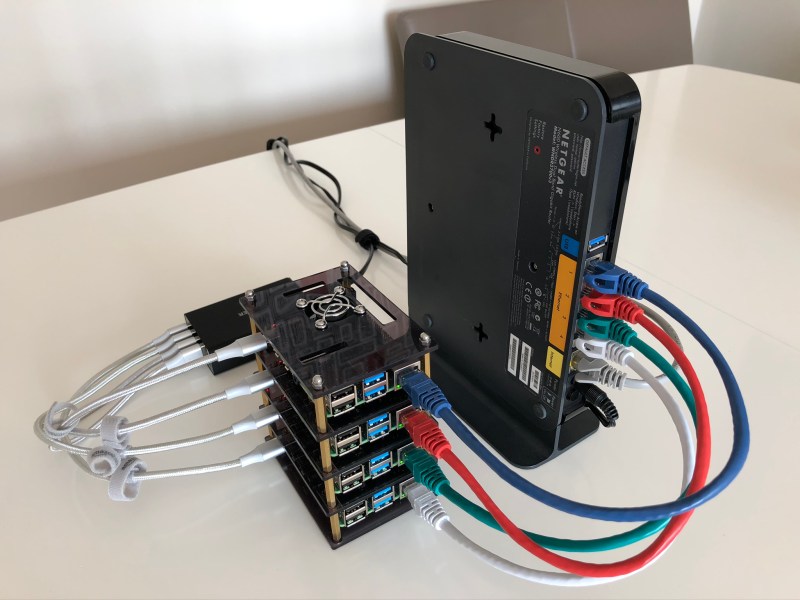
Raspberry Pi clusters are a common enough project, but a lot of the builds we see focus on the hardware side of the cluster. Once it’s up and running, though, what comes next? Raspberry Pis aren’t very powerful devices, but they can still be a great project for learning how to interact with a cluster of computers or for experimental test setups. In this project from [Dino], four Pis are networked together and then loaded with a basic set of software for cluster computing.
The first thing to set up, after the hardware and OS, is the network configuration. Each Pi needs a static IP in order to communicate properly. In this case, [Dino] makes extensive use of SSH. From there, he gets to work installing Prometheus and Grafana to use as monitoring software which can track system resources and operating temperature. After that, the final step is to install Ansible which is monitoring software specifically meant for clusters, which allows all of the computers to be administered more as a unit than as four separate devices.
This was only part 1 of [Dino]’s dive into cluster computing, and we hope there’s more to come. There’s a lot to do with a computer cluster, and once you learn the ropes with a Raspberry Pi setup like this it will be a lot easier to move on to a more powerful (and expensive) setup that can power through some serious work.


Ansible is a tool to manage software installations and it uses SSH to execute scripts on the “childeren” in the cluster it manages. So once you have SSH configured on all nodes and Ansible installed on a controller node you can ask Ansible to install Prometheus and Grafana (and other stuff) using Ansible Playbooks. A Playbook is a config that executes scripts.
Why use static IPs “in order to communicate properly”? Why not use explicit Hostnames like for example “RPi_CS1”, “RPi_CS2”, “RPi_CS3” and so on and let the DHCP do the work like it is supposed to be in the year 2020?
Just start the first RasPi, change the Hostname, reboot, start the second, change the Hostname and so on, repeat till the last…
Once done, you don’t have to remember the IPs in your cluster. After a reboot, or change in the Network-Settings there also will be no problems with a different IP-Range or something like that.
Probably because this is an article about clustering raspberry pis and not beginner DNS troubleshooting.
But, reasonable question still.
LMFAO
That’s perfectly fine if you’re not worried about having to use up extra CPU cycles and network overhead on low end systems to keep up with DHCP updates. If you’re trying to squeeze out every last drop of performance on something like an Rpi, simplest is best. I know, it’s nit-picky, but all that kind of stuff (like using DNS when you don’t have to) adds up. All the sudden you’ve lost 3-5% performance which can be critical in real world projects.
I use something similar, except I PXE boot all the pis to create a docker swarm.
Networking booting makes it easy to sync all the docker container data.
I’m currently working on getting PXE booting working on my Pi 4 Cluster, which currently uses SD card for /boot and SSDs via USB 3 for / after that.
Any chance you could tell me what is needed for the PXE boot to work? And also, do you have the rootfs mounted to an network drive? If so, does each machine have it’s own directory/filesystem, or do they share common configs, etc.?
Figured it out. I’ll probably write an article/tutorial for it. Turns out I needed three things on the server: isc-dhcp-server, nfs-server, and tftpd-hpa. Once I configured those and flashed the latest eeprom (rpi-eeprom-update with a netboot configured 2020-04-16.bin file), I was able to PXE boot and run a rootfs from the NFS server.
Sorry, I missed your comment yesterday.
It was a bit of a ball-ache to get working, there is a lot of conflicting information out there, as different rpi firmwares had slightly different boot sequences.
I found a lot of guides saying you needed different DHCP options, not sure which one’s are actually needed. 60, 66, 67, 43 seem to make it work for me. I did capture the traffic on boot, but havent saved the cap and cant do it right now.
Mine all load their bootcode.bin over the network, so no SD card or USB is required (except the one rpi3b)
If you tried to share the file systems you would most probably get r/w IO errors. Mine all have individual NFS loaded filesystems with a /Docker folder on each that I just sync up periodically via rsync.
I did hear people were having problems with PXE and rpi4 (im using 3b+) , so i’m glad they’ve fixed that with new firmware.
Thanks for the info! It certainly was a big pain getting it working, but I’m glad I did (learned a lot about DHCP, TFTP, and PXE in the process).
The difference with the Pi 3 and Pi 4 is that the eeprom on the Pi 4 replaces the need for bootcode.bin. So as long as a netboot enabled firmware was loaded onto the eeprom, you won’t need any sd card or tftp server to have that file available during the boot process.
The only thing now is that performance wise it’s still much faster for me to run SSDs via USB 3, than to mount the root fs via NFS. But on the bright side, I no longer need about five SD cards for /boot anymore lol.
Ansible is not monitoring software.
“Each Pi needs a static IP in order to communicate properly.”
I dispute that. If all are identical, they just need to be in a constant IP range.
For a raspberry pi setup where resources are limited, you’d be better off running Firecracker than Kubernetes (RPi4 required).
https://firecracker-microvm.github.io/
https://github.com/firecracker-microvm/firecracker/issues/1196
I would say that comes with a giant asterisk though. Firecracker doesn’t have anywhere near the same size community as k8s/docker. So from an implementation perspective, getting up, running and actually using may be a bit more challenging. Speaking for myself though, would be a far more interesting read.
https://aws.amazon.com/blogs/aws/firecracker-lightweight-virtualization-for-serverless-computing/
Support won’t be an issue. It’s the tech used in the latest ECS Fargate release on AWS.
I don’t believe that this is a cluster — yet… This is 4 individual machines being monitored and loaded by a central point. No job distribution/control has been established yet.
Will be once he adds Kubernetes as he mentions at the end.
in normal cluster the net are FASTER!
why not using GPIO for connection boards?
Came here to also point out the mistake re: Ansible.
Honestly, this really bums me out. Part of why I like HaD is the authors generally seem really well versed in the topics they share… this is just glaringly bad. The original article even explains what Ansible is and why he is using it.
Perhaps a single 80mm or 120mm fan on the side would be better at cooling these beasies. The 30mm usually scream too loud and barely move any air. Also a 8-port 1G switch (~$20) has room for 3 more of these. Some right angle USB-c connectors would look a bit tidier (https://tinyurl.com/ybtvq6rr).
I would suggest an old Pi 2 or 3 as separate control with the slaves “reset” pins wired to GPIO. You can also for wire the serial from each slave and completing the whole setup automatically (the console spits the IP address and host name, so you can detect is the PI has been “initialized in the cluster”).
Outside of the fact they are physically small I do not understand why every time there is a blurb here on clusters they are alwys playing with pi’s. It just gets old.
I think this build may have undervoltage problems with using charger instead of power supply. RPi 4 needs 3A current at 5.1V power supply and does not like 4,9V or so
Pointless ARM userless as for HPC/cluster due to extreme low performance/watt, as well price/performance.
Kubernetes as well nothing to do with bare-metal cluster, not even have load balancer between physical nodes.
WARNING: I didn’t read the external article
May be a bad idea as a production cluster but if you want to LEARN how to manage/use HPC/cluster with real hardware it seems to be a reasonable price. If we really want to go the cheap way (especialy for learning) local VMs is a good way. (His computer specs will tell how powerful those VMs would be)
Doesn’t the Pi require 2.5A? That power device claims 2.4A per USB port.
I bought one of those 5v power supplies off eBay. The ones everyone uses in 3D printer builds. Hooked up some power-only micro usb cables, and haven’t had any undervolt warnings at all.
The Pi can use up to 2.5 amps.
But it normally doesn’t consume even half of that, even when powering external devices like keyboards, mice, HDD enclosures, etc…
At least I haven’t had any power problems with my own 2 amp USB power supply running my own Pi.
Hi all, I am new to pi clusters. I was able to get it to work but the python library fabric won’t work with me and i am not able to actually use the cluster.. any help with a link or instructional video for the code part of the cluster? Thank you