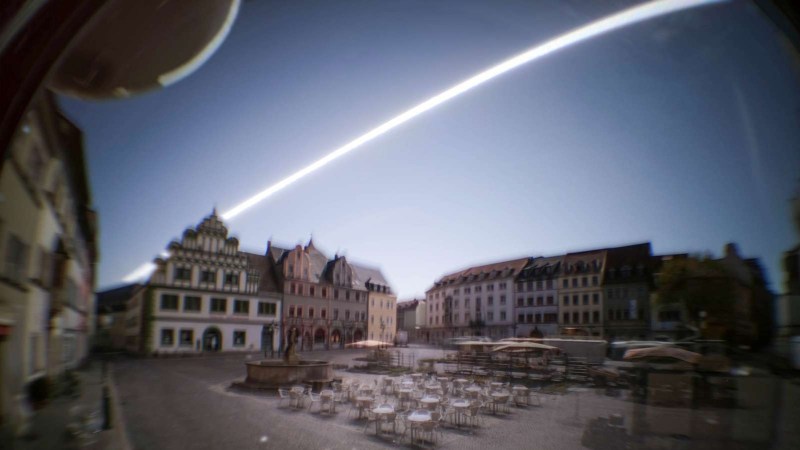
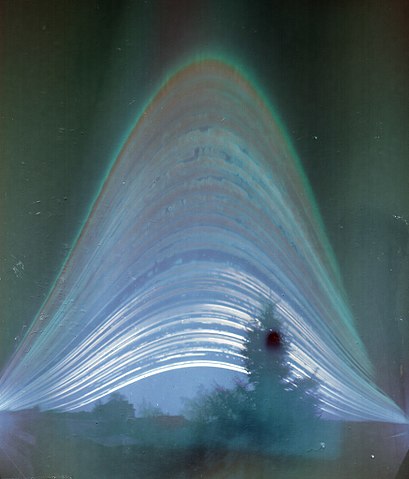
Have you ever heard of solargraphy? The name tells you much of what you need to know, but the images created with a homemade pinhole camera and a piece of photographic film can be visually arresting, showing as they do the cumulative tracks of the sun’s daily journey across the sky over many months. But what if you don’t want to use film? Is solargraphy out of reach to the digital photographers of the world?
Not at all, thanks to this digital solargraphy setup. [volzo] searched for a way to make a digital camera perform like a film-based solargraphic camera, first thinking to take a series of images during the day and average them together. He found that this just averaged out the sun from the final image. His solution was to take a pair of photos at each timepoint — one correctly exposed to capture the scene, and one stopped way down to just capture the position of the sun as a pinprick of light. All the foreground images are averaged, while the stopped-down sun images are overlaid upon each other, producing the track of the sun across the sky. Add the two resulting images and you’ve got a solargraph.
To automate the process, [volzo] used a Raspberry Pi and a Pi-Cam fitted in a weatherproof 3D-printed box. A custom hat powers up the Pi every few minutes, which boots up and takes the two pictures. Sadly, the batteries only last for a couple of days, so those long six-month exposures aren’t possible yet. But [volzo] has made all the sources available, so feel free to build on his work. If you prefer to use a DSLR for the job, this Bluetooth intervalometer might help.


This is more a job for a ESP32-cam board ;)
you could power that from a modest solar panel since it only needs to run during the day.
It has a sdcard slot for storage or you could even send the exposures of to a server tho that would make the power draw quite a bit larger.
The esp32-cam board I have isn’t really setup for real low power usage so you probably need to lift the voltage regulator and use a liFePo cell directly on VCC.
I would estimate about 6 months use on a 2500mAh LiFePo but I haven’t measured what writing to SDcard would take.
Six months is all it would take to make the classic “winter solstice to summer solstice” solargraph.
Its a nice idea, however one of the nice things about Solarography is that the cameras are of little value so that you can leave them anywhere for months. Generally I find I lose about 1 in 4 depending on where they are placed. Annoying, but no biggy. A pi version is just too nickable so you could only place them in a an area you have secure access to.
I also wonder whether the power issue could be solved with solar panels charging a battery?
“solar panels charging a battery” – yes! Seems so obvious once you said it. Let the sun power it’s own photos
Or you could use a sensor that is self-powered from the photons it receives:
https://spectrum.ieee.org/tech-talk/semiconductors/optoelectronics/selfpowered-image-sensor-could-watch-you-forever
technically speaking all energy sources on Earth apart from fissible nuclear fuel come from the Sun :P
Even fissile materials originated in a sun… :)
*supernova
A sun ends fusing somewhere around iron, heavier elements need more squishing ;-)
Yes, using a solar panel is indeed a very good point.
“A pi version is just too nickable so you could only place them in a an area you have secure access to.”
Only placing it in non-public areas with restricted access is sadly not a good thing if you actually want to have a good view or angle. I did that extensively for testing, but as soon as I was sure it’s working as expected I started to put the cameras on poles, struts and other magnetic objects in the public space. Due to the height it’s out of reach for curious people and at the height of about 3m that works quite well. For placement an extendable tripod leg with a hook is discreet and fast (I’ve got a tripod where you can detach the legs).
Someone suggested that solargraphs should always be mounted above the height of 2 drunk men, one standing on another shoulders
:D I’m very sorry but I absolutely need to steal this sentence and will need to think about that whenever I place a camera out in the wild.
I read a story while writing this article that a solargraph placed on a bridge somewhere was “detonated” by the bomb squad when someone saw it as a “suspicious package.”
One benefit of this is that it is colour. Solargraphs are all b&W bwcause dealing with colour film is difficult. I did have a go at making a colour one once with 3 solargraphs with colour filters on, but the results were underwealming
The result is quite nice, I wouldn’t have guessed these pictures were done using Raspberry Pi camera and postprocessing.
I’m wondering about the algorithm, though. If two photos are taken anyway, why not simply guess the actual intensity of bright spots by taking the brightness from the underexposed photo and scaling it based on difference in exposure? If the Sun is still overexposed in the second photo, the radius of the white blob could give a rough estimate. If more photos could be taken to successively find the exposure correction resulting in zero overexposed pixels it would be even better. Then do the averaging. Or am I missing something?
How about an esp32-cam? I played with one briefly, and although the frame rate is a bit slow, the picture quality was surprisingly good. A lot less power consumption, and you even have the option of uploading each photo if there’s wifi available. And if you were emulating film, wouldn’t the correct procedure be to take very short exposures and just add them together?
Jup, that’s exactly what I’m doing.
I hadn’t had a look at the ESP32-cam, If I recall correctly it’s just 5MP? The Picam v2 gives 8MP, that’s about the minimum I can live with.
However, nearly everything I do on the Pi should/would work on an ESP32, too. It may just be a bit more tedious to write and test the code.
The cameras I’ve been using with Raspberry Pi have such lousy dynamic range that when I try to capture images outside my window in the sunny weather, the parts in the sun are overexposed and the parts in the shade are underexposed at the same time. When I tried to do a time lapse video, I waited for an overcast sky because it made the picture quality tolerable.
I’m not quite sure if I can follow exactly:
Getting overexposed pixels (= the center of the sun blobs) on the underexposed photo is not a bad thing. The exact brightness of the underexposed photo is — in my experience — not so important when trying to achieve similar outcomes when comparing to film. Just knowing that this part of the image would have been exposed to enough light to be “burned” (or a white pixel in our case) is enough, the exact exposure (as in how much brighter than the minimum to be burned) wouldn’t result in a noticeable difference.
I’m basically just using the overexposed pixels (e.g. the sun pixels) as a mask to determine burned parts. The non-overexposed parts (the “corona” of the sun) result in a smooth gradient and that’s all thats needed.
I assume if I could reduce the overexposed pixels (white) to a minimum, then the arc of the sun would just be more yellow? Haven’t tried that yet, I’ll guess I’ll look into that.
The Picamera performs well as long as you don’t try to enlarge or print the image :/
Let me explain it on an example. You take a regular picture via a filter IIRC, so for the sake of simplicity let’s assume that the exposure time is 1/10s and the aperture is fixed. Then you take a picture at, say, 1/1000s and you get only a white blob somewhere, the rest black. So now you have two 8-bit RGB images, but you know that the values in the second one weigh 100x more. You convert both to 16-bit RGB, multiply values from the second one by 100 (probably with some cut off at the bottom of the range to get rid of the noise) and combine them. Now you have a 16-bit RGB picture with most of the picture within range and the overexposed sun in the range of . If you average that, the blue sky should no longer dominate. I guess. Just an idea.
ah, now I get it. That would be something similar to a classic HDR. I tried something very close to what you describe early on but sadly it didn’t work out well and was very dependent on perfect lighting conditions.
Understood, thanks for the reply.
Digital image sensor response is pretty linear, but film response is logarithmic, which helps in this case as the dynamic range of the photo is very big but you don’t care so much about the levels. And saturated pixels saturate their neighbors which doesn’t happen in film. This is one of the edge cases that film outperforms digital sensors, as usually you don’t mind burning the sun a little at all.
Kind-of cute, but wouldn’t the batteries last longer if he used something which doesn’t have to boot up? Something in which the operating system doesn’t go through a lot of unnecessary configurization and initialization on every boot? And then there’s hardware which requires initilization on every boot despite being part of a SoC, in some cases. I don’t know to what extent the Pi’s hardware or software address this issue, but given present trends, I expect it’s none at all.
Yes, the Pi is basically the worst hardware/SoC you could imaging for that kind of project. Every boot and every shutdown procedure eat up 10s of runtime each. But on the other hand it’s the cheapest and most accessible embedded linux device with decent camera support you’ll find. When relying on some piece of hardware that would actually support something like sleep-modes and energy saving you could save so much time when doing something like this…
Pronounce it like a pirate!
Solll-Arrrrr-graphy!
Since the majority of the image will stay the same, could you reduce the data, by only storing B&W data and a say one colour image a day?
Similar to luminance based image compression methods? Jup, that would certainly work. For the averaging itself however not many images are required and just dropping images altogether is a bit easier. If you compare the final long exposure image based on a 1000 single captures and a 100 (equally divided over the same time) you won’t notice a difference. (50 to a 100 images is usually the lower bound for perfect quality even at full resolution).
In the rather impressive enclosure, there seems to be a large lens. What is it?
In the enclosure sits a neutral density filter to reduce the amount of light and keep it sealed. On top of the Pi camera is a smartphone lens (one of these horrible thingies you can awkwardly stick in front your phone camera). I printed mounts for a selection of lenses for having a wide angle lens, a fisheye, etc to allow a bit more freedom in getting the right angle of view for the right shot. The four screws of the Pi Zero are used for alignment and a piece of rubber holds it nice and square in front of the Pi Camera sensor. It’s basically a poor mans interchangeable lens mod.