Pi Cam Replaces Pinhole And Film For Digital Solargraphy

Solargraph from a one-year exposure on film. Elekes Andor / CC BY-SA

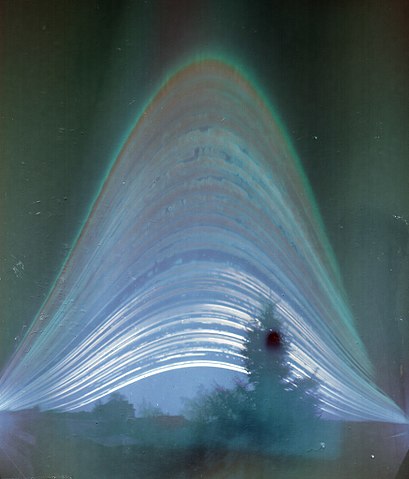
Have you ever heard of solargraphy? The name tells you much of what you need to know, but the images created with a homemade pinhole camera and a piece of photographic film can be visually arresting, showing as they do the cumulative tracks of the sun’s daily journey across the sky over many months. But what if you don’t want to use film? Is solargraphy out of reach to the digital photographers of the world?

Not at all, thanks to this digital solargraphy setup. [volzo] searched for a way to make a digital camera perform like a film-based solargraphic camera, first thinking to take a series of images during the day and average them together. He found that this just averaged out the sun from the final image. His solution was to take a pair of photos at each timepoint — one correctly exposed to capture the scene, and one stopped way down to just capture the position of the sun as a pinprick of light. All the foreground images are averaged, while the stopped-down sun images are overlaid upon each other, producing the track of the sun across the sky. Add the two resulting images and you’ve got a solargraph.

To automate the process, [volzo] used a Raspberry Pi and a Pi-Cam fitted in a weatherproof 3D-printed box. A custom hat powers up the Pi every few minutes, which boots up and takes the two pictures. Sadly, the batteries only last for a couple of days, so those long six-month exposures aren’t possible yet. But [volzo] has made all the sources available, so feel free to build on his work. If you prefer to use a DSLR for the job, this Bluetooth intervalometer might help.

Painting With Light And A Little G-Code

Most photographs are made in the fraction of a second that the camera’s shutter is gathering reflected light from the scene. But there’s fun to be had by leaving the shutter open and directing light into the camera. Called light painting, it can be as simple as a camera on a tripod in a dark room and a penlight spelling out dirty words – not like we’d know – or as complicated as this CNC dot-matrix light printer.

The first idea that [Jeremy S. Cook] had for this build didn’t go so well. He fitted an LED to the gantry of his 3D-printer, intending to send it G-code representing bitmaps. The idea would be to set it up in a dark place, open the shutter, and let the machine build up the image by rastering through the X- and Y- axes while blinking the LED on and off at the right time. But since the gantry only moves in one axis, he abandoned the printer in favor of his CNC router. He printed a collar to fit the dust collector shroud we previously featured, added a battery-powered LED, and affixed a pushbutton switch to the let the Z-axis turn on the light. It took some tweaking such as adding a translucent PLA diffuser, to get decent images, but in the end it worked. We like the soft look of the floating voxels, which were really helped by the later addition of a Nano and a Neopixel. Check out the build in the video below.

One thing we’d suggest is better reflection control. [Jeremy] used a black platen as a background, but it wasn’t quite enough. We suggest going none more black next time.

Continue reading “Painting With Light And A Little G-Code”

Build This Barn Door Tracker Today, Take Stunning Shots Of The Galaxy Tonight

Think you need some fancy equipment to get stunning shots of the night sky? Surely those long-exposure shots that show the Milky Way in all its glory take expensive telescopes with complicated motor-driven equatorial mounts, right? Guess again – you can slap together this simple barn door tracker for a DSLR for a couple of bucks and by wowing people with your astrophotography prowess tonight.

Those stunning, deeply saturated shots of our galaxy require a way to cancel out the Earth’s movement, lest star trails ruin your long exposure shots. Enter the barn door tracker, a simple device to let you counter the Earth’s rotation. [benrules2]’s version of the tool is ridiculously simple – two boards connected by a hinge. A short length of threaded rod with a large handle passes through a captive nut in the upper board.

A little trig allows you to calculate how much and how often to turn the handle (by hand!) to counter the planet’s 0.25°/minute diurnal rotation. Surprisingly, the long exposure times seem to even out any jostling introduced by handling the rig, but we’d still imagine a light touch and a sturdy tripod would be best. Those of you with less patience might automate this procedure.

It seems a lot to ask of a rig that you could probably throw together in an hour from scrap, but you can’t argue with [benrules2]’s results. His isn’t the only barn door tracker we’ve covered, but it looks like the simplest by far and would be a great project to build with kids.

[via r/DIY]

Motion Through Time Painted In Light

Photographer [Stephen Orlando] has an awesome body of work that focuses on human motion. The images he captures with colored light and a camera set up in a setting of choice tell a story of time in a way that’s visually stunning.

[Stephen] has experimented with various types of action. He’s attached LED strips onto props like oars in order to capture the rhythmic movements of rowing, or directly onto parts of the body to visualize more chaotic gestures, like the forms of a martial artist. His camera is set up to take long exposures, soaking in the light as it plots itself through space over time.

karateLight

Though this isn’t a hack directly in itself, [Stephen’s] experimentation with time and light is a great case of technology being added to the arsenal of traditional mediums we’re accustomed to seeing in the production of artistic work. The clean execution of his idea to tell a story about what we don’t typically get to see by use of light should inspire all of us who love to play around with LEDs in our projects. Sometimes the more interesting aspects of our work are created in the negative space we forget to consider.

The next time you find yourself working on a hack, look at what you’re creating from a perspective beyond its original context. For example, 3D printing with a delta robot is a bit of a departure from it’s original purpose as a pick and place machine. Even further yet is the concept of using one to draw images in space with light. Often the process of somethings creation, as well as the byproduct of what it took to make it, is just as worthy of investigation. Don’t forget to search between the lines… that’s where the magic is.

100% DIY Intervalometer Is 100% Awesome

It’s easy to tell from this process documentary that [Nagyizee] is not one to settle for prefabricated anything. He could have just bought some off-the-shelf DSLR intervalometer, but that would mean interfacing with someone else’s design through cold, soulless plastic.

[Nagyizee] wanted a one-of-a-kind tool built from the ground up. In addition to a timer, he was in the market for a light sensor and sound detection. He chose an STM32F100 ARM Cortex M3 running at 8MHz in the name of power efficiency and started designing the UI and firmware. A custom graphic library for the OLED display streamlines it even further. Once the schematic was finalized, [Nagyizee] devised a stylish and ergonomic wooden case to be milled with a tiny Proxxon F70.

With the enclosure decisions out of the way, he etched and drilled the PCB and placed the components. The light sensor needed a lens and a prism, so he made one from a 10mm LED body. Not one to miss a detail, [Nagyizee] also turned some buttons, hand painted them, and made a scroll wheel. He ends the video with a demonstration that proves it is quite capable. In addition to standard cable release mode, it handles long exposure times, sequential shooting, and capture on light, shadow, or sound. But wait, there’s more: [Nagyizee]’s creation combines modes with ease and grace.

Continue reading “100% DIY Intervalometer Is 100% Awesome”

Finding Meteors, Satellites, And Star Trails With A Raspberry Pi

meteorite

The Raspberry Pi is an incredibly popular, cheap, and low power computer that also has a nifty camera add-on that is completely programmable. This opens up a log of possibilities for long-exposure photography, and [Jippo] has found the best use so far: long exposure astrophotography for capturing meteors, satellites, and star trails.

[Jippo] is using a stock Raspi and camera module with a little bit of custom software written by his friend [Jani Lappalainen] that grabs image data from the camera and saves it either as a time-lapse, or only when something significantly changes. This would include meteors and Iridium flares, as well as passing planes, reflections of satellites, and of course long-exposure star trails.

So far, [Jippo] has already captured enough images to amount to a great night of skywatching. There’s a great picture of a meteor, a few pictures of satellites reflecting the sun, and some great star trails. The software [Jippo] is using is available on his site along with a gallery of his highlight reel.

DSLR Gives Exposure To 3D Light Traces

light lion

We’ve all twirled sparklers around in the darkness to write fleeting circles and figure eights with the light they give. Some of us have done it with the glowing end of a cigarette, too. Hackaday Projects user [ekaggrat] went a step further, painting with an LED mounted on the print head of his newly built 3DR Delta and capturing the LED’s path with a DSLR camera set for long exposure.

He started by creating a mesh model. From there, he converted it slices and G-code in Grasshopper. The LED is connected to pin D11/servo pin 1 on the RAMPS board. [ekaggrat] used the M42 G-code extension toggle the pin and write the slice lines with light. He has future plans to use an RGB LED, and we hope he shares that on the Projects site as well.

While this isn’t the most advanced light painting setup we’ve seen, it’s still pretty awesome and far more accessible. There is more information on his site, and you can grab the G-code from his repo. Stick around to see a video of the process.

Continue reading “DSLR Gives Exposure To 3D Light Traces”