Using A Laser To Blast Away A Bayer Array

A Bayer array, or Bayer filter, is what lets a digital camera take color photos. It’s an array of tiny color filters that sit on top of a camera’s CCD. The filter makes it so that each sub-pixel in the image sensor only sees red, green, or blue light. The Bayer filter is an elegant tool that gives us color digital photos, but what would you do if you wanted to remove one?

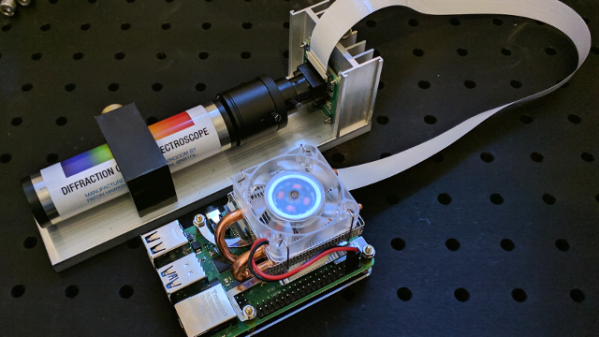
[Les Wright] has devised a way to remove the Bayer filter from the Raspberry Pi Camera. Along with filtering red, green, and blue light for their respective sensors, Bayer filters also greatly reduce the amount of UV and IR light that make it to the CCD sensor. [Les] uses the Raspberry Pi camera in his Pi-based Spectrometer, and he wants to remove the Bayer filter to improve and expand its sensitivity.

Of course, [Les] isn’t the first one to want to do this. Some have succeeded in physically scratching the filter off of the CCD, but because the Pi Camera has vital circuitry around the outside of the sensor, scratching the filter off would likely destroy the circuitry. Others have stripped it off using chemical means, so [Les] gave this a go and destroyed no small number of cameras in his attempt to strip the filter off with solvents like DMSO, brake fluid, and industrial paint stripper.

A look at the CCD, halfway through the process.

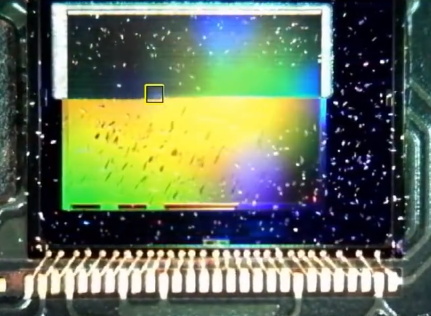
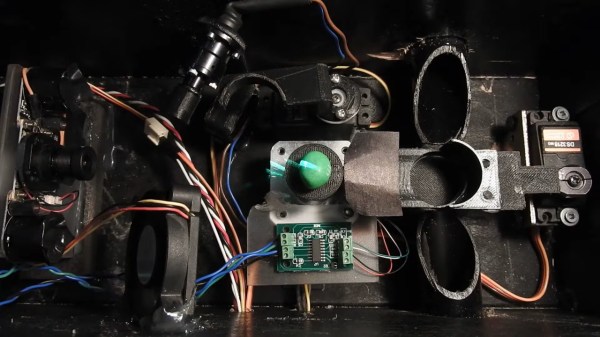
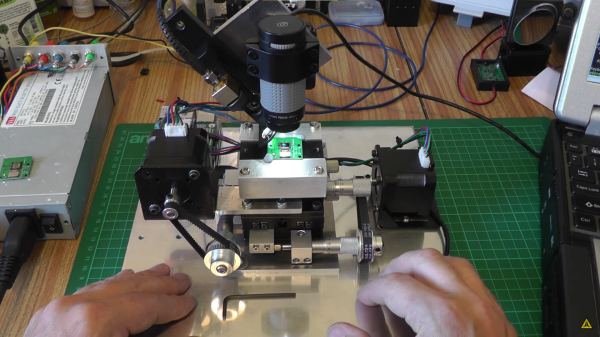
Inspired by techniques used in industry, [Les] eventually tried to use a several-kW nitrogen laser to burn off the filter (which seems appropriate given his experience with lasers). He built a rig that raster scans the laser across the sensor using stepper motors to drive micrometer bases. A USB microscope was included to allow progress to be monitored, and you can see a change in the sensor’s appearance as the filter is removed.

After blasting off the Bayer filter, [Les] plugged his improved camera into his home-built spectrometer and pointed it outside. The new camera gives the spectrometer much more uniform sensitivity and allows [Les] to see further into the IR and UV bands. The spectrometer can even detect the Fraunhofer lines—subtle dips in the sun’s spectrum from absorption by molecules in the atmosphere.

This is incredible for a DIY setup and instrument, and we can’t wait to see what [Les] does next to improve his measurements. If your spectrometry needs are more mass than visual, take a look at this home-built mass spectrometer. Home spectrometers aren’t just for examining light spectra—they can also be used to judge the ripeness of fruit!

Continue reading “Using A Laser To Blast Away A Bayer Array”

Pi-Based Spectrometer Puts The Complexity In The Software

Play around with optics long enough and sooner or later you’re probably going to want a spectrometer. Optical instruments are famously expensive, though, at least for high-quality units. But a useful spectrometer, like this DIY Raspberry Pi-based instrument, doesn’t necessarily have to break the bank.

This one comes to us by way of [Les Wright], whose homebrew laser builds we’ve been admiring for a while now. [Les] managed to keep the costs to a minimum here by keeping the optics super simple. The front end of the instrument is just a handheld diffraction-grating spectroscope, of the kind used in physics classrooms to demonstrate the spectral characteristics of different light sources. Turning it from a spectroscope to a spectrometer required a Raspberry Pi and a camera; mounted to a lens and positioned to see the spectrum created by the diffraction grating, the camera sends data to the Pi, where a Python program does the business of converting the spectrum to data. [Les]’s software is simple by complete, giving a graphical representation of the spectral data it sees. The video below shows the build process and what’s involved in calibrating the spectrometer, plus some of the more interesting spectra one can easily explore.

We appreciate the simplicity and the utility of this design, as well as its adaptability. Rather than using machined aluminum, the spectroscope holder and Pi cam bracket could easily be 3D-printer, and we could also see how the software could be adapted to use a PC and webcam.

Continue reading “Pi-Based Spectrometer Puts The Complexity In The Software”

TMD-2: A Bigger, Better, More Collaborative Turing Machine

One of the things we love best about the articles we publish on Hackaday is the dynamic that can develop between the hacker and the readers. At its best, the comment section of an article can be a model of collaborative effort, with readers’ ideas and suggestions making their way into version 2.0 of a build.

This collegial dynamic is very much on display with TMD-2, [Michael Gardi]’s latest iteration of his Turing machine demonstrator. We covered the original TMD-1 back in late summer, the idea of which was to serve as a physical embodiment of the Turing machine concept. Briefly, the TMD-1 represented the key “tape and head” concepts of the Turing machine with a console of servo-controlled flip tiles, the state of which was controlled by a three-state, three-symbol finite state machine.

TMD-1

TMD-1 was capable of simple programs that really demonstrated the principles of Turing machines, and it really seemed to catch on with readers. Based on the comments of one reader, [Newspaperman5], [Mike] started thinking bigger and better for TMD-2. He expanded the finite state machine to six states and six symbols, which meant coming up with something more scalable than the Hall-effect sensors and magnetic tiles of TMD-1.

TMD-2 has a camera for computer vision of the state machine tiles

[Mike] opted for optical character recognition using a Raspberry Pi cam along with Open CV and the Tesseract OCR engine. The original servo-driven tape didn’t scale well either, so that was replaced by a virtual tape displayed on a 7″ LCD display. The best part of the original, the tile-based FSM, was expanded but kept that tactile programming experience.

Hats off to [Mike] for tackling a project with so many technologies that were previously new to him, and for pulling off another great build. And kudos to [Newspaperman5] for the great suggestions that spurred him on.

“Hey, You Left The Peanut Out Of My Peanut M&Ms!”

Candy-sorting robots are in plentiful supplies on these pages, and with good reason — they’re a great test of the complete suite of hacker tools, from electronics to machine vision to mechatronics. So we see lots of sorters for Skittles, jelly beans, and occasionally even Reese’s Pieces, but it always seems that the M&M sorters are the most popular.

This M&M sorter has a twist, though — it finds the elusive and coveted peanutless candies lurking in most bags of Peanut M&Ms. To be honest, we’d never run into this manufacturing defect before; being chiefly devoted to the plain old original M&Ms, perhaps our sample size has just been too small. Regardless, [Harrison McIntyre] knows they’re there and wants them all to himself, hence his impressive build.

To detect the squib confections, he built a tiny 3D-scanner from a line laser, a turntable, and a Raspberry Pi camera. After scanning the surface to yields its volume, a servo sweeps the candy onto a scale, allowing the density to be calculated. Peanut-free candies will be somewhat denser than their leguminous counterparts, allowing another servo to move the candy to the proper exit chute. The video below shows you all the details, and more than you ever wanted to know about the population statistics of Peanut M&Ms.

We think this is pretty slick, and a nice departure from the sorters that primarily rely on color to sort candies. Of course, we still love those too — take your pick of quick and easy, compact and sleek, or a model of industrial design.

Continue reading ““Hey, You Left The Peanut Out Of My Peanut M&Ms!””

Old Polaroid Gets A Pi And A Printer

There’s nothing like a little diversion project to clear the cobwebs — something to carry one through the summer doldrums and charge you up for the rest of the hacking year. At least that’s what we think was up with [Sam Zeloof]’s printing Polaroid retro-conversion project.

Normally occupied with the business of learning how to make semiconductors in his garage, or more recently working on his undergraduate degree in electrical engineering, [Sam], like many of us, found himself with time to spare this summer. In search of a simple, fun project that wouldn’t glaze over the eyes of people when he showed it off, he settled on a printing party camera. The guts are pretty standard fare: a Raspberry Pi and Pi cam, coupled with a thermal receipt printer for instant hardcopy. The donor camera was a Polaroid Pronto from eBay, in good shape on the outside and mostly complete on the inside. A Dremel took care of the latter, freeing up space occupied by all the plastic bits that held the film cartridge and running gear of the film handling system.

The surgery made enough room to squeeze in the Pi Zero and a LiPo battery pack, along with a buck converter. Adding in the receipt printer and its drive board and mounting the Pi cam presented some challenges, but everything fit without breaking the original look and feel of the Polaroid. The camera now produces low-res hardcopy instantly using a dithering algorithm, and store high-resolution images on an SD card for later download. As a bonus, [Sam] included a simulated time and date stamp in the lower corner of the saved images, like those that used to show up on film.

[Sam]’s camera looks like a ton of fun. We’ve seen other Polaroid conversions, including a stunning SX-70 digital upgrade, but this one shines for its simplicity and instant hardcopy.

[via Tom’s Hardware]

Pi Cam Replaces Pinhole And Film For Digital Solargraphy

Solargraph from a one-year exposure on film. Elekes Andor / CC BY-SA

Have you ever heard of solargraphy? The name tells you much of what you need to know, but the images created with a homemade pinhole camera and a piece of photographic film can be visually arresting, showing as they do the cumulative tracks of the sun’s daily journey across the sky over many months. But what if you don’t want to use film? Is solargraphy out of reach to the digital photographers of the world?

Not at all, thanks to this digital solargraphy setup. [volzo] searched for a way to make a digital camera perform like a film-based solargraphic camera, first thinking to take a series of images during the day and average them together. He found that this just averaged out the sun from the final image. His solution was to take a pair of photos at each timepoint — one correctly exposed to capture the scene, and one stopped way down to just capture the position of the sun as a pinprick of light. All the foreground images are averaged, while the stopped-down sun images are overlaid upon each other, producing the track of the sun across the sky. Add the two resulting images and you’ve got a solargraph.

To automate the process, [volzo] used a Raspberry Pi and a Pi-Cam fitted in a weatherproof 3D-printed box. A custom hat powers up the Pi every few minutes, which boots up and takes the two pictures. Sadly, the batteries only last for a couple of days, so those long six-month exposures aren’t possible yet. But [volzo] has made all the sources available, so feel free to build on his work. If you prefer to use a DSLR for the job, this Bluetooth intervalometer might help.

Machine Vision Keeps Track Of Grubby Hands

Can you remember everything you’ve touched in a given day? If you’re being honest, the answer is, “Probably not.” We humans are a tactile species, with an outsized proportion of both our motor and sensory nerves sent directly to our hands. We interact with the world through our hands, and unfortunately that may mean inadvertently spreading disease.

[Nick Bild] has a potential solution: a machine-vision system called Deep Clean, which monitors a scene and records anything in it that has been touched. [Nick]’s system uses Jetson Xavier and a stereo camera to detect depth in a scene; he built his camera from a pair of Raspberry Pi cams and a Pi 3B+, but other depth cameras like a Kinect could probably do the job. The idea is to watch the scene for human hands — OpenPose is the tool he chose for that job — and correlate their depth in the scene with the depth of objects. Touch a doorknob or a light switch, and a marker is left on the scene. The idea would be that a cleaning crew would be able to look at the scene to determine which areas need extra attention. We can think of plenty of applications that extend beyond the current crisis, as the ability to map areas that have been touched seems to be generally useful.

[Nick] has been getting some mileage out of that Xavier lately — he’s used it to build an AI umpire and shades that help you find lost stuff. Who knows what else he’ll find to do with them during this time of confinement?

Continue reading “Machine Vision Keeps Track Of Grubby Hands”