
I admit: a few years of prototyping without easy machine shop access really whets my tastebuds for turning metal chips. But all that time spent away from proper machine tools has also pushed me to re-imagine part catalogs, something I see almost every day. Without any precision metalworking tools handy, stock mechanical parts have become my supplement for complexity. And so a former dogma to machine-everything-thyself has been transformed into a hunt for that already-made-part-that-does-it-for-you.
But with part catalogs featuring tens of thousands of purpose-built parts, I started reimagining some of them for other misdeeds. And after a few years spent reinventing use cases for some of these parts, I’m about ready to tell you how to misuse them properly. So today I’d like to show you some of my favorite mechanical part B-sides, so to speak. These are ordinary parts in unorthodox places–something you surely won’t find in the datasheet! Now let’s have a look.
From Steel Balls and Pins to Kinematic Couplings
To warm things up, let’s start with kinematic couplings. Kinematic couplings are a mechanical design pattern that, when applied to two components, allows those components to connect and disconnect with extreme repeatability. This property comes from following the method of exact-constraint. By design, the two components are connected together with exactly one constraint per degree of freedom, no more, no less. The result is that, when connected together, coupled parts neither bind nor wiggle; they fit together one and only one way.
Kinematic couplings are often used in optical instrumentation setups where mirrors and lenses need to be finely adjusted without, of course, binding or wiggling. Typically these couplings are manufactured from extremely dense materials like hardened steel such that the coupling’s points of contact don’t deform. That may be all well and good for Thorlabs, but we too can make some decent Maxwell couplings from a mishmash of stock and 3D printed parts.

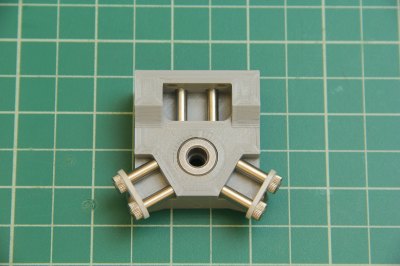
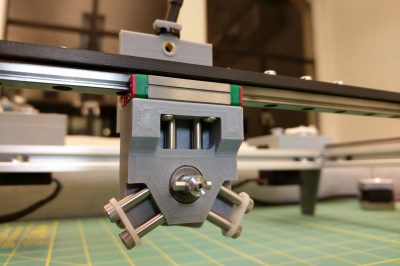
In this setup, the six points of contact in the coupling are made from hard steel parts like their expensive counterparts, but everything else is 3D printed. Since the points of high stress in this design are covered by dense components, the result is both fairly repeatable while being mostly-3D-printed. In fact, in testing the coupling above, I’ve observed a consistent repeatability just under 25 microns. Sure, that may be more than the sub-micron repeatability of some high end couplings, but for many applications it’s fantastic.
I’ve experimented with setups like the one above with a mix of press-fit dowel pins or shoulder screws combined with threaded steel balls. The dowel pins and shoulder screws are quick finds on McMaster-Carr or Aliexpress, but the threaded balls are actually 3D printer replacement parts from a Kossel Delta 3D printer. It goes to say that our palate of stock parts need not be limited to component catalogs exclusively but can extend into the ecosystem of RC, 3D Printer, and other hobbyist replacement parts now commoditized by the consumer goods they go into.
Battery Clips Recast for Fixturing
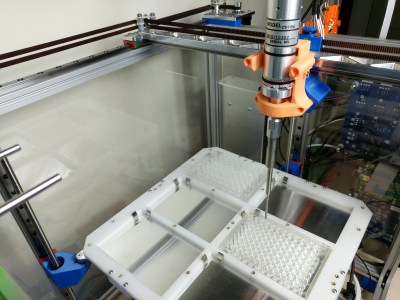
Now let’s redirect our precision locating adventures out of the optics lab and into the wet lab where we find ourselves working with 96-well plates. In an automated setup, these plates will be fixed into a machine deck where an overhead robot will perform liquid transfers on them. Here, plates need to be held tight enough so they don’t move with machine vibration–but not too tight–or they’ll risk spilling when scientists arrive on scene to collect them.
A gentle preload to hold these well plates in a fixed position would be ideal here. Some sort of leaf spring would be nice, but custom leaf springs are expensive. So let’s ask: what’s another canonical part offering gentle preload that comes in all shape and sizes? Battery clips of course!
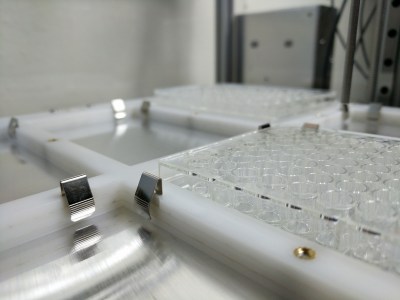
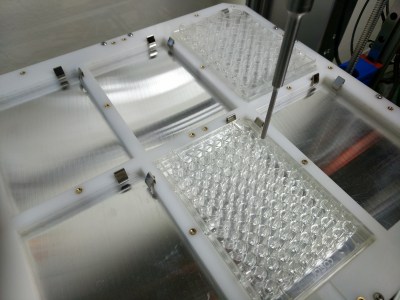
Here I opted for Keystone Electronics’ 5205 Battery Contact Spring (Digikey) intended for molded plastic. My setup resulted in press-fitting them into three stacked layers of laser cut Delrin without any batteries, but shh–the contacts will never know the difference! Since battery contacts are designed to be compressed for long periods of time without fatiguing, the contacts shouldn’t weaken from plates in the fixture overnight. (No word on how many cycles they’re rated for, but for a budget prototype these will do just fine.)
Mini Spring Anchors on a Budget
Now let’s transition to working with extension springs. These springs often arrive with loops on each end to make them easier to attach into their target application. But when it comes to hooking them into 3D printed or laser-cut plastic parts, attaching springs to small integrated plastic features risks them tearing out of the part.
One solution is a stock part called a spring hook or spring anchor. While large spring anchors tend to be prolific, small ones aren’t. Alas, in my original hunt for spring anchors, I could only turn up one Misumi part at the M3 scale I was looking for. And at $5 apiece, they’re exorbitantly more expensive than other stock parts in my fastener bucket. As for simply opting for a screw in this case, it turns out that they make inconvenient spring anchors for two reasons: (1) the head gets in the way of installing the spring and (2) they only work well if the extension spring can be installed perpendicular to the screw. Surely, I thought, there must be a cheaper solution in this pile of part catalogs.


![Jubilee's Bed Springs. Image Credit: [Cindy Feng]!](https://i0.wp.com/hackaday.com/wp-content/uploads/2020/08/z_coupler_spring_installation.png?w=262&h=262&crop=1&ssl=1 "z_coupler_spring_installation")


And there was! The answer arrived in the form of solder terminal lugs. These are normally intended to be soldered into a wire at one end and screwed into an electrical terminal at the other. And at about 20 cents apiece, they’re also quite cheap. Best of all, since they’re made from brass, they can be formed with pliers into a shape that’s convenient for retaining the spring at a particular orientation. I’ve used both Keystone Electronics’ 7328 (Digikey) and 4000 (Digikey) parts to hole small extension springs in compact odd configurations each of which was gently “pliered” into a convenient orientation first.
Vented Screws reimagined as Cable Tensioners
These next parts hearken back to my 3 part mini-series building up two-stage animatronic tentacle mechanisms. These systems are driven with a pair of hand controllers that tug on a set of mechanical control cables. Just like a bicycle, having these cables adjustable for proper tension is key to getting them to work smoothly without any perceivable “slop” or backlash. Bicycles rely on a screw based mechanism that lets the user fine tune the tension by effectively changing the length of the cable housing. Could I use a stock part to do the same thing?
Yes! It turns out I’d been ogling McMaster-Carr’s vented screws category for a couple years hoping I’d someday have an excuse to buy them, and the time had finally arrived. Vented screws are essentially screws with a small hole drilled down the center. Were I some process engineer specializing in pressure vessels, I’d probably tell you how these screws, combined with an o-ring, form a useful part of a servoed pressure control system. But I can’t. What I can tell you is that threading the mechanical control cable through these vented screws creates an exceptional cable tension adjustment point.
By installing one vented screw per cable into the into the laser-cut controller, the entire system can be fine tuned for a high-fidelity puppeteering performance as compelling as the good ol’ 1979 Alien chest-burster scene.
The Standoff Sandwich
Standoffs are metal posts threaded at both ends. They might be the electronic engineer’s go-to for mounting circuit boards, but I’d claim they’re a great way to mounting many mostly-flat components–not just circuit boards–in a rapid prototyping or hobbyist use case. I call this technique the standoff sandwich, and I’ve mentioned it once before. Here standoffs combine with laser-cut elements to build up a 3D structure. Since they’re available in a range of lengths, we sidestep the need to machine parts to length by simply buying the part at the correct length. We need not limit ourselves to one layer either. Double and triple-decker standoff sandwiches are all fair game too. And at about 50 cents apiece, the overall costs for a significant portion of your structure can be fairly cheap too.


These days, I find them useful for small scale robotics applications when mixed with 3D printed or laser cut parts.
A Vocabulary of Parts
It’s been two years since I tore down my garage “machine shop” and took the leap back to school for one last mission. With my best tools in the deep sleep of storage, I thought I’d be giving up feeding my part-hungry soul with a steady stream of machining projects.
But something else happened. Far away from the tools, I found part catalogs. These field guides to the “pickings” of “Part Land” became my saving grace, a new way to design widgets–without actually machining anything! And with some creative use-case reimagining, I discovered that the capabilities of this part vocabulary go far beyond what the books say. With today’s examples, I hope you start to see that too. So the next time you need a little machine shop “glue logic,” I hope you challenge yourself to go beyond what you can make and include the span of what you can find too.


this is an awesome post idea. I hope it becomes a very regular feature
+1
I have to agree. Putting the ‘Hack’ back in Hackaday. Thumbs-Up !!!
vibe of old HaD! me likey
++1
These tips have new ideas flowing in my brain. Please add this as a regular feature of HaD!
Thirdeded :)
Fourtheded, make this a regular thing if you can! We love seeing things reimagined, especially on a budget!
Wow, these solutions are amazing! As someone who basically does this for a living as a mechanical engineer for a hardware startup, I can attest to looking through these McMaster/Misumi/Digikey catalogs for way too much time in the hopes that I can find the wording that will describe exactly what I need. Misumi is an especially dangerous time sink because they are a “custom configurable” site so they can make things with the exact hole pattern / diameter / length you need.
Also, I’ve heard the “standoff sandwich” referred to as a “clock cage” — this might be an antiquated term, but I can attest that these are great structures because it’s easy to machine flat plates to high tolerances and it’s also easy to buy standoffs that are precise to +/- 0.05mm if you’re looking for parallelism.
Makes sense to call it “clock cage” though I’d never heard the term applied to standoffs in quite that fashion.. But even the earliest clocks used spacers that function very similarly to standoffs and give the same array of parallel sheet look.
I quite agree its an impressive array of tricks.. Most of which are not new ideas to me. Though Vented screws.. Never knew they existed at all! So now I have another possible solution in my head thank you very much Joshua.
I wonder how stupid we would all feel and clunky our builds would be if we didn’t have such easy access to shared ideas and alternative use for common parts. I’m not going to say anybody lacks the ingenuity to come up with any of these ideas, but you can’t use vented screws in your design if you don’t know they exist.
Those solderlugs alternative use is great – another cheap part that can be used to save you labour or expense on ‘proper’ fittings (I’ve never used them for anything but their design purpose – most of my custom lug come from off cuts and leftover bits of PC cases- thin enough to bend and cut easily (tinsnips or now one of those nibbler tools) and plentiful every time I’ve needed some).
Yeah, several years ago I spent a bunch of time machining my own vented screws for cable adjustments for a robotics application, and I sure wish I’d known they existed as stock items. That’s really cool!
Bicycle brake cable adjustment. Doesn’t hurt to remind everyone though!
never seen those in anything but rather large size. These screws are just available for almost any occasion tiny or huge..
Sunday afternoons sometimes see me scouring Ikea (because it is open) looking for parts and materials.
One example: Grundtal is a useful source of stainless-steel tube on days that the stainless-steel tube shop is shut.
And probably cheaper than the stainless-steel shop as well.
Vigda triple curtain rail + cutting boards were the basis of my plotter.
I can see a use for vented screws in high vacuum applications.
Though, it wouldn’t be of too major help to be fair since gas would still be trapped in the thread profile itself.
(A lot of solutions I have seen is to just put a big old slot on one or more sides of the threaded section of the screw. Providing a nice corridor for gas to escape via.)
And yes, screws like these would obviously be in blind holes. (Or in through holes if they aren’t drilled into the chamber wall itself.)
I know of vented screws to use for sealed motors to use as mounting screws while also allowing path for direct cooling.
Page bookmark’d
Absolutely excellent article!
It is reAlly good to see someone that understands what they want to achieve, thinks, and finds an imaginative way to do more with less. That is the essence of engineering: to do for £1 what any fool can do for £2.
It is also absolutely necessary when pushing the boundaries. How, for example, do you go about testing the worlds fastest oscilloscope. Obviously you don’t have a scope that can do it!
Excellent article.
Some handles triple as cord wraps and equipment legs. Let the kid in you, come out. This sort of thing is just normal in R&D electronic/light/other equipment prototyping.
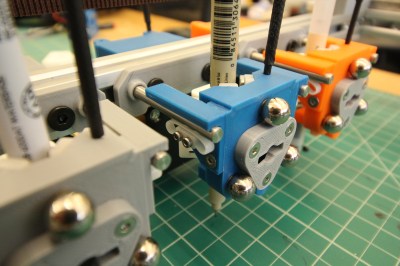
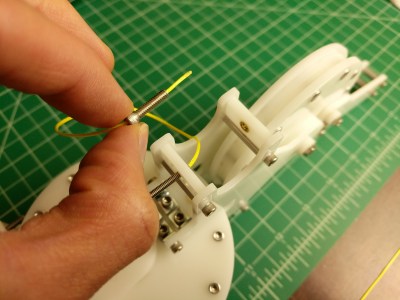
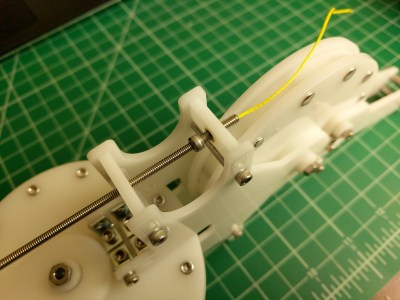
What is happening in the spring holder picture, the green thing with the axle coupler (bottom right pic)? Is that making the axle coupler stiffer?
Oh hey great question! it’s a series-elastic actuator that allows you to rotate the pulley up to a fixed torque limit set by the spring. I’ve been meaning to write about this at some point, but haven’t gotten to it just yet.
This particular setup is used on Jubilee, my toolchanging machine where the pulley is tugging on mechanical control cables. For more details on that setup in particular, I made some notes on this wiki page:
https://jubilee3d.com/index.php?title=The_Remote_Elastic_Lock
and hasty demo here:
https://youtu.be/zC31QyefbI8
But yeah–stay tuned, and I’ll totally plan to write it up at some point!
https://www.youtube.com/watch?v=fRo3FUWs4Sg
for those of us who couldn’t grok the tool changer
Ironically Bosch HAD something similar for all their more common electrical components, both off-the-shelf, and what they made for OEM.
and I have to emphasize had, because in the process of revamping their website for the toddlers with tablets generation, that got snuffed.
Crap yeah there were at least half a dozen examples of that around the auto parts field, specs on the parts and guides to the part numbers, so you could figure out how to put a beefier alternator in easily, with right pulley and fitting. Or they’d have spring sizes, loads, diameters etc, so you could crossmatch those, get your ride 2″ higher or lower. Have some induction mods making your plugs burn a bit so easily figure the next coldest… other stuff I forgot, actual informative stuff instead of making the frigging DESKTOP site look like it’s meant to be used on a phone with a 5″ screen.
Yes, I have often run into the problem of coming across a replacement part for some other device that looks like it might work for me, based on the image, but not being sure because no specifications are listed. The seller will just give a part number and call it good. The device maker usually doesn’t give details about individual parts.
This applies to any website that sells replacement parts, not particularly Bosch. If the part is cheap enough, I may take a chance and buy it anyway. Sometimes that pays off. Other times, it just provides more stuff to put in the parts box for possible future use.
I do this all the time working on old cars.
One good example, the front transmission mount on a 1970 VW Squareback is a 1 year only part which nobody in the aftermarket reproduces. The bolt patterns are the same, but some lengths are different.
I was able to use cheap chinesium 1/2″ drive sockets as spacers to use an easily available mount instead. The sockets have the right internal diameter to fit snugly over the bolts/studs, and they turn out to be exactly the correct length as well.
I’ve run across plenty of other innovative uses for various parts in order to replace broken or unavailable parts on many different cars and even motorcycles.
Heh yeah, I was confounding the helpers at Home Depot one time when I was picking bits out of the gas fittings, plumbing fittings and electrical conduit to re-engineer an EGR system. Had to pass a tailpipe emissions test and it blew numbers like a new car.
Brings to mind the gun mount made out of double box end wrenches and a garage door opener in the last episode of Breaking Bad.
An off the shelf solution to an otherwise complex problem.
Much as appreciate Joe Kim’s artwork, I think he made the McMaster-Carr catalog too thin.
The “123” on the cover is volume number.
Great article. You should start a regular feature and take ideas from readers. I probably have a dozen similar things that I’ve done. Pretty sure I’m far from alone. And yeah, McMaster is an awesome source and resource. And I love that they have trustworthy mechanical drawings. I can make my CAD designs well before the parts arrive. Usually, they just drop into place. I still learn a lot every time I scan through the catalog.
By the way, another cheap source for spring leafs are window screen clips.
Great article and love the creativity represented.
I especially like your tension clips for the 1/4″ rods on your “and a rack full of pin tools,” image (the little white almost-D-shaped bits w/ 2 screw heads). Great solution for a simple way to reversibly hold a component on those rails. Are they commercial parts or 3D printed?
Good eye! They’re plastic flexures that I laser cut from 1/8th-in (3.175mm) Delrin.
Here’s an action shot:
http://www.doublejumpelectric.com/projects/toolchanging_pen_plotter/pics/parking_post_flexure.gif
The updated version of these are actually used on some Jubilee tools. There’s a CAD file here if you want to cut your own:
https://github.com/machineagency/jubilee/tree/master/tools/jubilee_tools/tool_template/fabrication_exports/laser_cut_parts
and a couple folks have actually done a bulk run of them to make them easier to pick up:
https://www.lukeslab.online/shop/compression-flexure-jubilee-laser-cut
Thanks! Those will be really useful with my optics builds that use 6 mm rod as alignment rails!
These are some really great tips! One question – in the kinematic couplings, are the metal balls glued or are they threaded and screwed somehow? I can’t work out how they’re attached from the photos.
They either have an internal thread or a threaded post sticking out. (You can find both types.)
Vented screws are indeed handy for many purposes in pressure systems, though it’s usually just to avoid small trapped volumes.
In a positive pressure system an assembly within the pressure environment which has blind holes, will always have a little volume left between the screw and the bottom of the hole. If it’s 3mm in diameter and 2mm long, that’s about 14mm^3 of gas. Assume it’s pressurised to 200 bar, that 14mm^3 would want to expand to 2800mm^3 or half a teaspoon or atmospheric air. It’s unlikely this would pose a problem as it would leak out around the thread with great enthusiasm due to the high driving force – meaning as long as the thread isn’t an interference fit, the gas would flow and pressure would equalise.
Vacuum systems are a different kettle of fish though. If we start off with the volume filled with atmospheric air and then attempt to get the system down to 10^-9mBar (which is a good and frequently used level of vacuum), that’s 12 orders of magnitude less than atmospheric pressure. The 14mm^3 of atmospheric air would become 14,000m^3 at the high vacuum pressure. This is huge. It’s 7% of the volume of the Hindenburg! And with hardly any pressure to drive it out along the tiny gap along a screw thread, it would take absolutely ages to vent and hinder getting to the desired vacuum levels. Matters are made worse with multiple screws. Much better to have a hole down the centre of the screw which allows almost immediate venting of the the trapped gas. Further, it provides front and back venting for the tiny volume of trapped gas around the screw thread too.
Having broken a few drill bits making them when in a pinch, I’ve found that removing the temper before drilling greatly helps. Quite expected carbide bits to go through hardened steel like butter, but it seems the temper is not even in screws and breaks the bit when exiting the far side of the metal. This lead to teaching my 4 year old daughter about the colours steel goes through when heated. No idea how spot on the temper was after, but it worked and some drill bits survived. And a 4 year old was briefly entertained too.
Hurray for teaching your 4 year old daughter about steel tempering!
Vented screws are the main product for a company called UC Components Inc. 45 years of drilling holes in screws!
Nice note on the ventilated screws! Could have used a few of them years ago, rather than having to hand drill things.
Waaay back in the pre-internet days, we motorcyclists sometimes made up odd length or hard to find cables by cutting down longer (preferably new) ones. Rusty or otherwise crusty ones won’t hold solder.
This was the day of chlorinated solvents and other nasty things to prep the wire strands, so getting good solder adhesion was a bit easier.
We used a “silver solder bearing” paste to slowly build up a new lump on the raw~cut end of the cable.
A bit of patience and some careful sanding or filling and you could be back in business after an afternoon of handywork.
Just don’t beat it with a hammer, as that breaks the bond with the wires and you’ll just have a weak end that fails at the worst time.
That’s not the easiest or best way to put a nipple on a cable. Better to make a piece of brass to the right shape, drill a hole with a generous countersink on the back face, thread the cable through then un-lay a short section, splaying out the strands. Then you can pull the splayed section back hard into the countersink and fill it with ordinary soft solder.
(Solft-soldering doesn’t do quite as much damage to the mechanical properties of the cable)
Back to the topic at hand, for new-build stuff rather than restoration, crimping electrical connectors on to wire rope can work for mechanical linkages.
And even if you don’t use electrical connectors, the cheap hydraulic cable crimpers (advertised as 8 ton or 12 ton) are an excellent way of crimping purpose-made ferrules in to rope.
(They also make a good power-pack section for more specialised tools: http://bodgesoc.blogspot.com/2014/04/hydraulicrivetsqueezer.html )
You could use a brass eyelet for the first paragraph.