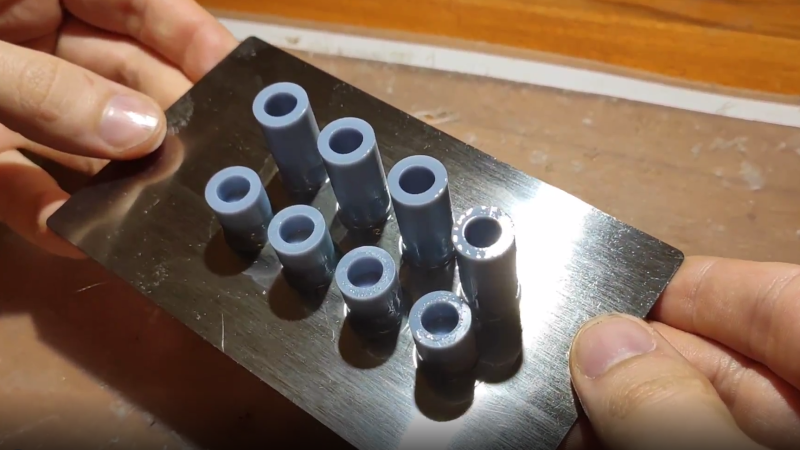
The Elegoo Mars is an affordable SLA (resin-based) 3D printer, and there are probably few that have seen more mods and experimentation than [Jan Mrázek]’s machine. The final design of his DIY flexible build plate is a refinement of his original proof of concept, which proved a flexible build platform can be every bit as useful on an SLA printer as it is for FDM; instead of chiseling parts off a rigid build platform, simply pop the flexible steel sheet off the magnetic base and flex it slightly for a much easier part removal process. His original design worked, but had a few rough edges that have since been ironed out.

Fortunately, it’s a simple job for any metal fabrication shop and [Jan] got a variety of thicknesses cut very cheaply. It turns out that the sweet spot is 0.3 mm (although 0.2 mm is a better choice for particularly fragile parts.) [Jan] also suggests cutting the sheet a few millimeters larger than the build platform; it’s much easier to peel the sheet off the magnetic base when one can get a fingertip under an edge, after all.
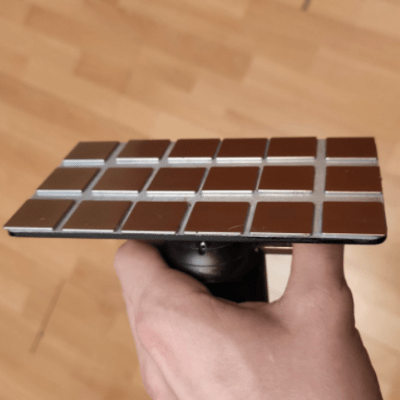
The magnetic base that the steel sheet sticks to is very simple: [Jan] converted a stock build platform by mounting an array of 20 x 20 x 1 mm magnets with 3M adhesive mounting tape. He was worried that resin might seep in between the magnets and cause a problem, perhaps even interfering with the adhesive; but so far it seems to be working very well. Resin is viscous enough that it never penetrates far into the gaps, and no effect on the adhesive has been observed so far.
Watch how easily parts are removed in the short video embedded below, in which [Jan] demonstrates his latest platform design.
It looks like only fine tuning is left from here on out. [Jan] suspects the new sheet is responsible for a slight apparent increase in elephant foot distortion (where an object widens out slightly right at the base) but that’s a minor issue at worst. Flexible build platforms for SLA are recently starting to show up for sale as aftermarket parts, but [Jan]’s work shows that an effective DIY solution is perfectly accessible to a hobbyist.
If you’re curious about adding an SLA 3D printer to your workshop, here’s an article that explains what you’d be getting into in terms of moving from FDM to SLA.


Dude handling the pieces in the video without gloves…that UV resin isn’t something you want to play with.
Hey guys, please read the blog post – it contains a note about it. I am aware what can I do and what I can’t do with resin. I agree it is not ideal.
I agree once probably isn’t going to hurt you, but from what I understand sensitivity builds up with repeated exposure to the resin.
Overreact much?
MSDS:
“May cause dermatitis on prolonged contact in sensitive individuals”
“wash with soap and water”
Know the hazards. Act appropriately. Don’t blindly trust the safety nannies. Safety Third!
That said: The stuff is icky and smelly, so it’s gloves for me.
Come on Paul, overreacting in comments is the only thing the safety nannies have! Don’t try and take that away!
Definitely need to understand the hazard. If you google image search SLA resin burn the blurry picture is a reddit link is a picture of guy’s leg that had to have 10% of his skin excised and replaced with cadaver skin for a burn that appeared about 24 hours after showering to wash it off. Soap and water weren’t enough to clean the resin off. I recall other reports of trying to wash it off and finding out when the skin was exposed to the sun it very much wasn’t washed off.
So, there are multiple things with resin that can hurt you:
When it cures, it is highly exothermic, which means is can melt things (like your skin) if exposed to lots of UV (like the sun). BUT, if you are working with UV resin, there better not be any UV around, and you better wash everywhere when you are done.
You can develop a sensitivity/allergies from it (bit the amount of exposure varies from person to person).
I also believe that leaving it on your skin for a prolonged period of time without UV can cause chemical burns or irritation.
Note: the above is true for most resin, but there may be some out there that don’t follow this, or are much worse.
But, for the resin he was using, if you wash it off right away and avoid UV, then the worst risk is eventually becoming allergic to it. I also have spilled this same resin on my skin (washed it off right away) and I had no adverse reaction or irritation.
Good lord, wear gloves when working with SLA resins.
I just bought a flexible build plate for my printer from Wham Bam…Works great.
Any drawbacks? (besides losing 2 mm)
Use alcohol if you get it on your hands. Wash good with alcohol to get it off then wash with soap and water to get the alcohol off and not dry out your hands. It’s a bitch when you touch your eyes.
Just wear gloves and be careful!
I’ve heard that using alcohol will dissolve the resin and allow faster adsorption through the skin.
It will. The best thing to do is use copious amounts of soap and warm water to wash it off your hands. FYI I’m MakerJuice’s UV formulation chemist (been involved in UV formulating for ~ 20 years) and we work with these resins daily.
The LD50 of most photo-reactive uncured resins means it still needs to be treated with some respect. Always read the SDS/MSDS, and assume the company uses legal language that makes it sound more benign.
I keep my SLA printer in an down-draft exhaust-vented garage, overhead work-lights that will slowly kick off the UV resin particulates, paper lined drip pans, and always wear new gloves when touching the machine (they only buy you time with some solvents).
Spills will happen… cheap SLA printers are way more messy than a FFF/FDM process.
A chef friend of mine has a great story of a guy that didn’t think washing your hands before and after using the bathroom was proper practice. One day they were preparing Carolina Reaper Chilies for a meal, and his karma came due… starts with a slight itching sensation before the real pain sets in.
Don´t be that guy… ;-)
To give you context – the plate was supposed to be clean – but it wasn’t washed properly. I didn’t want to redo the shot – but I regret it – people do not care about the build but tell you to “were gloves”.
The part which causes skin irritation in resins are mostly methacrylates. They should be handled with care and for some individuals, they cause severe allergic reaction on skin (it appears as burnt skin). A few years ago I was tested for reaction to methylacrylates and my skin is not overly sensitive to it. Therefore, I am willing to accept the risk to touch washed print with bare hands and risk that it wasn’t washed properly. It will not cause a severe damage to my skin. Note that I am *NOT* saying “I am ok with pouring resin all over my skin”. I treat resin with respect and would never intentionally touched resin with a bare skin. I am trying to make reasonable precautions, however, as I am not overly sensitive, I am willing to take “larger risk”. Life is all about taking risks and setting the risk level to a reasonable amount – when you go outside and wall on the street you accept the risk of being hit with a car. This is the same – when I expect the print to be washed, I will touch it as there are no fatal consequences for me when it is not the case and the risk is acceptable.
“when you go outside and wall on the street you accept the risk of being hit with a car”
Yes, but when there are kids and teens I look left, right, left or wait for a green signal, even if it’s not necessary. If there are no kids around I cross the street when there’s a possibility. So in case of a youtube video I’d stick with sticking to all safety precautions.
If you actually had worn gloves they’d just have found some other trivial nit to pick. I swear it’s the new “first” – gotta get those fake internet points!
A friend of ours developed severe allergies to solvents after 20 years working as a painter. Anecdotally, I would agree it seems completely random if or when this sensitization stuff happens to people…
Liked the spring plate by the way, and given how nicked up my build plate is after a year it is certainly an improvement to the design.
Looking forward to your creative input in the future.
=)
I like this! Coming from FDM to resin printers, I was surprised that you couldn’t just print parts flat on the bed (unless their attachment area is relatively small and the part is strong enough). I tried to print a battery cover plate flat on the bed, and because it stuck down so well, I could only remove it by destroying it piece by piece. The typical solution is to suspend the part over the plate with a bed-of-nails of supports. This results in more resin use and longer build times.
Mostly I’m surprised it’s taken this long for this problem to be solved.
I knock the print with a flat plastic spatula to get it off the build plate, and it works fine even for big pieces.
That’s a serious improvement for batch printers.
really? Just put it in the freezer and the parts pop rigth off.
You want a second built plate anyway to start your next print asap.
Then you have enough time to wash and cure the part, put it in a freezer.
In what moment you put it in the freezer? after curing? Also is that your food freezer? :P lol
Not impressed with the magnet mounting approach, as it does not introduce flatness.
Better precision is achieved by transferring the accuracy of a glass plate (over steel sheet metal) or precision ground steel plate: stack up steel, glass, a plastic foil and stick the magnetic onto the stack. Tape a fence around the array of magnets. Get 1 small washer per magnet and sand on both sides to deburr, then put one centered on each magnet. Brush some epoxy resin onto the build plate, pour the rest over the magnets and place the build plate onto the washers once the bubbles have escaped.
The design was poured in epoxy after few weeks of usage and milled flat (there’s no blog post about it). To my surprise, the magnets were only about 0.06 mm out of plane (highest to lowest point) when I measured them using a dial indicator before pouring epoxy over it and milling it. Well, it is not that surprising – magnets have tight tolerances out of the factory and probably the 3M tape is surprisingly consistent in it’s thickness.