If there is one thing we’ve learned during several years of running the Hackaday SMD soldering challenge it is this: Most people need magnification to do good soldering at a tiny scale. The problem is, like most tools, you can buy something as cheap as a $5 binocular headset or you can spend $1,000 or more on a serious microscope. What’s in between? [Noel] looks at some affordable options in a recent video that you can see below.
[Noel] started out with a cheap “helping hand” that has a simple little magnifying glass attached to it. The major criterion was to find something that would have no delay so he could solder under magnification. While it is possible to work under a scope with a little lag in the display, it is frustrating and there are better options.
The first attempt was a 10 Euro set of magnifying glasses that have different strength lenses that interchange for different amounts of magnification. Of course, each lens has a different focal length, and you won’t want to be an inch away from your hot soldering iron.
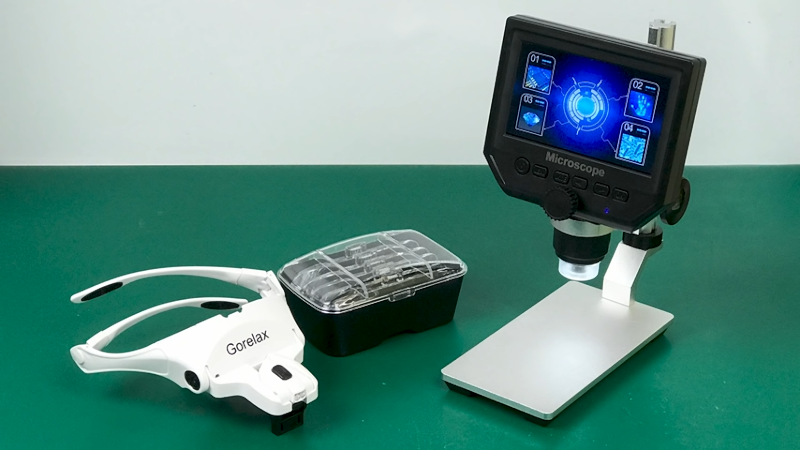
The next contender was a 26 Euro LCD microscope. We know from experience the stand is everything with these cheap scopes. Luckily, [Noel] got a stand that is pretty stable. He mentions that the scope isn’t USB.
We like the flip-down binoculars, with a few lenses that stack, although the ones in the video are probably workable. We also have enjoyed our cheap microscope, although you should be aware they can be flaky if you use any of the additional features. Also, pushing on buttons is likely to move you off target at high magnification. Still, what do you want for that price?
Some people prefer soldering with a stereo microscope for depth perception. If you want to work around some of the limitations of the cheap microscope, [Elliot Williams] hacked one to work a little better.


I have what is essentially that same microscope. I like it. It works well enough and I can solder under it without much trouble despite the default being double mirrored or something a little crazy. Flipping it around to normal makes the video become offset on the screen for some reason. Besides that, it is quite nice. It even has wifi capability that I keep forgetting to use. =) I think it was about $60 when I bought it. My only REAL complaint is that the base is shiny aluminum. Anything small that doesn’t block or absorb enough light from the LEDs becomes backlit and washed out. Adding some sort of matte black finish is looking necessary.
I also had a similar set of glasses that I gave to the local makerspace. They’re also quite good. Cheap as can be, so the little LED that I had on mine very quickly broke, but I never really needed it anyway since I have a light on my bench. I can definitely recommend owning either or both of these.
I picked up a binocular magnifier from a slit lamp (the thing they use to check out your eyes if get some metal filings in it) then mounted it to an articulated arm from one of those crappy magnifiers with the lamp around it.
It just holds the weight of the microscope but does a great job.
I personally tend to use a cheap USB webcam with the lens adjusted almost the way in. You can get enough magnification to study tardigrades and nematodes, having a quarter of a single water droplet fill a computer monitor and still be in sharp focus can be particularly useful. When it comes to smd I just dial it back. I tend to shake too much these days so positioning smd components is still tricky. I end up using pantograph style jigs with set screw adjustment when things get too small.
Sometimes it helps with placement if you put down a dot of solder on one pad, and hold the iron in it while placing the part. The solder wets the part and helps keep it in place against hand tremor.
Tip I was given from a wachmaker: even if you wear glasses as I do, you can still wear magnifying reading glasses, just wear double glasses. A narrow pair from a local supermaeket works well for me. Being narrow you get a magnified zone at the bottom of your field of view but a normal zone when you look up to find the next component.
Having two different prescriptions for my eyes makes the supermarket “cheaters” unusable for me.
I did consider buying two sets with different diopters(?) and swapping lenses, but the prescription for one of my eyes doesn’t seem to be available in “cheaters”.
How does that stop you putting an extra cheap magnification pair in front of your normal glasses? The prescription set stacked with another cheap pair further down the nose should work. (I don’t need any help with my eyes yet so have no personal experience but I’ve seen it done)
Struggled with jewelers loupes and cheap USB microscope for year, until I saved enough for a second hand Mantis with X4 and X10 optics: this is a life changer, I’ll never get bored to emphasis enough this point: they are the best 600€ spent, ever, ever, ever, period!
So I guess cheap and optic don’t go together.
I beg to differ.
I’m the standard presbyopian, so I need more light and always glasses (else I’m suprised after groceries shopping…).
My tool of choice is are double eye glasses headband heavily modifight to be lighter and adapted to all day carrying. A wide headband suites me well, I like it. Major magnification for me 10x. Stereo view is a must have, no single view solution worked for me. Lighting is done by a lot of LED strips… Spend less than 40 € or so.
Works well, 2×1 smd is ok. No trembles, waiting for them to arrive… :-)
For closer inspection I have the shown microscope. Its ok, not great, you get what you pay. Don’t know what I paid.
Looks like we are all different.
The Mantis microscopes I’m familar with are professional 3D optical microscopes in a completely different league to the cheap microscope in the article and costs several orders of magnitude more. I use a MagnaVisor, a StereoZoom binocular microscope, and a cheap USB microscope but would love to get a Mantis instead if I had the space and money.
I previously spent quite a bit (60€+100€+30€, etc…) on various USB microscope, head loupe, it start to add up, and let’s face it, they are crap compared to a Mantis
Yes, Mantis are expensive and take a lot of bench space, that’s a fact.
But an old model can be had second hand and are almost within the reach of serious hobbyist.
Once the halogen bulb replaced with LED, you basically have a microscope forever: no electronics, no battery, with awesome magnification and clear picture: I was blind before having one!
I really liked the Stereo Zoom microscope, we had in a company I was employed previously, for soldering. But it cost about €3000. Now we have a Mantis, but I can not see why it shoud be better than the binocular type which gave me more stable vision. You know where to put your had and eyes while with the Mantis I always have to seek the “sweet spot”.
For Home use I have a stereo binocular microscope I litterally found in the trash bin. I only had to remove some dust. I should replace the bulbs with LED, but that’s not urgent. It’s not perfect for soldering, the field of view is quite small and the magnification with 10x and 20x a little too high – but at zero cost! :-)
I have the exact same setup here and I totally agree with his conclusion: Both are must-have tools for anybody at 40 and up. At a younger age I was always wondering why people would want to use a magnifier, it was so much easier without. I could easily read even the tiniest fonts on resistors or SOT-23 without problems.
But suddenly when turning 40, I had to switch between glasses in order to see anything. That is so frustrating. But these magifier glasses work very well and they are my favorite tool because of their wider field of view. The microscope works great for inspection, but it much harder to do actual soldering there. The view is very narrow. But it works and I can do difficult cases this way.
BTW: where did he find that microscope for 26€? The cheapest price I found for the exact same microscope was 18€ plus 16€ for the stand (including shipping).
Just standard +3.5 or +4 dioptre reading glasses work great, and are £1.50 here. As was said above, just wear two at once for greater magnification.
The electron(ic) microscope looks great though for the price – we have one at work, a professional one costing megabucks, it looks almost as good.
P.S. Does anyone else think the name “Gorelax” sounds like a particularly violent enema, or is it just me??? Perhaps that’s what they are originally designed for administering….
Side effects include, but are not limited to, staining of underwear and compulsory social distancing.
It would remind me of the verbal diarrhoea of a certain politician.
CamelCase saves brands
At this point, my lenses have long since reached the approximate compliance of polycarbonate, so I have been using magnification aids for years. Everything from the giant lens on an articulated arm to stereo-microscope. Several varieties of dimestore cheaters and headband magnifiers. I only use the giant lenses when once in a while anymore, but the ring lights built into my better ones keeps them useful.
Overall, the lesson I have learned is: The best is a personal and a situational thing.
For me, the general purpose low mag is an Optivisor for a lot of things, and a similar headband unit to the gorelax for others. They wear differently, interfere with position differently, and fit with other safety gear differently. I use cheater plates in the welding helmet most of the time. Used to get the soft plastic wet-and-stick half lenses for making your own bifocals, but can’t find them the last few years.
Clip-on, flip down loupes (the older B&L are really the best) that clip on the temple piece of my glasses are preferred where I need the magnification and don’t need bino. Less cumbersome than full headgear. I have no clue how many different one I have. Bought the first back when I was in the lab to help read ID’s on contact masks, among other things.
Monocular and stereo microscopes, as well. Mono biological high mag because it was a good deal- it has come in handy, but mostly has been a fun toy. A Greenough-type stereo head (second hand, lower end unit) mounted on an arm at one lathe is useful for setup and positioning at low power, and for tool inspection at higher power, when I don’t want to disturb location if I don’t need to. Single-objective stereo-zoom (Nikon) is at the bench, with a number of lighting options. It is also a four port, so I have two cams on it and can still or video in stereo. REALLY handy. Well worth the trouble and money. 10/10. Highly recommend.
I still lust for a mantis with a good selection of objectives, but I know that I can’t justify the money. Oh well.
The one thing I DO NOT recommend is stacking lenses unless they are of high quality. Small aberrations become significant quickly. I didn’t listen when I was told this as an arrogant kid (when using an optical aligner, take off your glasses and zero the eyepieces. It is time well spent. Ditto for any other eyepiece-bearing instrument), and eventually learned it the hard way.
I’m lucky, my glasses have -5 diopter, so when i put them down, i’m in close vision territory. I do 0402 without much problem by hand, although i have to begin the day without coffee to be less shaky
-3.5 on the right eye, unfortunately some astigmatism, which is worse on the left. It would probably be helpful to start the day without coffee for this, but I see this impossible :-)
>you can spend $1,000 or more on a serious microscope
Certainly, but a quite good chinese stereo microscope is more like 300-400€ or $. If you are serious with your electronics it is REALLY worth the investment. But yes, it is still quite expensive for a student or people with little money.
I bought a Mustool G1200 microscope, similar to what is shown above. It certainly isn’t perfect, but it does for sure help with soldering when you need to be sure things are as you’d like. I bought it mainly for the recording features to help with showing others how to solder correctly. Color in particular seems to be 16 or 15 bit maximum so images take on a unique sort of cell shaded appearance.
I have also used a mantis scope in the past and while I did enjoy using it, I found that after a while the led illumination ring was really poor quality light – At one point, after some convincing of the boss, I actually replaced all the leds in the ring with higher cri leds and that did help a great deal. I also installed a polarization filter below the most commonly used lens to help cut down the glare.
One day I might buy a second hand mantis, but until then, the G1200 is good enough.
I’ve picked up three relatively inexpensive stereo microscopes from shopgoodwillonline over the years. The stand can be the critical and most expensive part. Needs to be there when you need it and out of the way when you don’t. Make sure you get one with variable zoom (not stepped zoom). Eyecups are a necessity if you wear glasses. I’ve used microscopes at my work so long that I’ve worn out glasses lenses and the eyecup keeps that from happening.
I went with one of the HAYEAR Chinese camera scopes from Amazon at $289. It has a 14MP HDMI/USB camera, a 144 LED lighting ring, a heavy adjustable stand, and I chose the 180X lens. I’m using it exclusively with my 22″ cheapo FHD HDMI monitor. It works great for soldering, and I use it mostly zoomed out all the way, as using it zoomed in all the way you can see the die in a LED, too close for soldering. I was able to dead-bug a BGA flash IC using magnet wire. as well as attach magnet wire to 0.5mm pitch QFP pins using it often. It even takes stills onto a microSD card. The only thing that is lacking is the depth perception you get from a stereo scope.
>I chose the 180X lens
pr0 tip: x10 is the perfect magnification for hardcore smd soldering. You might want to go x20 + 0.5 barlow for greater distance. Anything more and soldering tip takes half the view.
I have and use both of these types of magnifiers when checking parts values , and examining boards after assembly. But, find that the working distance is too short when doing the assembly or soldering. I found inexpensive Dental Binocular Magnifiers work much better for this. They are usually available in 2.5 or 3.5x and have a working depth of around 420-450 mm. Available as either clip-on for glasses or with built in arms.
I have purchased in the past the above presented microscope and magnifying lenses but for soldering
they are not so great. Recently I’ve bought a proper stereo microscope including an excellent camera
and I use this for almost all on my SMD soldering and for taking detailed pictures (or videos)
I wish I wouldn’t had bought all the cheaper stuff before and got the real microscope from the start.
I’ve paid a little over 300£ (during a promotion) from here https://www.aliexpress.com/item/33056739722.html