[chadaustin] has a favorite keyboard with a great ergonomic shape, key travel distance, and size, but after switching to Windows 10, the wireless connection introduced a terrible delay. Worse yet, the receiver is notoriously susceptible to interference from USB 3.0 hubs. To provide 128-bit AES encryption, the receiver is paired with the keyboard at the factory and cannot be replaced. If you lose that, you gain a highly ergonomic paper-weight. The solution for [chadaustin] was tethering the keyboard and receive several crash-courses in hardware hacking along the way. As evidenced by the responses to this project on ycombinator, many long-time fans of the Microsoft Sculpt Ergonomic Keyboard, introduced in 2013, suffer similar issues.
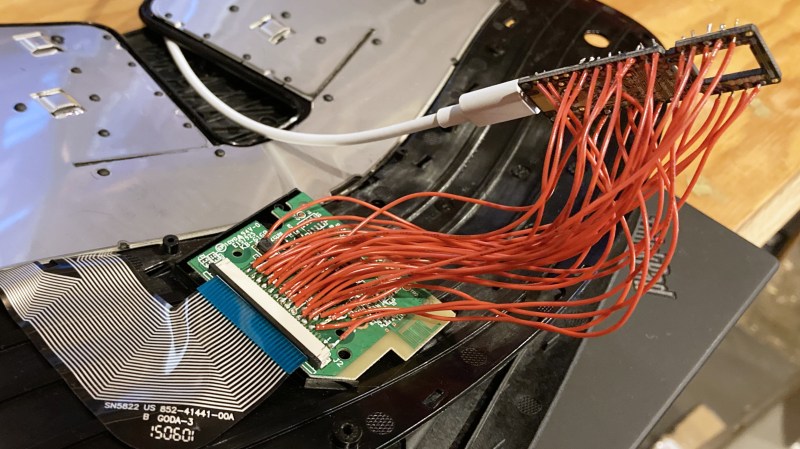
We really appreciate that [chadaustin] took an incremental approach, tackling one problem at a time and getting help from others along the way for first attempts at many complex steps. The proof-of-concept involved hand-soldering each lead from the keyboard matrix’s test pads to a QMK Proton C, which worked but couldn’t fit inside the keyboard’s case. For a more permanent and tidy solution, [chadaustin] tried a ribbon-cable breakout board and other microcontrollers, but none of those were compact enough to fit inside the case either. This required a custom PCB, another first for [chadaustin].
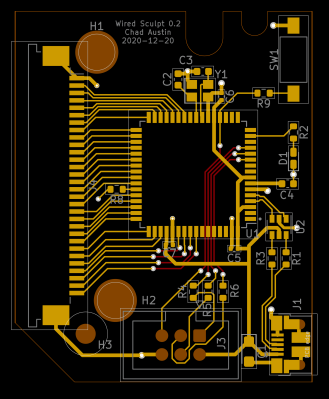
After a one-day intro to KiCad, [chadaustin] dug into the datasheets, completed a schematic for the board, and generously shared the process of choosing components and creating the layout. [chadaustin] ordered a board and found the mounting holes’ placement needed to be shifted.
With the full matrix mapped by [johnmilkspill], flashing QMK onto the AT90USB1286 controller went fairly smoothly. [chadaustin] chose to map both sides of the split spacebar back to the space key but did add a feature by repurposing the battery indicator LED to Caps Lock. And the results?

According to testing done with Is It Snappy?, the latency dropped from the wireless 78 ms down to 65 ms over USB. More importantly, this latency is now consistent, unaffected by USB hubs, and there is no receiver to lose. Of course, [chadaustin] has ideas for future improvement, including regaining the multimedia function keys, as these kinds of hacks are never really done; they are just in the current revision. No word on the fate of the detached number pad, but that likely needs its own tether and is a project for another day.
Thanks for the tip [Linus Söderlind]


did a simmilar thing last week but i used a prebuilt solution and a teensy 2.0
https://photos.app.goo.gl/3rroLX3DhQBWFX699
also i got mad with the drill
Don’t be a slave, use wires.
I absolutely love this keyboard, it is by far the most comfortable keyboard to type on that I’ve ever used and I’ve had no wrist issues since I got one. I do however have a consistent issue with it and Windows 10, missing the first keypress when I first start typing after being idle for awhile. I’ve seriously considered ripping the existing controller out of both the keyboard and number pad and replacing them with a NRF51 or similar based solution to replace the proprietary 2.4GHz RF with Bluetooth. Might do the accompanying mouse too while I’m at it and get rid of both dongles. I made the mistake of ordering the keyboard and mouse separately instead of as a set and am stuck with two stupid dongles instead of one….
I’m happy for him that he got it working.
But also:
The way the red wires are bodged together is a time consuming unreliable horrible mess.
With a bit of preparation it can be done much neater, more reliable and quicker.
And the way to do it is actutally quite simple once you know it.
First thing is to fixate the two PCB’s to each other, so they do not move relative to each other. This is the biggest part concerning reliability. If it does not move and the wires don’t bend, then it won’t break.
One way of doing this is to put the two PCB’s next to each other and glue something over the seam. For example a few toothpicks (or something a bit stronger), but even toothpicks can be acceptable if you glue a few on both sides of the PCB’s.
I have a bunch of wooden sticks of approx. 2*3mm that are suitable, but you cold also use some thick wire.
Once the PCB’s are fixed to each other, you can use “enameled wire”, “Lacquered wire” or “magnet wire” to directly solder the wires without stripping them first. You do need a temperature controlled soldering iron, as the temperature has to be around 400 degrees centigrade. For best results, use two irons. A hot one to burn of the lacquer and tin the ends of the wires, and a bit cooler iron to do the actual soldering. When your iron is a bit cooler (300c to 350c) then the flux will not evaporate so quickly, which gives you more time to solder a connection. Apparently not all brands of wire work. there are some special high temperature resistant wires for which it’s hard to burn through the lacquer with your iron, and sometimes the lacquer does burn off, but does not leave the copper clean enough to be directly soldered. If you encounter this, try some other wire.
still tedious thou