Wireless 360 Controllers Now On The Dreamcast

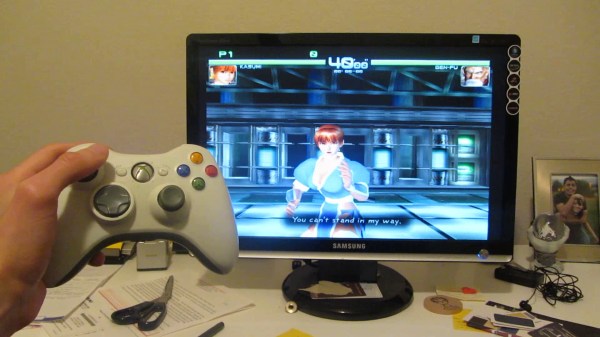
Perhaps the greatest convenience feature of modern consoles is the wireless controller. Eliminating the risk of tripping over cords and enabling play in all manner of poorly ergonomic positions, they added huge comfort to the console gaming experience. [ismell] was no fan of the Dreamcast’s original controller, and the cable was too short to boot. It was time to bring the 360 Wireless controller to Sega’s swansong.

Early attempts by [ismell] involved a Windows computer acting as a USB host for the 360 controller, which would then send out commands back to the Dreamcast via a Cypress EZ-USB FX2 microcontroller. If this sounds esoteric and messy, that’s because it is. It was also too slow to reliably work, as the Dreamcast’s Maple controller bus expects updates every millisecond, else it considers the controller disconnected.

Instead, a dedicated USB host was needed to speak to the 360 controller and also the Dreamcast. [ismell] landed on the MicroZed 7010, a System on Chip that also packs an FPGA on board. With Petalinux running on the board, it interfaces with the Xbox 360 USB wireless controller interface, and then sends the data out over a custom “network” driver that sends packets to the Dreamcast over the Maple bus.

It’s by no means a simple hack, and the MicroZed is far from cheap, but it works and works well as shown in the video below. We’ve seen other wireless controller adapters over the years, too – like the wild BlueRetro build. We always love to see a good retro console hack, so don’t be shy about sending in your own!

Continue reading “Wireless 360 Controllers Now On The Dreamcast”

An Algorithm For Art: Thread Portraits

We’ve all been there — through the magic of the internet, you see someone else’s stunning project and you just have to replicate it. For [Jenny Ma], that project was computer-generated string art, as in the computer figures out the best nail order to replicate a given image, and you lay out the thread yourself.

So, how does it work? Although a few algorithms are out there already, [Jenny] wanted to make her own using Python. Essentially it crops the image into a circle and then lays out evenly-spaced software nails around the circumference. The algorithm starts from a random nail and then determines the best next nail to wrap around by drawing a line from that nail to every other nail and choosing the darkest one based on the darkness of the image underneath that little line. It repeats this one chord at a time, subtracting from the original image until every pixel has been replaced with a thread or lack thereof, and then it spits out an ordered list of nail numbers.

Once the software was ready, [Jenny] made a wood canvas that’s 80 cm (31.5″) in diameter and started laying out the nail hole locations. There wasn’t quite enough room for 300 nails, so instead of starting over, [Jenny] changed the algorithm to use 298 nails and re-ran it.

[Jenny] does a great job of discussing the many variables at play in this hardware representation of software-created art. The most obvious of course is that the more nails used, the higher the resolution would be, but she determined that 300 is the sweet spot — more than that, and the resolution doesn’t really improve. We have to wonder if 360 nails would make things any easier. Check out the build video after the break.

Want to cut out most of the manual labor altogether? Build yourself a string art machine.

Continue reading “An Algorithm For Art: Thread Portraits”

Industrial-Grade Storage Built With Laser-Cut Steel

A tidy workshop is much more likely to be a happy workshop, and one that better supports the practice of making. Organisation is key to maintaining tidiness over time, and for that, you need storage. [Wesley Treat] needed some more space recently, and set about building a serious storage unit using laser-cut parts.

The key to the build lies in the elegant steel flanges used to make the drawers. These were designed in CAD, with a DXF cutting file exported and sent off to OSH Cut for laser cutting and bending, in much the same way one would send 3D printed parts off to Shapeways or PCB files to JLCPCB. The drawer flanges are then joined with steel angle and fitted with plywood bases and sides. The drawers are then given CNC-engraved nameplates for a nice aesthetic touch. Once finished, the heavy duty drawers slide on wooden rails built into the walnut frame.

It’s a great example of how farming out a single piece of a larger project can lead to a quicker build and better final results. Producing 12 flanges by hand in the home shop would take longer and likely have far more variability. For those that only have a 3D printer at home, farming out production for metal parts is a good way to do heavy-duty projects without having to invest in an entire machine shop.

[Wesley] has graced these pages before, too – with a great guide on reproducing knobs for vintage hardware. Video after the break.

Continue reading “Industrial-Grade Storage Built With Laser-Cut Steel”

Wooden You Love To Build A Ribbon Microphone?

Carbohydrate foams derived from dead trees are not the first material that springs to mind when considering building audio equipment. But really, there’s no reason not to explore new materials for jobs normally reserved for metal or plastic, and when pulled off right, as with this wooden ribbon microphone, the results can both look and sound great.

To be fair, there are plenty of non-wood components in [Frank Olson]’s replica of a classic RCA model 44 microphone. After all, it’s hard to get wood to exhibit the electromagnetic properties needed to turn acoustic energy into electric currents. But that doesn’t mean that wood, specifically walnut veneer, isn’t front and center in this design. [Frank] worked with thin sheets of veneer; cut into shape with a commercial vinyl cutter and stacked up with alternating grains, the wood was glued up with copious cyanoacrylate adhesive to form a plywood of sorts. The dogbone-shaped body was fitted with two neodymium magnets, leaving a gap just wide enough for the microphone’s ribbon diaphragm. That was made from a thin piece of aluminum foil that was corrugated using a DIY crimp roller. Suspended between the magnets and connected to leads, the mic element was adorned with a wood and fabric windscreen and suspended from elastic bands in a temporary frame for testing. The narration on the video below was recorded with the mic, which sounds quite nice to our ears.

We’ve seen ribbon microphones before, as well as wooden microphones, but this is the first time we’ve seen a wooden ribbon microphone. It looks as though [Frank] has more work he wants to do to finish it off properly, and we eagerly await the finished product.

Continue reading “Wooden You Love To Build A Ribbon Microphone?”

LEGO Lunar Lander Animatronic Movie Released

Retired scientist [Mark Howe] spent the last couple months making an animatronic movie featuring his LEGO lunar lander in a video recreation of the Apollo 11 moon landing (also embedded below). [Mark] is not only the producer, but serves as the technical director, set designer, and cameraman as well. He designed and 3D-printed a custom special effects stage for the scene. It gives motion to the LEM using stepper motors, timing belts, pulleys, and a linear guide rod, all hidden inside a discrete upstage tower. He simulates the Lunar regolith using grout, spray adhesive, and a smattering of small rocks.

[Mark] implements the special effects sequencer in an Arduino Nano, and provides sound effects using an Adafruit audio sound board which he loaded up with sound files from the real Apollo 11 landing. Floor strip lighting is provided by an array of Neopixels, and a back-lit Earth is lowered from the fly space for one cut. He made a custom PCB motherboard to hold the Arduino, sound card and motor drivers.

The resulting production is quite impressive. This isn’t [Mark]’s first attempt to relieve the double boredom of both retirement and coronavirus isolation — back in December he produced a similar animatronic movie recreating a Saturn V launch. Thanks to [jhookie55] for the tip.

Continue reading “LEGO Lunar Lander Animatronic Movie Released”

Free RTOS

Getting Started With FreeRTOS And ChibiOS

If operating systems weren’t so useful, we would not be running them on every single of our desktop systems. In the same vein, embedded operating systems provide similar functionality as these desktop OSes, while targeting a more specialized market. Some of these are adapted versions of desktop OSes (e.g. Yocto Linux), whereas others are built up from the ground up for embedded applications, like VxWorks and QNX. Few of those OSes can run on a microcontroller (MCU), however. When you need to run an OS on something like an 8-bit AVR or 32-bit Cortex-M MCU, you need something smaller.

Something like ChibiOS (‘Chibi’ meaning ‘small’ in Japanese), or FreeRTOS (here no points for originality). Perhaps more accurately, FreeRTOS could be summarized as a multi-threading framework targeting low-powered systems, whereas ChibiOS is more of a full-featured OS, including a hardware abstraction layer (HAL) and other niceties.

In this article we’ll take a more in-depth look at these two OSes, to see what benefits they bring. Continue reading “Getting Started With FreeRTOS And ChibiOS”

Visualise ESC Problems With LEDs

For many in the RC community, blowing up an Electronic Speed Controller (ESC) means one thing: throwing it away and buying another one. However, if you’re regularly pushing the limits or simply hate waste, fixing failed units is an option. To assist in this task, [LouD] built an ingeniously simple ESC tester.

The board is designed to be wired in parallel with a brushless DC motor when hooked up to an ESC. The board packs two LEDs per phase, wired in opposite directions. Thus, current flow in both directions can be visualised on a phase-by-phase basis. If everything is operational, the red and green LEDs on each phase should glow evenly as the throttle is ramped up. However, if there are problems, it will be readily apparent as the blinking becomes erratic or one or more LEDs fails to light at all.

It’s a nifty little device that would prove useful when testing  a pile of possibly-defective units. It’s also a quick way to verify a fix. The project is up on OSHPark should you wish to order your own.

Continue reading “Visualise ESC Problems With LEDs”