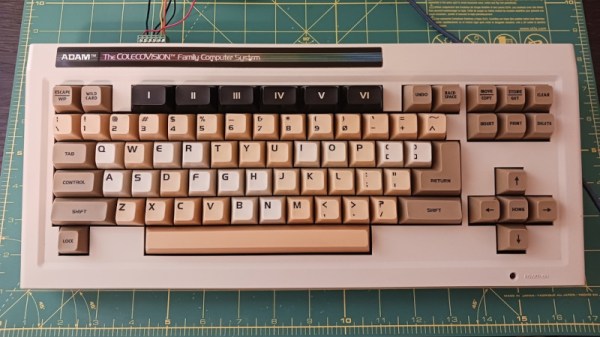
The Coleco Adam is one of the great might-have-beens of the 8-bit home computer era, with an impressive bundle and on-paper spec let down by bugs, hardware issues, and poor availability. It’s something of a footnote today but it seems Coleco did get something right as it had a great keyboard. [Nick Bild] has one, and he’s brought it into the 21st century with a USB interface.
The interfacing is courtesy of a Teensy microcontroller board as in so many other keyboard projects, but what makes this extra-interesting is the way the Coleco keyboard speaks to the world. Instead of merely being a matrix peripheral as were so many of its contemporaries, Coleco created their own custom serial bus for Adam desktop peripherals called AdamNet, and thus the keyboard contains its own 6801 microcontroller to perform the interfacing. The Teensy then is a USB-to-AdamNet interface, and could we’re guessing be made to talk to other Coleco peripherals if they exist.
You can see the keyboard in action below the break, and as you can see it fits quite nicely into 2023. We’ve not featured much about the Adam before here at Hackaday, but the ColecoVision console which sits at its heart has even seen a new version.
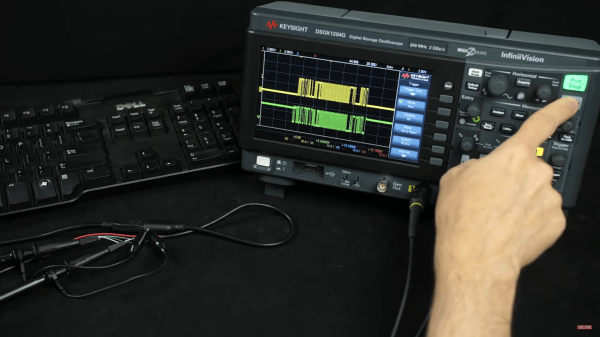
It turns out that PS/2 and USB are very, very different. A PS/2 keyboard sends your keystroke every time you press a key, as long as it has power. A USB keyboard is more polite, it won’t send your keystrokes to the PC until it asks for them.
To help us make sense of USB’s more complicated transactions, [Ben] prints out the oscilloscope trace of a USB exchange between a PC and keyboard and deciphers it using just a pen and the USB specification. We were surprised to see that USB D+ and D- lines are not just a differential pair but also have more complicated signaling behavior. To investigate how USB handles multi-key rollover, [Ben] even borrowed a fancy oscilloscope that automatically decodes the USB data packets.
It turns out that newer isn’t always better—the cheap low-speed USB keyboard [Ben] tested is much slower than his trusty PS/2 model, and even a much nicer keyboard that uses the faster full-speed USB protocol is still only just about as fast as PS/2.
If you’d like to delve deeper into keyboard protocols, check out [Ben]’s guide to the PS/2 keyboard interface, complete with a breadboarded hardware decoder. If these keyboards have too many keys for your taste, you might consider this USB Morse code keyboard. Thanks to Peter Martin for the Tip!
[chadaustin] has a favorite keyboard with a great ergonomic shape, key travel distance, and size, but after switching to Windows 10, the wireless connection introduced a terrible delay. Worse yet, the receiver is notoriously susceptible to interference from USB 3.0 hubs. To provide 128-bit AES encryption, the receiver is paired with the keyboard at the factory and cannot be replaced. If you lose that, you gain a highly ergonomic paper-weight. The solution for [chadaustin] was tethering the keyboard and receive several crash-courses in hardware hacking along the way. As evidenced by the responses to this project on ycombinator, many long-time fans of the Microsoft Sculpt Ergonomic Keyboard, introduced in 2013, suffer similar issues.
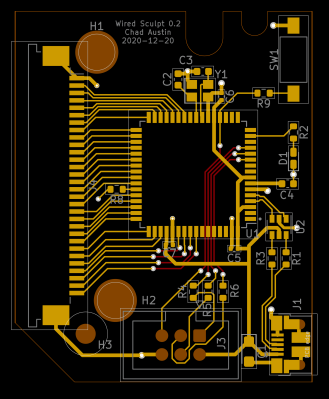
KiCad USB controller board layout
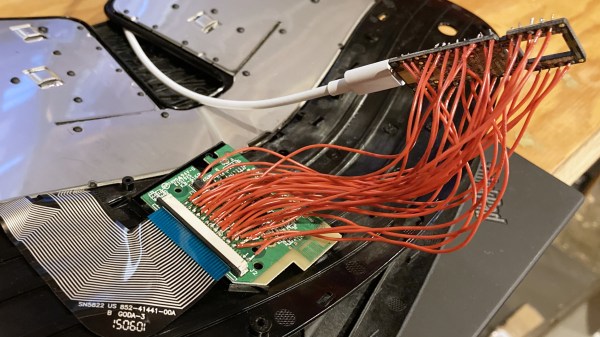
We really appreciate that [chadaustin] took an incremental approach, tackling one problem at a time and getting help from others along the way for first attempts at many complex steps. The proof-of-concept involved hand-soldering each lead from the keyboard matrix’s test pads to a QMK Proton C, which worked but couldn’t fit inside the keyboard’s case. For a more permanent and tidy solution, [chadaustin] tried a ribbon-cable breakout board and other microcontrollers, but none of those were compact enough to fit inside the case either. This required a custom PCB, another first for [chadaustin].
After a one-day intro to KiCad, [chadaustin] dug into the datasheets, completed a schematic for the board, and generously shared the process of choosing components and creating the layout. [chadaustin] ordered a board and found the mounting holes’ placement needed to be shifted.
With the full matrix mapped by [johnmilkspill], flashing QMK onto the AT90USB1286 controller went fairly smoothly. [chadaustin] chose to map both sides of the split spacebar back to the space key but did add a feature by repurposing the battery indicator LED to Caps Lock. And the results?
USB controller fits into the plastic case, wires added to ISP for bootloader button
According to testing done with Is It Snappy?, the latency dropped from the wireless 78 ms down to 65 ms over USB. More importantly, this latency is now consistent, unaffected by USB hubs, and there is no receiver to lose. Of course, [chadaustin] has ideas for future improvement, including regaining the multimedia function keys, as these kinds of hacks are never really done; they are just in the current revision. No word on the fate of the detached number pad, but that likely needs its own tether and is a project for another day.
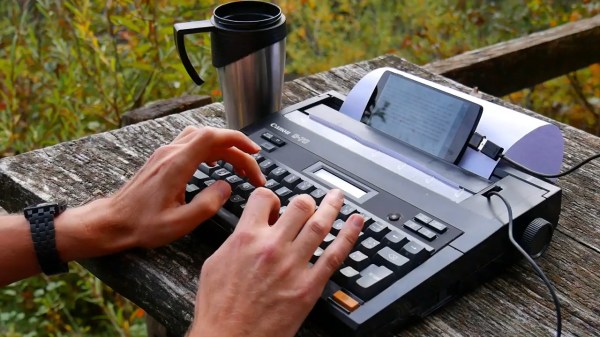
Back before there were laptops and subsequently, netbooks, there were these adorable thermal typewriter/word processors that are lovingly referred to by their fans as baby wedges or wedgies. These fascinating little machines can put words on paper two different ways: you can either use a prohibitively expensive little ribbon cartridge and regular copy paper, or you can go the easy route and get yourself a 96′ roll of thermal fax paper and type until you feel like tearing off the page.
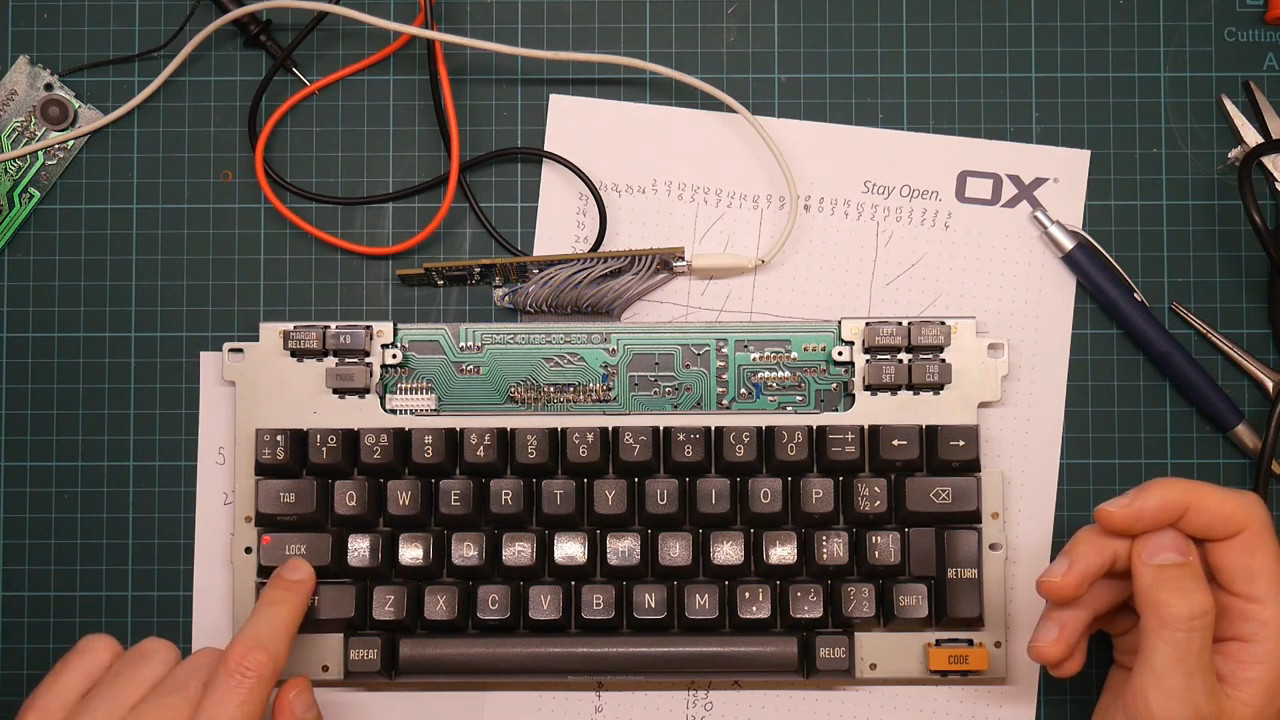
One thing that keeps these baby wedges within the typewriter camp is the Shift Lock function, which can only be disengaged by pressing Shift and had its own discrete logic circuitry on the board before he was forced to remove it.
That little screen is pure word processor and was used to show the typing buffer — all the characters you have a chance to correct before the print head commits them to paper. In a win for word processors everywhere, the screen was repurposed to show the current word count.
He was kind enough to post his firmware as well as real-time footage of the build. Watch him demo it in the wild after the break, and then stick around for part one of the build saga.
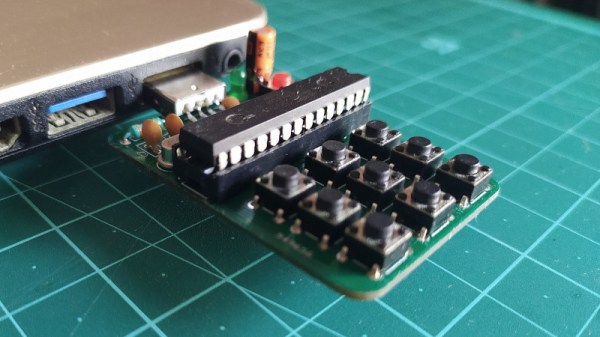
A useful add-on for any computer is a plug-in macro keyboard, a little peripheral that adds those extra useful buttons to automate tasks. [Sayantan Pal] has made one, a handy board with nine programmable keys and a USB connector, but the surprise is that at its heart lies only the ubiquitous ATmega328 that you might find in an Arduino Uno. This isn’t a USB HID keyboard, instead it uses a USB-to-serial chip and appears to the host computer as a serial device. The keys themselves are simple momentary action switches, perhaps a deluxe version could use key switches from the likes of Cherry or similar.
The clever part of this build comes on the host computer, which runs some Python code using the PyAutoGui library. This allows control of the keyboard and mouse, and provides an “in” for the script to link serial and input devices. Full configurability is assured through the Python code, and while that might preclude a non-technical user from gaining its full benefit it’s fair to say that this is not intended to compete with mass-market peripherals. It’s a neat technique for getting the effect of an HID peripheral though, and one to remember for future use even if you might not need it immediately.
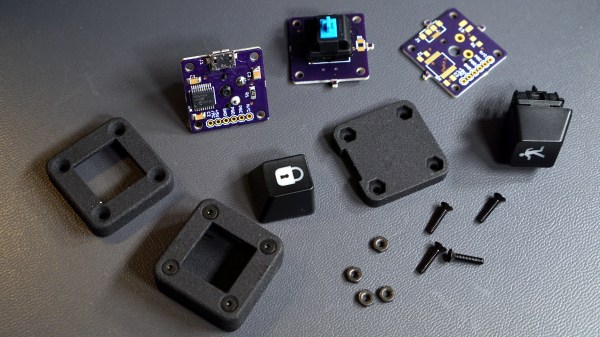
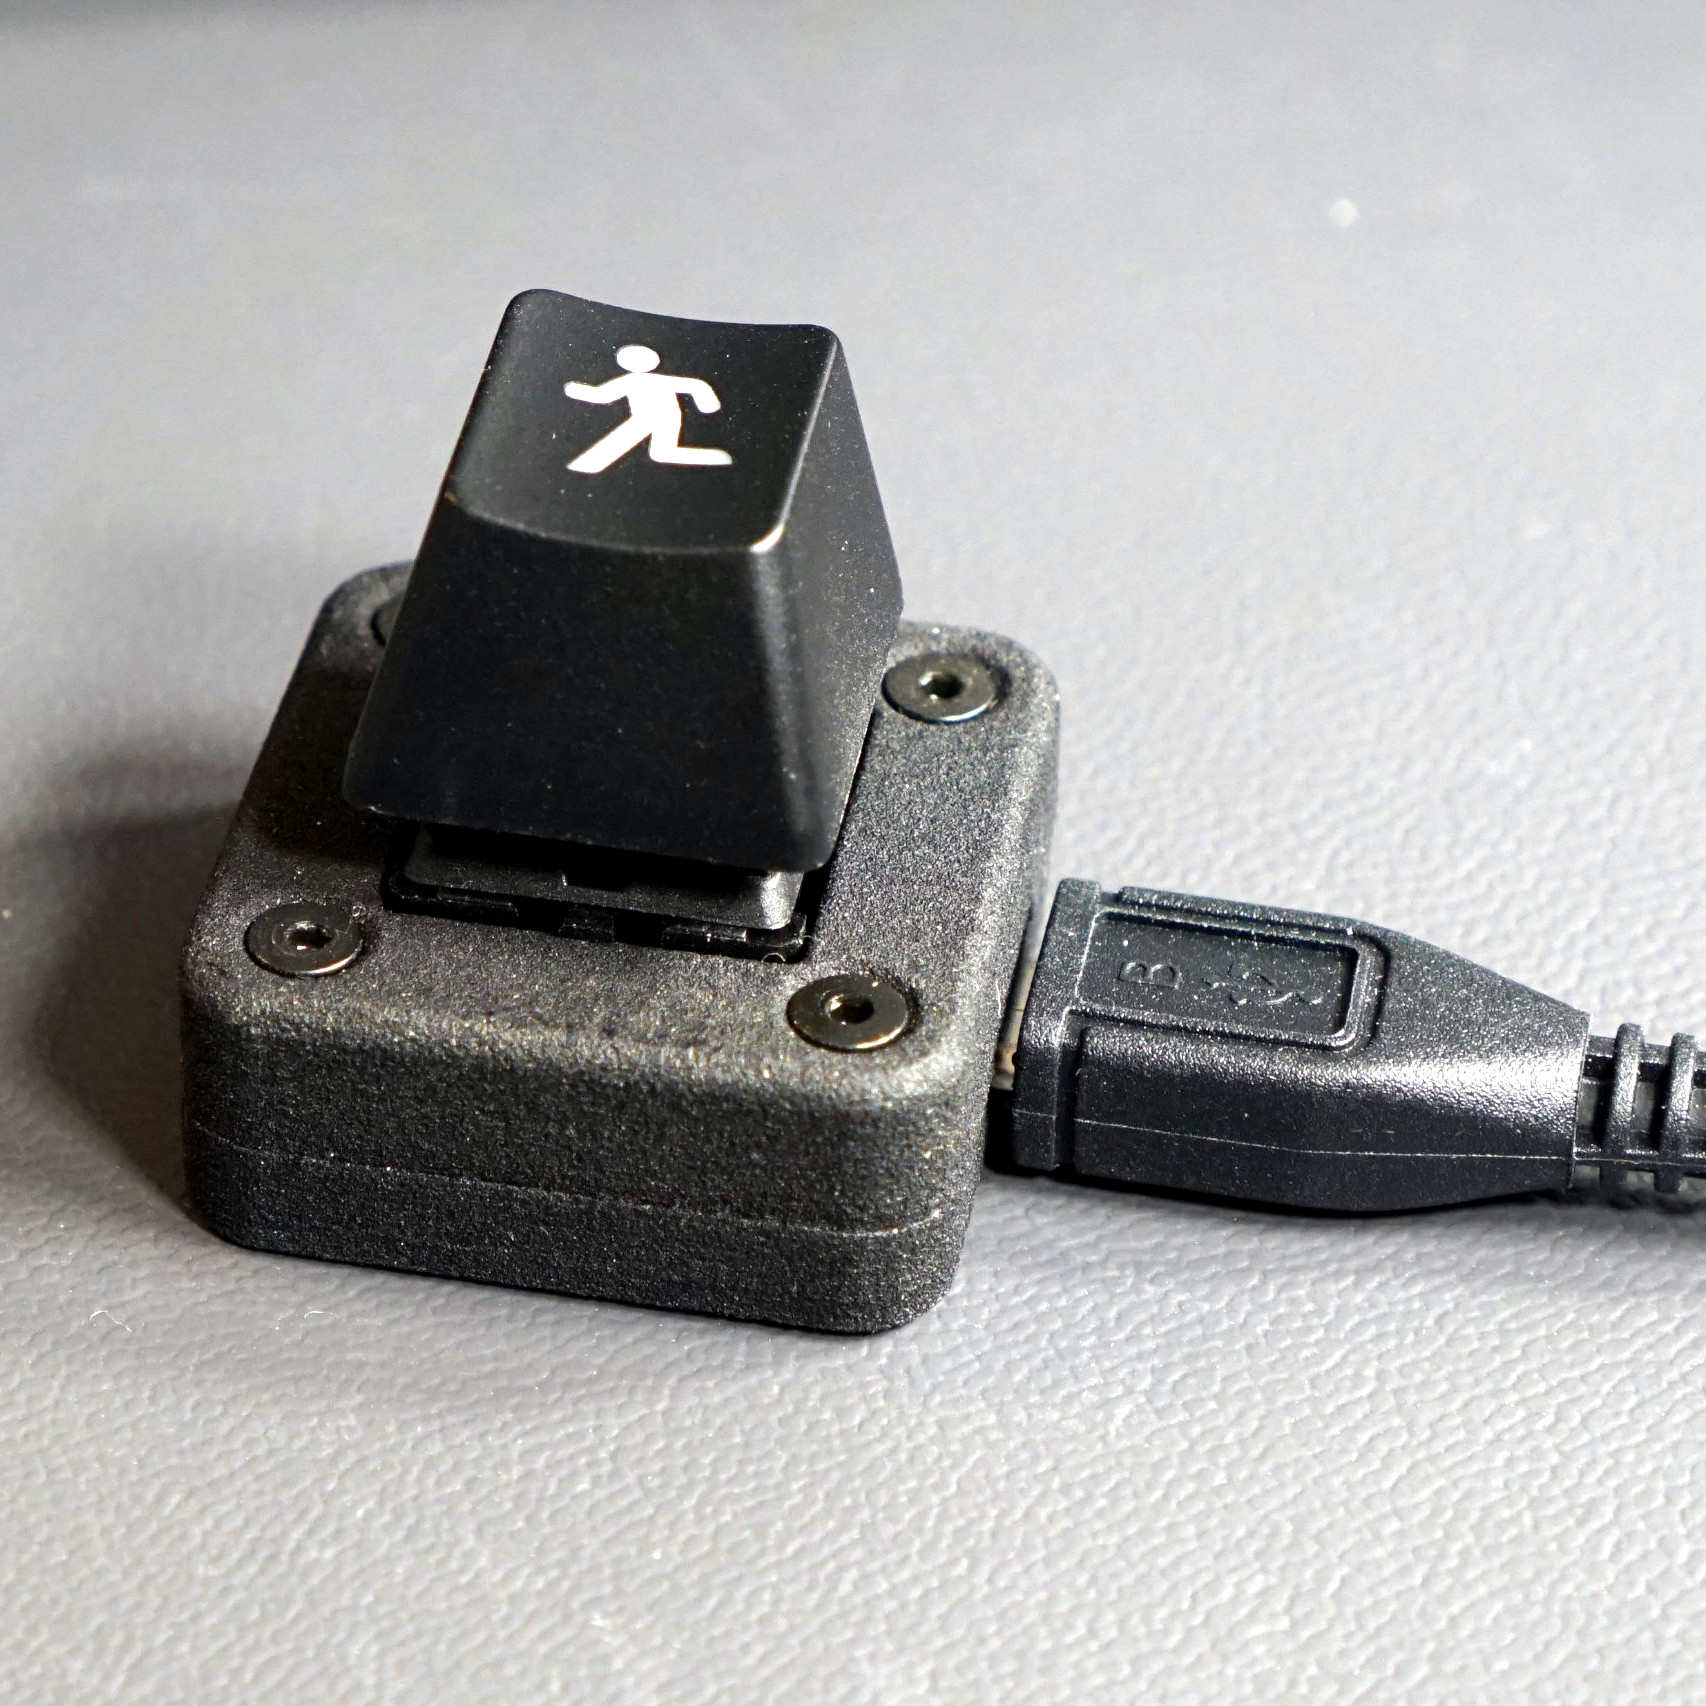
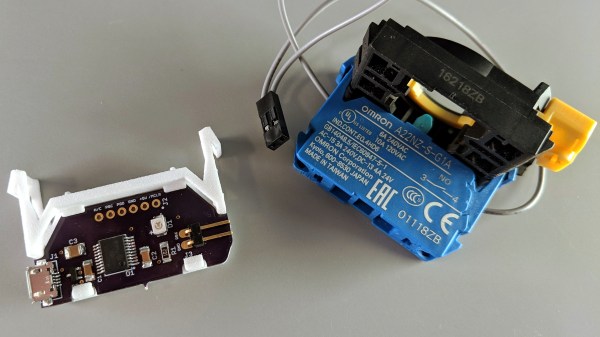
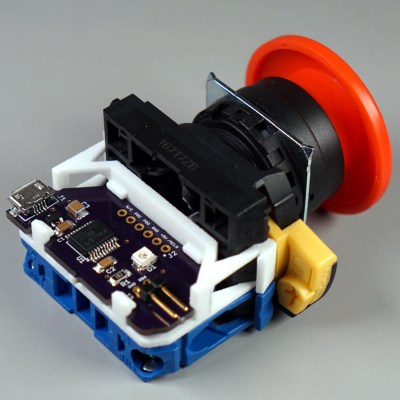
[Glen]’s project sounds perfectly straightforward: have a big industrial-style push button act as a one-key USB keyboard. He could have hacked something together in any number of ways, but instead he decided to create a truly elegant solution. His custom PCB mates to the factory parts perfectly, and the USB cable between the button and the computer even fits through the button enclosure’s lead hole.
It turns out that industrial push buttons have standardized components which can be assembled in an almost LEGO-like manner, with components mixed and matched to provide different switch actions, light indicators, and things of that nature. [Glen] decided to leverage this feature to make his custom PCB (the same design used in his one-key keyboard project) fit just like a factory component. With a 3D printed adapter, the PCB locks in just like any other component, and even lines up with the lead hole in the button’s enclosure for easy connecting of the USB cable.
What does [Glen] use the big button for? Currently he has two applications: one provides a simple, one-button screen lock on a Linux box running a virtual machine at his place of work. It first disengages the keyboard capture of the virtual machine, then engages the screen lock on the host. The other inserts a poop emoji into Microsoft documents. Code and PCB design files for [Glen]’s small keyboards are available on GitHub.
As [Glen] describes it, the only real goal in his decision to design his single-key USB keyboard was to see how small he could build a functional keyboard using a Cherry MX key switch, and every fraction of a millimeter counted. Making a one-key USB keyboard is one thing, but making it from scratch complete with form-fitting enclosure that’s easy to assemble required careful design, and luckily for all of us, [Glen] has documented it wonderfully. (Incidentally, Cherry MX switches come in a variety of qualities and features, the different models being identified by their color. [Glen] is using a Cherry MX Blue, common in keyboards due to its tactile bump and audible click.)
[Glen] steps though the design challenges of making a device where seemingly every detail counts, and explains problems and solutions from beginning to end. A PIC16F1459, a USB micro-B connector, and three capacitors are all that’s needed to implement USB 2.0, but a few other components including LED were added to help things along. The enclosure took some extra care, because not only is it necessary to fit the board and the mounted components, but other design considerations needed to be addressed such as the depth and angle of the countersink for the screws, seating depth and clearance around the USB connector, and taking into account the height of the overmold on the USB cable itself so that the small device actually rests on the enclosure, and not on any part of the cable’s molding. To top it off, it was also necessary to adhere to the some design rules for minimum feature size and wall thicknesses for the enclosure itself, which was SLS 3D printed in nylon.
PCB, enclosure, software, and bill of materials (for single and triple-key versions of the keyboard) are all documented and available in the project’s GitHub repository. [Glen] also highlights the possibility of using a light pipe to redirect the embedded LED to somewhere else on the enclosure; which recalls his earlier work in using 3D printing to make custom LED bar graphs.

 It turns out that industrial push buttons have standardized components which can be assembled in an almost LEGO-like manner, with components mixed and matched to provide different switch actions, light indicators, and things of that nature. [Glen] decided to leverage this feature to make his custom PCB (the same design used in his