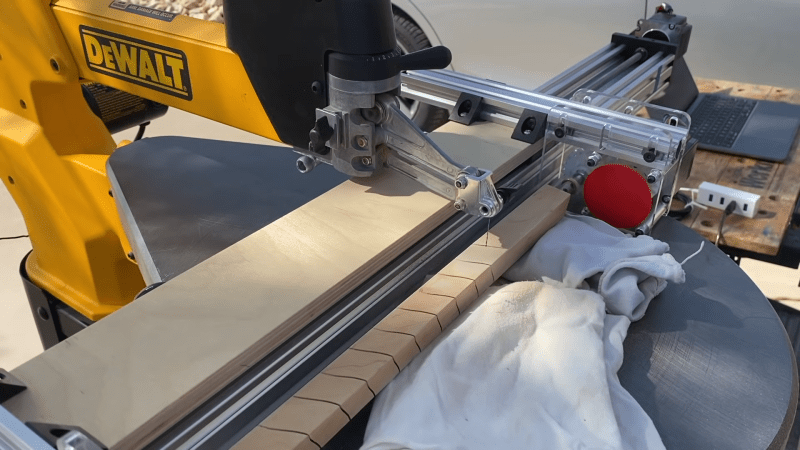
If there’s one thing that woodworkers have always been good at, it’s coming up with clever jigs and work-holding solutions. Most jigs, however, are considerably simpler and more static than this CNC-controlled scroll saw add-on that makes cool wooden spirals a snap.
As interesting as the products of this setup are, what we like about this is the obvious care and craftsmanship [rschoenm] put into making what amounts to a hybrid between a scroll saw and a lathe. Scroll saws are normally used to make narrow-kerf cuts in thin, delicate materials, often with complicated designs using very tight radius turns. In this case, though, stock is held between centers on the lathe-like carriage. The jig uses a linear slide driven by a stepper and a lead screw to translate the workpiece perpendicular to the scroll saw blade while a geared headstock rotates it. Starting with the blade inserted into a through-hole, the saw slowly cuts a beautiful nested spiral down the length of the workpiece. An Uno, a GRBL shield, and some stepper drivers let a little G-code control the two axes of the jig.
The video below shows it in action; things do get a bit wobbly as the cut progresses, but in general the jig works wonderfully and results in some lovely pieces. At first we thought these would purely be objets d’art, but then we thought about this compression screw grinder for DIY injection molding machines and realized these wooden screws look pretty similar.


Wait… where does the computer control come in?
Oh yeah, used my computer to watch the video of a woodworking jig in slow mo and fast speed. I’ll be adding that to my collection as soon as I get my triangle cutting jig done (spoiler alert… it can do scalene and isosceles… still trying to figure out that pesky isosceles).
I use GCode/GRBL files in the Universal Gcode Platform (UGS) on my Mac to control the pitch and length of the spirals, as well as start/stop, feed-rate, etc. Maybe I’ll try to cut triangular spirals next, thanks for the suggestion! :-)
This is also how ‘Feed Screws’ are made.. A Little Different, but somewhat the same.. Generally the Pitch is changing as the screw gets longer.. Here is one example of a Supplier I have used..
https://www.carletonhelical.com/
I did the FeedScrew Cutting some years ago, where I took a Drill Press Head, Mounted it on the Compound of my Lathe, and Chucked the ‘Screw Blank’ in the Four Jaw of the Lathe.. The Feed Screw of the Lathe was DC Motor Driven, and followed a Round Paper Template that was coupled to the head stock of the Lathe.. The Paper template had the ‘Stripe’ that I wanted the Drill Press Head to Follow.. The Headstock Speed of the Lathe, was slowed down to about 1 RPM ( Small gear Motor ), and the Drill Press was spinning a Circle Cutter ( Fly Cutter ).. Each Cut the Head Stock of the Drill press was lowered about 1/8 Inch (3MM) and another pass was made..
Everything was ‘Old School’ except for the Glass Fiber Optic ‘Banner’ Analog unit that was tracing the Paper template that had a Black Stripe on it.. The Output of the Fiber Optic, Drove the Speed of the DC Drive motor for the Apron Feed of the Lathe..
This was in the Late ’90’s and I considered using steppers then for the ‘Smarts’.. But Electronics being what they were then.. and Touch Screens being ‘Non Existent’ in normal circles, I chose the Analog/Optical method..
Still have it all.. and it’s easy to use and easy to understand..
Cj
Very nice, thanks for sharing! My next re-build will use this jig with a router (or Dremel) to cut feed screws like you describe, as well as make wooden screws. The software allows me to change the pitch very easily.
My ‘First Screw’ I cut, was a 3″ Dia ‘Wood Screw’ that was used as a Studio Prop in a Movie.. I used the Same Lathe, but at that time the Feed Screw was Still Gear Driven.. I was able to get 4 Threads per inch.. I used a Dremel mounted to the tool Post to Cut the thread.. Took a While..
The Next Problem was the Nut.. How to make a Nut that had the Same Profile as the Odd Ball Screw I Cut..
I Coated the Screw with Candle Wax.. ( Thick Mold Release ) And Cast a Nut on the OD of the Screw with ‘Bondo’ Body filler, and PVC Pipe as the OD of the ‘Nut’..
I was able to keep the ‘Plastic Nut’ on the Wood Screw to turn the OD to make it round with the Screw.. Then Glued that ‘Nut’ into a Block of Wood.. All Visible Parts were Wood.. Never saw the Movie.. Some ‘Grade Z’ Flick in the Back Lot of Desilu Studio in Culver City
Cap
Very cool, I should try that. I do wooden screws on my router table, but for the nuts I use a commercial tap.
https://www.instructables.com/Wooden-Threads-With-Your-Router-Table/
I like how you used a router to cut threads.
But I don’t have a 3D printer.
And we must have these wooden spiral-cut things because… um, remind me why?
Art? Beauty? Fun projects?
In reply to Drone:
If you think you need a reason, you’re in the wrong place.
If you need to ask questions like this, this website isn’t for you.
… because I can …
Thanks for your interest and the historical references. Sorry I wasn’t around in the 70’s.
Wooden screws are easy, I made plenty of those with tap/die sets, and also on my router table.
https://www.instructables.com/Wooden-Threads-With-Your-Router-Table/
What I would like to see, though, is if anyone has made nested spirals or helices (not screws) like I’ve done here where you can have two, three, four, six wooden spirals wrap around each other all from the same dowel with matching grain. Since I can’t post pictures with this comment please see my six piece spiral/helix in step 4 here:
https://www.instructables.com/Nested-Helix/
I have made up to nine nested spirals from a single dowel.
Whether the spirals have a practical purpose or not does not matter to me. I personally appreciate this kind of beauty and symmetry in a piece of wood art/craft; and I enjoy making them and giving them away.
Steve Garrison ( http://www.spiralsbysteve.com/helix-forms.php ) has done some work along these lines and I have credited him for the idea.
So if you or Uncle Bum@!#$ know of any other prior art like this please let me know.
Thanks again for your interest.
Step 1: make a (tapered) helix with light wood.
Step 2: make another helix with dark wood. Mix them to create a light / dark theme.
Step 3: the harder part. Engrave snake scales down the length, to show 2 snakes entwined.
Your target? The Rod of Aesculapius – the mythical god of medicine.
Good idea. I’ll try that sometime! Thx!
That thing could become ultra ultra ultra slow CNC lathe
My next project will be a router/Dremel attachment to cut screws, spirals, and spindles. Thx!
Seems a cheap alternative for applications normally needing a wire EDM, if you only want to cut brass or aluminum. Even with stainless you might get away with a diamond blade. Heck, you could cut stones too… Where do I send my money???
I haven’t tried brass or aluminum, or acrylic rod. I think I will, that would be cool! Might have to beef-up the headstock/tailstock mounting. Thanks for the suggestion.
In reply to Ren:
See if you can find a local Makerspace or library to print the 3d files for the thread cutting jig. Or send the files from the Instructable off to a commercial 3d print shop. https://www.instructables.com/Wooden-Threads-With-Your-Router-Table/
Thank you!
Years ago, I bought an antique wood clamp (the type that uses two wooden screws threaded between two parallel blocks of wood). The seller pulled a fast one on me. It turned out that one of the screws was too large for the threads, and I have been trying to figure out a way to make a replacement for it.
I guess in the intervening years I could have whittled a replacement.
Wow! This is amazing. The cutting is very satisfying to see and you don’t even need to sand it at all.
Thanks. It really comes out very smooth. The cutting is very slow, but it doesn’t require any interaction; just watch it. My bigger diameter spirals have very little vibration during the cut. I just finished a 1-7/8″ dia spiral that came out beautiful.