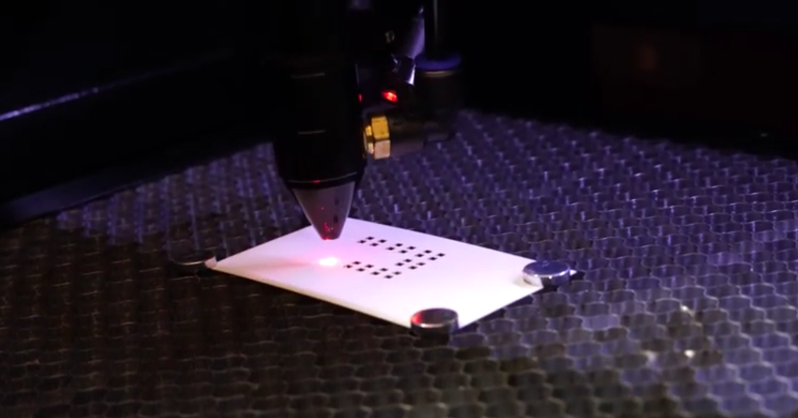
There are plenty of ways to make printed circuit boards at home but for some features it’s still best to go to a board shop. Those features continue to decrease in number, but not a lot of people can build things such as a four-layer board at home. Adding a solder mask might be one of those features for some, but if you happen to have a laser cutter and a few business cards sitting around then this process is within reach of the home builder too.
[Jeremy Cook] is lucky enough to have a laser cutter around, and he had an idea to use it to help improve his surface mount soldering process. By cutting the solder mask layer into a business card with the laser cutter, it can be held on top of a PCB and then used as a stencil to add the solder paste more easily than could otherwise be done. It dramatically decreases the amount of time spent on this part of the process, especially when multiple boards are involved since the stencil can be used multiple times.
While a laser cutter certainly isn’t a strict requirement, it certainly does help over something like an X-acto knife. [Jeremy] also notes that this process is sometimes done with transparency film or even Kapton, which we have seen a few times before as well.


Another solder stencil material that is fairly perfect for small runs of a handful of boards is regular 80 gram paper.
If one desires more thickness, there is thicker paper on the market too.
Yes, it will seep away a tiny bit of the flux.
Nor is paper great at handling really fine details.
And yes, it will also wear out fast, like in 10-20 applications. And some designs faster than others.
But it sure is cheap and easily available and even in fairly large sizes.
Laser cutting paper is also fairly easy.
Iv successfully used card. Sometimes I sprayed it with some clear lacquer to reduce the moisture absorbsion issues. I only get about 6 boards reliably before the paper starts to degrade. It may have something to do with the paint scrapper I use for the application.
I have had some better results going diagonally across the stencil, this reduces the chance that it gets caught on any edges and tears it apart. Also good to try to have a “light” touch.
But getting 6 boards is though fairly good.
But I don’t add any lacquer myself, I use regular old printer paper. Cut it in the laser before smearing the boards.
I haven’t had much issue to combat the flux sucking nature of paper, it is marginal at the worst of times and generally doesn’t seem to impact solder quality nor effect the strength of the paper. To be fair, adding lacquer might just make the paper more grippy and wear out even faster.
I bet I could even do this with a vinyl cutter. Ok, now I need to go order some solder mask…
Here’s a video from MikesElectricStuff of using a vinyl cutter to make solder stencils. Apparently it works quite good down to 0603 sizes. https://www.youtube.com/watch?v=FrxlQ2l_AHM
Credit cards a quite thick to make solder stencils from. They’re around 740um, while normal stencil thickness is more between 80um to 150um
Using paper in “emergencies” might work, 80 gram paper is quite close to 100um thick which is the right thickness. Flux is not made out of water, so the paper won’t bulge in the way as when it’s wet. But if you do this regularly, then it would be much more logical to have a stack of suitable plastic sheets lying around.
I wouldn’t say that paper is only applicable in “emergencies”.
I have used it on metric 0603 parts, 0.5mm pitched QFN parts, among other components with great success. Though, on tighter designs it has a slight risk of tearing, but this is usually due to poor laser settings and/or bad focus. (leads to excessive charring of the edges, for thin walled sections, there isn’t much fiber left.)
It won’t last for all that many boards, but easily enough for smaller production runs. 80 gram paper is also cheaper than any plastic film, not to mention easier to source. So making a second stencil is trivial.
Though, it has a thickness of 110µm, but it is close enough to not matter. And one can also adapt the footprint sizes a bit and circumnavigate this issue. (if one wants to play around with such, then 0402 is actually well within reach.)
In regards to how long a paper stencil lasts. It depends a fair bit on how fine the details are. For 0402 parts with a well tuned laser, a handful of applications, like about 2-5 boards. For larger components, it lasts longer. If one does 1206 as one’s smallest components, then it practically lasts forever as far as manual paste spreading goes.
I think that the use is “solder mask” here deviates a little from the conventional usage.
This seems to be a “solder stencil”
“Solder mask” normally refers to the solder-resist (typically green) layer that is used to dissuade solder from bridging between tracks.
In fairness, the term would be perfectly logical if we had never had through-hole and solder-wave machines. If wer were starting from now, the stencil would be the solder mask.
(oh, and please pronounce the “L” in solder when reading my post, I did when writing it) it’s “sowlder” in my language. :)
Agreed. I fairly basic mistake with terminology. I’ve used laser cut mylar sheet as a solder stencil. It works well and definitely stands up better to use than paper.
Also, 100% on the pronunciation of soLder. Surely “sodder” would be someone who performs sodomy.
Sure, and while we’re at it, let’s pronounce the k in “know,” the k and gh in “knight,” the gh in weight, height, neighbor, etc. and piss off the Irish by insisting on pronouncing all names exactly as spelt.
The English word solder comes to English ultimately from Latin (solidare means to fasten together) but by way of Old French (souder/soudure).
English is messy, and words (whether as spelt or as pronounced) can mean different things in different contexts. Is “lay” a present tense transitive verb, or is it a past tense intransitive verb? If someone says “hey” are they greeting someone, objecting to something, or referring to horse food (hay)?
Yes. I was thinking they were cutting some sort of conformal coating that would be applied to the PCB. Instead it’s just a stencil which has been done for home PCB making for a very long time. Nothing new here.
We hates it when they says “Put a bit of soda on…” and you’re thinking “Baking or washing?” and then it turns out they meant solder.
Could it be done with something a little more durable and even cheaper, like a piece of plastic soda bottle or milk jug or aluminum soda can? I mean I guess it all depends on what the laser can cut, and also if you can get it to stay flat enough.
Considering the issues of even having a small bend/crease/kink in a commercial stainless stencil, then I wouldn’t want to use a pet bottle nor an aluminium can. Just getting it flat is a project in itself. (even though all one needs is a paper weight and time.)
Secondly, most CO2 lasers can’t cut aluminium, engrave is though somewhat possible. Since it is a very reflective mirror most energy gets reflected away, even if one scuffs it up. A sufficiently powerful laser will though cut it, but 40-50 watts isn’t enough, even 200 is a bit on the weak side. (this is generally true for most metals.)
Though, the biggest issue of a soda bottle, or some milk jugs is the material thickness, and how even the thickness is, a stencil should preferably be as close to 100µm thick as possible. (there is exceptions for some components.) An aluminium can is a better thickness, but making it sufficiently flat to not have smearing around its edges will be a pain.
If one only does a couple of boards, cutting a piece of paper is faster, cheaper and gives better results. If one is going to make a lot of boards, then buy a proper stencil, they aren’t expensive in the slightest.
I use paper for prototype boards where I don’t know if the board will end up as the final design (since prototypes can have issues), therefor it is cheaper to spend 2 minutes transferring a file from the PCB CAD program to the laser CAM program and dial in the settings for cutting paper and have it cut in usually under a couple of minutes, time one could spend on doing something else, instead of spending 5-20 bucks on an effectively single use stencil. (and sometimes the proper stencil is almost free when one orders the production batch of boards.)
For small volume production where one makes batches of 1-5 boards at a time every other year, then a proper stencil is usually a drag to keep around regardless. It usually ends up finding legs and disappearing by the next time one needs it, even if it should be in the neatly organized set of folders for stencils…
If one’s low volume stencil material of choice is paper, plastic film, or a proper stencil doesn’t largely matter. Paper tends to have the advantage of being cheap and easy to source and very easy to cut in a laser.
Soda cans work just fine. Ferric chloride eats through aluminum very quickly, much faster than through copper, so they take no time at all to etch.
DIY home-made SMT metal stencil – the definitive tutorial
https://www.youtube.com/watch?v=JWUJtmgh55M
I will keep this in mind for when I have a need for making home made metal stencils. (or etch other holes in thin sheet metal)
Though, would likely just buy a stack of sheet metal of appropriate thickness if the process is easy enough.
You’ll have to adjust for the opening if your business card thickness is very different from the conventional stencils that the foot print is meant for as this will affect the *volume* of solder paste onto the pads. Too much or too little paste can cause issues. Too much paste can cause solder bridge between pins.
Chances are that the business card stock is much thicker than a stainless steel stencil. Might want to consider soemthing thinner.
Euhm…
@00:55 “Set solder mask clearance to 0.2mm and minimum width to 0”
@02:08 Complaining that the holes overlap. Duh!
But even worse.
@01:20 he uses B.Mask in KiCad to make his stencil, and this is the solder mask layer (Which is printed on the PCB itself). The correct layer to use would be B.Paste, which is of course for the solder paste, and this omits all the THT footprints from the output so you can skip the whole editing step.
The settings for the solder paste layer are right below the solder mask layer, but you can’t see that because the video has a very low resolution in the first 70s.
Cutting soldering stencils with a laser is nothing new. Even the commercial stainless steel stencils are done this way.
I do like this video though:
https://www.youtube.com/watch?v=WlvlHMxde3A
EcProjects laminates a plastic sheet between two wet sheets of paper to cool the plastic and prevent the edges from melting, which increases accuracy during laser cutting.
You are right, I made a mistake on the terminology, though seems I used the right term in the video itself.
Thanks for the tip on the B.Paste layer.
That being said, I’m pretty new to this. You could present things in a nicer tone.
Solder stencil, not solder mask. Two different things.
Yeah, that was my mistake when I submitted it. Somehow got the terms swapped in my head!
For those without a 40w laser cutter 0.2mm black card stock and a red 300mw diode (the kind you find inside DVD-RW drives) works well
It can cut stencils sot-223 and 805 packages quite neatly with the right flatcam settings. 40mm feed-rate and a -0.2mm tool size. I’ve not tried any smaller packages yet
Thanks for the writeup Brian!