T-slot extrusions used to be somewhat mysterious, but today they are quite common thanks to their use in many 3D printers. However, it is one thing to assemble a kit with some extrusions and another thing to design your own creations with the material. If you ever had a Play-Doh Fun Factory as a kid, then you know about extrusions. You push some material out through a die to make a shape. Of course, aluminum extrusions aren’t made from modeling clay, but usually 6105-T5 aluminum. Oddly, there doesn’t seem to be an official standard, but it is so common that there’s usually not much variation between different vendors.
We use extrusions to create frames for 3D printers, laser cutters, and CNC machines. But you can use it anywhere you need a sturdy and versatile frame. There seems to be a lot of people using them, for example, to build custom fixtures inside vans. If you need a custom workbench, a light fixture, or even a picture frame, you can build anything you like using extrusions.
Why Extrusions?
If you are handy enough, of course, you can build all of those things without resorting to aluminum extrusion. After all, it isn’t hard to build a box out of wood or even aluminum stock. But having stock inexpensive aluminum is both strong and convenient. In general, all you need is a way to cut the extrusion square (or, buy it in the lengths you want) and a way to drill holes in the relatively soft aluminum. In some cases, you may want to tap some holes — either that already exist or those you freshly drilled.
However, what you do need is a lot of special parts. There are brackets and special nuts and a variety of accessories. You can think of it as something akin to an adult Erector set. One thing that has made working with extrusions easier is that you can 3D print just the bracket you need in many cases instead of buying an exotic bracket or having to stock a lot of different items. A fantastic example of this are all of the brackets and retaining parts Roger Cheng covered in his guide How to Build Anything Out of Aluminum Extrusion and 3D Printed Brackets.
Extrusion Geometry
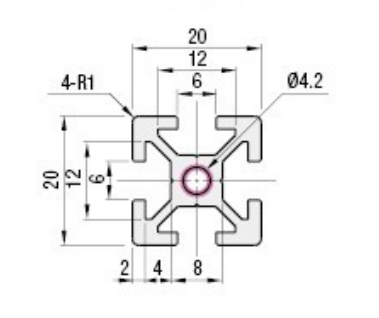
There isn’t just a single kind of extrusion, but they all share some common features. In general, the extrusion will be like a square or a rectangle. The most basic extrusions are square and there will be a central hole and one or more T slots for attaching things. If you are making something you want to be attractive, you might not want the T slot on all sides, but usually, with a 3D printer or other machines you’ll have a slot on all sides.
Some extrusions are metric and some use inch measurements. It is common to call a square profile by its measurement as in a 20×20 profile (20mm on each side).
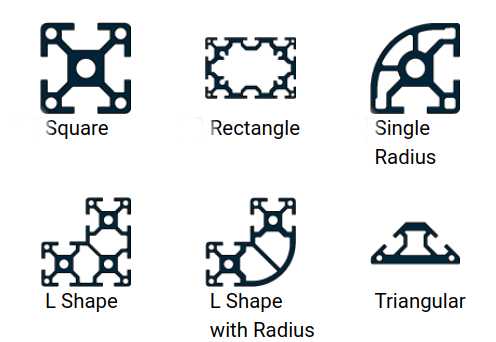
More complex extrusions will usually repeat the pattern so a 40×20 extrusion appears like two 20×20 extrusions joined together. Of course, they aren’t made that way — it is one solid extrusion where they’re squeezed out like Play-Doh, a fascinating story that Dan Maloney dove into last year. However, there are other extrusion shapes, such as those with a radius or those shaped like triangles for special purposes.
There are two things you’ll need to do: join extrusions together securely and affix things to the extrusions. For example, if you are making a table, you’d want to build a frame to hold the desktop that has four legs. You’d attach a laminate tabletop to the frame and put leveling feet in the legs. Of course, you could get a lot fancier like [Evan] and [Katelyn] did in the video below.
Extrusion Connections
In many cases, attaching accessories like a foot or a bracket to an extrusion has a lot in common with how you join multiple extrusions together, so let’s attack that first. The trick is to use special nuts that fit inside the T slots. You have several options. Square nuts can slide into the slot if they are thin enough. You can put a tension spring on the nut to hold it in place while you tighten the bolt into the nut. However, usually, people just thread the bolt on and slide the whole thing into the slot.
The downside to this is that you have to have access to the open end of the slot. If you want to add something between two other nuts or if the slot is blocked with a bracket, you will have to tear everything apart to get the new nut in. This is a type of preset nut, and they also make rectangular nuts known as T nuts that serve the same purpose.
If you were, for example, affixing a stepper motor bracket with two mounting holes to your frame, you’d either insert the nuts or thread them loosely on the bolts inserted into the bracket and then slide them into the slot. When you have the assembly in the right position, you simply tighten the bolts.
The only tricky part is the length of the bolt to use. You need a bolt that will go through the bracket and just go into the nut without coming out the other side and touching the extrusion. If the bracket were, say, 10mm thick and the nut is 6mm thick, you might use a 15mm long bolt to leave a millimeter margin. If the bolt is too short, the joint won’t be sturdy.
If you need to add something to the middle of an extrusion where you can’t access the entrance to the T slot, you’ll need a special kind of T nut. These are the least secure attachment but are often good enough. These nuts have an elliptical shape so that when they rotate 90 degrees they get stuck in the slot. There are also nuts that have springs or set screws so you can put them in the slot at an angle and then rotate the long edge to compress the spring, allowing the nut to clear the slot. When you let go, the spring pushes the nut into the edge of the slot, locking it in place. These are sometimes called drop-in or roll-in nuts.
You can also get T head bolts where the bolt head fits into the slot instead of the nut. These look like T nuts, but have a threaded bolt instead of a threaded hole. They also make T nuts that have multiple threaded holes. For example, a corner bracket — something we’ll talk about shortly — might have three holes spaced every 20mm, and there will be a corresponding nut with 3 holes with the same spacing. Of course, you could always just use three regular nuts.
Joining Extrusions
You can attach a stepper motor bracket or a cabinet slide using T nuts and bolts. But you can also attach a bracket to two or more extrusions to join them together. They make these brackets in aluminum, steel, or polymer, of course, but you can also 3D print them. However, you need to be careful. Usually, the brackets only constrain the extrusions in two dimensions, so you’ll want to use a second method to overconstrain the joint.
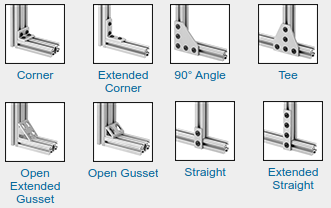
Most brackets are exactly what you’d think — they are shaped somewhat like an L or a T or a plus sign but there are a dizzying array of options. There are also corner connectors for making boxes that have an XYZ configuration. However, you can also get inner brackets that look like two T nuts in an L shape. A set screw holds each leg of the L in place. Some have an angled set screw to help align the connection in which case, you have to use a different type of inner connector depending on which way the connector faces. You’ll usually use these in pairs to hold both sides of the extrusion, although that’s not always necessary. You can see an example of a simple inner connector in the video below.
Sometimes you want to just join two extrusions end-to-end. A linear connector can do that. It is just a strip of metal that fits in the slot and has a few holes for set screws. You can also get brackets that will let you put a piece of extrusion in as a diagonal brace for extra strength.
There is also a simple way to connect two extrusions without using a bracket at all. It is more work, though, but uses fewer parts. Suppose you want to join extrusion A and B at a right angle. Your first step is to tap the central hole (or holes) in extrusion A. Then you drill a normal hole through extrusion B big enough to get a hex key for your bolt through the hole. You thread a bolt into the threaded hole, but before it is tight, you slide the head of the bolt into B’s T slot. The hole in B is positioned so you can finish tightening the bolt.
Accessories
There are many things made to work with extrusions you can get from the same place you buy them. There are cover plates, feet, and casters. You can get springs that hold sheet material like acrylic in the T slot. There are wheels, doors, handles, and hinges all made to fit into T slots.
If you browse any of the 3D printing sites like Thingiverse, you’ll find there are many designs for things like spool holders, filament guides, tool holders, and lamps that will fit in a T slot either as a friction fit or by mounting with nuts. Just remember that if you want to add something later and it needs screws, you’ll probably want some kind of drop-in nut.
Where to Get Extrusion
The cheapest way to buy extrusion is to get it surplus in whatever lengths you can get — usually leftovers — and cut them to the size you want yourself. If you do cut it yourself, you’ll want to be sure to make a clean and square cut so that the extrusions square up when you attach them together. You’ll want to use a metal cutting blade, of course.
However, if you buy new extrusions you can usually get them cut very precisely to whatever size you need. This may also cut down on expensive shipping for long pieces that you’ll cut anyway. In addition to cuts, you can often get the material in different colors or metal alloys. You can also ask for holes on one or both ends to be tapped if you prefer not to do that yourself.
There are many places you can buy extrusions and related items. Misumi is a common option as is 8020. The big suppliers like Grainger, Fastenal, and McMaster-Carr carry a lot of this sort of thing, but they are often pretty expensive.
The 3D Printing Connection
You can 3D print a lot of brackets (including one that is apparently the world’s best) and accessories and if you want to model something, you can even 3D print extrusions, although you need your print tolerances pretty tight. There are many designs for plastic T nuts that take a normal nut for threading and a plethora of brackets of all descriptions.
There are a few things to watch out for, though. First, use common sense. plastic brackets and extrusions won’t be as strong as those made of metal, although we’ve seen people go overboard with the idea. Also, not all extrusions are exactly the same, so a design for a nut that fits brand X might not fit the ones you have. As always with 3D printing, you’ll need to tweak and adjust.
If you want to get fancy with your designs and maybe even use 3D printed holders for cheap nuts. Either way, if you are building a desk, a machine, a robot, or nearly anything else you can imagine, aluminum extrusions are a great thing to have in your toolkit.


Nice summary; thanks! Can we get a compare and contrast on extrusion versus channel strut? (I have one thing in my house Frankensteined together from both metric extrusion and imperial channel strut…) DIN rail is less directly overlapping in uses, but also would be nice to compare or have adapters to attach to the others.
the ‘adult erector kit’ sounds interesting but most probably I am missing some cultural context :-)
It is more “Erector Set” than kit. It is/was a toy for kids to build stuff. It was made with metal, and you joined ends with nuts and bolts. Some of the sets had motors and you could make cars and other motorized things. Here’s the wikipedia, https://en.wikipedia.org/wiki/Erector_Set
Up to the 70’s in the US, every mechanically inclined boy got at least one Erector Set as a Christmas or birthday present. In the late 70’s Lego’s took over and playing with Erectors was less common, at least in my neighborhood.
https://www.toyhalloffame.org/toys/erector-set
Seems like there is a different name for those or comparable sets/sytems in many countries: http://www.osnl.co.uk/
got there with this: https://duckduckgo.com/?q=relation+märklin+erector+meccano
Known as Meccano in the UK. Many a lad knew the pain of stepping on square nuts. Lego took the baton on that too.
Erector sets and Meccano were competing products. Meccano (as I recall) was steel and each size had it’s own colour whereas Erector was all aluminum.. I had both as a kid and I (sort of) grew up in the 50’s and 60’s
Listen you young whipper snapper!
My erector set components were ALL steel, and we liked it that way!
Aluminum!
In Germany this was Märklin Metallbau.
and we had fishertechnik, oh boy, just checked and they still exist: https://www.fischertechnik.de/en/
Oh that thing was called “Merkur” in out country. Because there was lack of basically everything during the socialism era and because this thing was kind of available (and quiet common) many people was using is for making useful stuff. Including scientific instruments – probably one of the most famous in this field was this guy https://en.wikipedia.org/wiki/Otto_Wichterle
In France it was named “Meccano” ™(r)(c)
i’ve only used them for one project, a kit 3d printer (like everyone else). but i love how that worked out! the best part is the extrusions provided the bulk of a linear actuator, so it was super convenient for the 3 identical axes of a delta printer. the kit came with a bunch of T-nuts which i loved, though obviously the printer never sees any particular mechanical load. really, most of the places where the extrusion is jammed into a hole in a PLA bracket, friction would hold it in place just fine.
for one piece, i couldn’t use the T-nuts…i had to use an M2.5 screw, and the M2.5 nut simply doesn’t engage at all. so i made my own by cutting down a penny into an oblong shape, and trapping that in place with the M2.5 nut.
i did come up with one novel hack i’m pleased with. i wanted to run electrical wire in some of the slots, but i couldn’t use zip ties to hold it in place like you see so commonly, because it’s got a truck for the linear actuator that rolls over it. i had used masking tape but after only a year it was peeling and the wires were popping out and rubbing on the trucks. so, as an exercise in printing the smallest details, i made little things you can slide inside the slot, and then twist with needle-nose pliers to lock into place. it was the fiddliest thing…the parts are mechanically next to worthless. but i put a couple dozen in the printer back in 2015 and they’ve simply stayed in place.
http://galexander.org/x/extfast.jpg
I would have used little squirts of hot glue to hold the wires in place.
We’ve used 8020 for a number of projects around here. My favorite is the sliding rail system that allows my overhead Robotic Camera system to do duty for reading along with Newspapers and websites on tablets for our various shows. Since the configuration of the largest studio can vary with the show being taped, the camera had to be in multiple locations for use. The system we designed allows for use within a 10×6 area that encompasses the main staging for most shows.
8020 is great. For home use the knock off extrusion will work fine.
You should also mention Kindorf/Unistrut. That was my first use of linear rail for constructing such projects.
I used to work in a candle factory. Almost all of our guarding was made from 80/20. The beauty of the stuff is its about 1/4″ in the groove. Build a box to cover the machine then cut plexiglass/polycaronate sheet to fit the box and presto. You got a guard to keep hands out of the machine. https://www.slideshare.net/knottsco/8020-guarding-flipbook. Some great examples in the link. We also built custom machines out of the extrusions that were simply amazing. Custom drills for boring wick holes in three wick block candles etc. Great stuff to work with.
I always use to think why would I want to spend the money (for a computer desk) to build with extrusion when I can just build it with wood. With the current lumber prices, this may very well be the better way to go across the board.
Kind of crazy isn’t it. Guess the trees can’t keep up.
Anyway metal extrusion is used in commercial buildings.
Quick to putting something up.
https://3dinsider.com/metal-extrusions/
I buy t-slot at a local scrap yard for the aluminum scrap price- usually about $1-2 per lb. No, I don’t get to pick and choose – I have to take whatever size(s) they have, but I don’t build stuff from someone else’s BOM anyway. I generally find it best to acquire major parts first, then measure, model, and design around them.
I prefer to bolt the t-slot directly together and usually skip the L brackets and plates. That requires square cut ends, but I have access to a milling machine at Milwaukee Makerspace so not a problem for me. I see a lot of printers built with 20 mm t-slot and then all the corners are full of L brackets and plates in an attempt to stiffen the frame, but those add-ons can’t prevent the beams from flexing. People really should be using larger cross section t-slot. The extra stiffness would eliminate the need for most of the brackets and plates. I suspect the cost of larger t-slot is lower than the cost of the smaller stuff plus all the extra hardware.
Square aluminum tubing is stiffer than same size t-slot so unless you have some special need for the t-slot, most designs would probably be better with square tubing.
I assume your scrap yard is in the Milwaukee area, not the Madison area, right? I’ve been here for a few years and I still don’t have a preferred scrap yard, metal supply, etc…
Slotted extrusions have one very important drawback, in that designs where structures undergo torsional deformation are to be avoided. U Channel, round and rectangular tube are typically less expensive, but are somewhat physically heavier. Personally, I prefer a rectangular tube in mild steel option, as tacking something together with a welder saves a fortune in fasteners and assembly time.
I don’t think I have actually ever seen a slotted extrusion product that didn’t have a weird bend or twist in it from the factory. If I recall correctly, it is because of how most slotted-channels are pulled straight at the end of production prior to cutting. A linear rail based on such products sounds frankly like a sledgehammer with a noodle for a handle. I can’t see how these could hold dimensional tolerances for very long. Not inconceivable mind you, but just seems rather delicate considering what most designers would expect at that scale. ;-)
I’m a fan of Makerbea, a 10mm t-slot extrusion system. It’s great for smaller scale projects, I used it to build a custom stand for my water-cooled PC.
Nowhere did anyone mention that the flatness and squareness was not all precise .
Yes, it should be noted that extrusions are not known for their dimensional accuracy. The better systems such as 8020 have their tolerances listed in their specifications. Extrusions are also prone to bending and warping. Also, most supplier cuts are usually only to within 1/16″. In addition, aluminium has a large thermal coefficient of expansion. What this all means is that they systems aren’t as suitable for building precision CNC machines out of as many people believe. Good design is needed to minimise thermal effects, and careful assembly needed to keep things square. It’d be difficult to do a great job without a surface plate, a height gage and decent reference square. You might need to sacrifice the anodization to get flat surfaces too.
Great, I wanted to vent about my recent extrusion purchase. I bought 80/20 20 series T-slot. Lots of it. The problem is that 80/20 20 series is different than actual 20×20 extrusion. The slots are only 5.25mm wide while everything on amazon has 6mm wide slots. Almost everything on thingiverse is for 6mm slots.
Better than the other way. Adding material is loads more difficult than subtracting.
I would like to highlight that not only can you have these extrusions cut to size. but you can also have laser cut steel fittings produced with the holes exactly where needed.
Though most Lego is now in the form of kits to build specific things, the real utility of Lego is to have a tub of 2000-3000 pieces, and build your own designs as they occur to you. Same with Erector/Meccano.
So where does one buy a similar kit of a few dozen pieces of extrusion, with a gazillion connectors, plates, etc.? Ideally with stepper motors, timing belt, different sized toothed wheels, etc. Sort of a professional upgrade from Erector/Meccano for building functional prototypes.
I have googled variations of “mechanical engineering starter set”, but don’t find anything but cheap toys.
MakerBeam is mentioned above. RatRig maybe? Perhaps there’s an opening in the market for something like that – a larger Erector set for mechanical engineering. Although the price tag would probably be very steep.
I had a Vex robotics kit many years ago. I didn’t use it much, but I liked collecting larger motors, linear actuators, and batteries and building things with those. Maybe because that kind of kit is very limiting at larger scales, where a motor has to have the right power/weight/shape to fit the project.
Sounds like a Kickstarter, right there. “The 2020’s answer to Fischertechnik”
In 2012, right before starting Smoothie-project, I was a contributor to the contraptor project (contraptor.org).
Contraptor is a really cool project, you should check it out if you don’t know about it. It’s Meccano(tm) for grown-ups.
I was working on a metric version of it (20 mm instead of 1 inch as a grid). Not just the structural stuff, but also the linear bearings, etc.
I designed an angle-with-holes (like contraptor) profile, and a T-slot one.
The angle one was 20 mm on a side, 2 mm thick, with holes every 20 mm at 5 mm from the borders, 5.2 mm in diameters.
The T-slot one was pretty much a clone of misumi 2020, just re-drawn from scratch.
I found some aluminum extrusion places around the world (France, Poland, India, China), and worked on getting prices and samples.
The places in Europe were way too expensive.
The place in India was a bit more expensive than the ones in China, but I happened to have somebody who could help we communicate with India people, so I worked on getting a sample from India.
The sample I got was absolutely terrible. *All* dimensions out of (the very clearly defined) specs. One of the sides was TWENTY TWO millimeters (21.9+) instead of 20 plus or minus 0.1.
When I complained, nicely, asking for a second sample, I was insulted in vicious ways I have not experienced before or since in business. Like, out of nowhere saying really nasty things about my mother, demeaning me etc.
This guy didn’t do a service to his country. I haven’t done *any* business with India since, not once (and have done business with China hundreds of times). Until somebody shows me otherwise, I consider India a lawless wasteland full of terrible people. Recently I talked to somebody who wanted to resell Smoothieboards in India, but this experience was in the back of my mind the whole time …
The full sample price in India cost me as much as just the *DIE* cost me (would have cost me, ended up being free, see below) in China, too, this wasn’t trivial an expense for me either.
Anyway.
Then I went to China.
Incredible communication and service, the best price, *free* samples (they happened to have a die that was very close to what I wanted, and I switched to that shape/die, but the sample/die price wasn’t too bad either if I had had to use my own profile design and didn’t (re-)use theirs).
I produced nearly a ton of profiles, had them shipped to my place, which was quite an adventure, my first time learning international shipping with containers etc. Experience that would later be useful when I started selling Smoothieboard-powered laser cutters and CNC mills.
And I sold a lot of it around the Reprap, Contraptor and Open-Source-Hardware communities over a few years.
I still have a few hundred kilograms of profiles around in a storage place/thing.
Fun adventure in Open-Hardware lands.
My go to aluminum extrusion profile
https://www.ikea.com/us/en/p/vidga-triple-curtain-rail-white-20299155/
cheap, and available
I pick up bed frames left on the curb for the angle iron.
This
Seems like it would be flexible and not straight. What are it’s disadvantaged? What do you use it for (cnc?). Price is good.
Last build with it was a custom enclosed corexy 3d printer with 370x370x370mm build volume
I find that the extrusions themselves are fairly cheap, but all the brackets, special nuts, connector pieces, have absolutely stupid prices and companies expect you to buy a box of thousand or charge you five bucks per nut, or buy the box AND charge you five bucks per nut, and the local suppliers are only interested in selling to companies that basically buy the whole catalog at once when they’re fitting a factory or a new production line.
The stuff I get at the local scrap yard usually has a lot of hardware attached. In fact I often have to disassemble the stuff myself and grab as much of that normally expensive hardware as I can for the steel scrap price while I’m getting the t-slot for the aluminum scrap price. I get brackets, plates, t-nuts and screws, hinges, door handles, feet, etc. Of course, I usually have to spend some time cleaning the stuff off, too.
Even if you have to buy it new, the larger cross section t-slot doesn’t usually cost much more than the smaller stuff and is MUCH stiffer, eliminating the need for a lot of the extra hardware that people buy to try to stiffen up the smaller t-slot.
40×40 t-slot usually has 8mm slots that will work fine with 5/16″ carriage bolts.
Square/rectangular tubing is cheaper, lighter, and stiffer than same size t-slot. T-slot is great if you need to bolt things on and do a lot of experimenting or plan on taking the thing apart to reuse the pieces. If you’re building a one-off, rectangular tubing is the way to go. You can attach things with cheap, self-tapping or sheet metal screws. Tubes can be joined with 3D printed corners and/or metal plates and screws as you probably would do with t-slot using expensive t-nuts and screws.
That’s one way of doing it, but for proper work you can’t go dumpster diving – at least reliably so.
I’ve been working with the 30×30 and 40×40, 40×120 stuff, and you still need a large number of connector pieces to make things work. End caps, plates corner braces… when each corner bracket piece costs $10 and you need three for every corner of a box, that’s $240 already. L-brackets for securing the top table and the bottom shelf, $8 x 18 is $144, plus the extrusion itself, plus the special nuts and bolts… pretty soon you have a $1000 bill of materials for a “simple frame” that was supposed to be cheap and easy to build.
And all that stuff ends up weighing about 500 pounds in the end so you can forget about wheeling it around on little caster wheels. In retrospect we should have gone with steel tube and sheet metal, and simply welded the thing together, but the plans were handed down and said, “make this happen”.
Lucky! What kind of industry is in your area that throws out extrusion?! Just curious
The kind that’s closing shop.
Some of the manufacturers of extruded components have CAD software where you can design and visualize structures. When you are done designing, the software spits out a BOM and a quote, you can also order and pay when you are ready. For example, Rexroth (I am NOT affiliated) offers MTpro, which seems to be free to download. They just offered the 5.6GB mtprosetup5000_x64.ZIP file to me when I clicked download, it didn’t ask me for anything, not even my Email address. (That shake-down probably comes later. Sorry, I don’t have time to test drive it at the moment.)
Warning: Using a particular manufacturer’s design software sometimes leads to proprietary components which results in manufacturer/vendor lock-in, if that bothers you.
Here are a couple of links for the MTpro example:
* Engineering Software MTpro
https://www.boschrexroth.com/en/xc/products/product-groups/assembly-technology/topics/engineering-software-mtpro/index
* How To Build Anything with Aluminum Extrusion (by Bosch Rexroth)
https://www.youtube.com/watch?v=gJIChIs4g6A
https://www.youtube.com/watch?v=gJIChIs4g6A
I work at item24, they are the founder of the aluminum extrusion profile. We therefore say your ideas are worth it. With our extensive package there are so many possibilities. See, for example, our engineering tool that anyone can draw for free.
https://item.engineering/DEde/tools/engineeringtool
I would be happy to help you if more information is required.
Here’s an idea: change your name. Searching online for parts named “item” is about as futile as googling for “A”.
this
@Jeffery, that online construction tool looks interesting, thanks. However, I suggest everyone should start here:
https://www.item24.de/en/homepage.html
Then select your language first (en/fr/de) in the upper-right corner.
I’d love to find a design software that isn’t locked to a specific vendor but still free.
Pick any CAD suite, import the models.
Yeah but that approach has a lot of holes. You would need to import a LOT of models for rails, joins fasteners etc. Then there needs to be a set of rules for what works with what. And then there’s the layer that build the BOM.
Why can’t anyone spell and pronunciate the word correctly ? A L U M I N I U M.
Did you mean “pronounce”? In American English, “aluminum” is an accepted way to spell and pronounce “aluminium”.
While you’re tilting at that windmill, go ahead and revise the rest of them: Molybdenium, Lanthanium, Tantalium, and Platinium. I’d love to see IUPAC’s response to your proposal.
What are best sources in France/Europe?
Motedis has good hardware, good prices, terrible customer support (borderline agressive, you’re insulting them if you contact them for any reason).
Motedis has changed a little bit and now they are even active on makers forums (in french).
Otherwise RS carries some, and since they ship free on week-end orders, it offset the high front price.
https://www.item24.de/en/homepage.html
item24 has companies in whole Europe, I’m sure they can help you. PLease contact me if I can help you.
I once tried to get anything from Item24.
In between broken links, missing specs, and this whole b2b vibe, I did not succeed.
Just went with Motedis instead.
I only recently became aware of aluminium extrusions (aka profiles) when someone posted an arcade stick build to Reddit. They used extrusions for the frame, and laser-cut acrylic for the top and bottom. It worked really well. The case for an arcade stick is kind of notoriously hard to make well, and good-quality cases are upwards of €90, so this was kind of an important new approach for the enthusiast community. I’m now kind of obsessed lol
In a former life we used Bosch extrusions to make frames to hang stuff on in an industrial environment. We used the 45×45 and 45×90 mm sizes. I never noticed any significant twisting or bending in them; they seemed straight and square as delivered. I thought of the 45×90 ones as aluminum 2x4s. We mostly used cast gussets to join them, attached with T bolts and nuts.
We are T SLOT big factories in shandong province , China
Anyone up for helping me figure out how to prototype an aluminum framed, triple-paned, magnetically levitated sliding door for a patio? And can we split the profits from the patent licensing and/or manufacturing? 🙂
First rule of patent club, you don’t pitch your idea in an open forum. Anyone who can “help” you with this can do it without you.
If anyone is looking for a tool to help them design their first 8020 project. Give this a try… https://www.craftyamigo.com/ saves you a ton of time in getting a compatible parts list. It’s also free / web based.