High Voltage Gives Metal Balls A Mind Of Their Own

Have you ever seen something that’s so fascinating you’re sure there has to be some kind of practical application for it, but you just can’t figure out what? That’s how we feel when watching tiny ball bearings assemble themselves into alien-like structures under the influence of high voltage in the latest Plasma Channel video from [Jay Bowles].

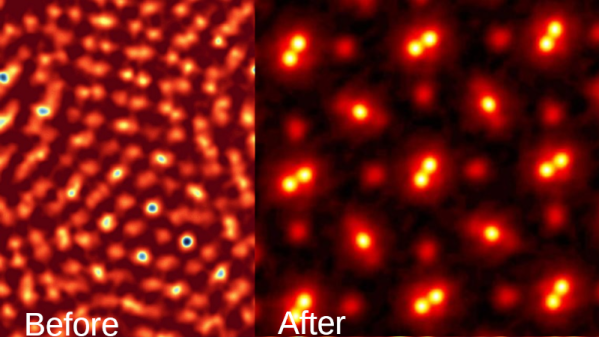
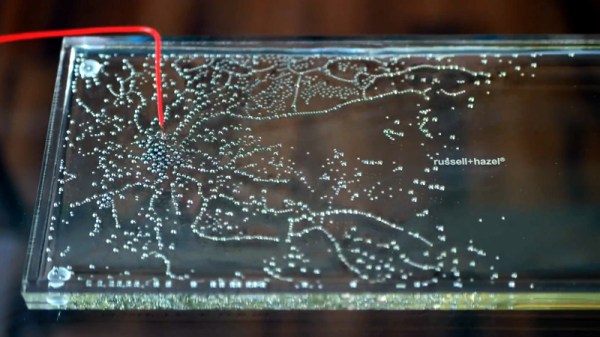
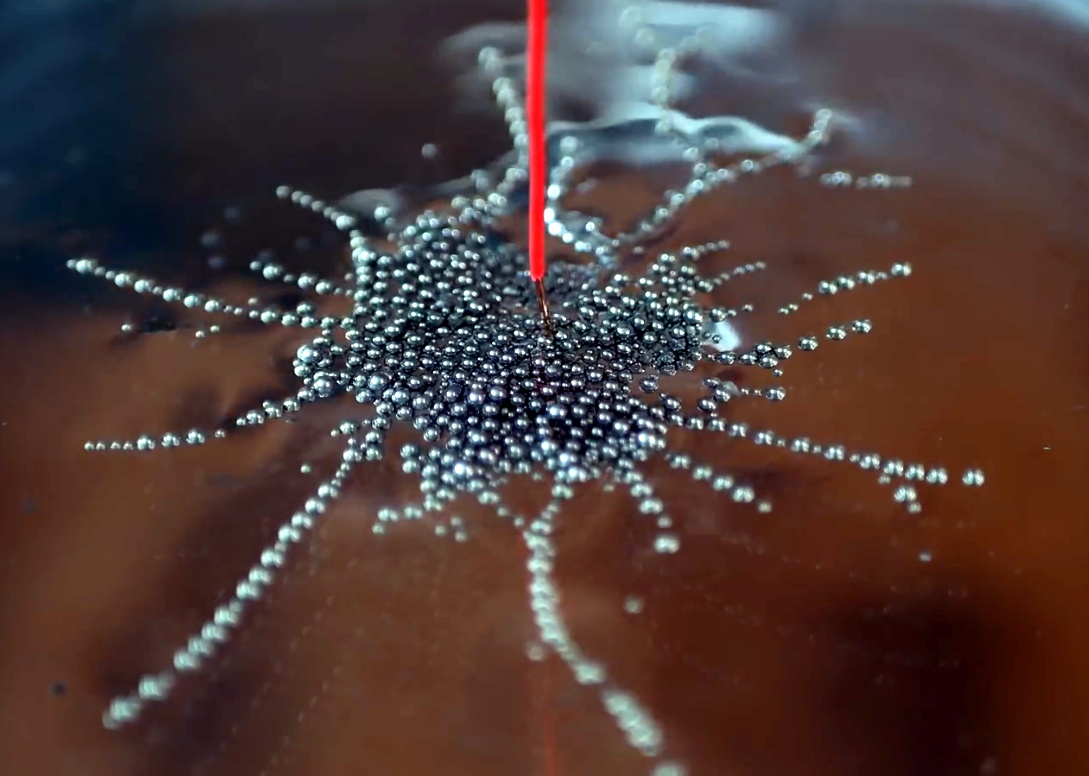
Now to be clear, [Jay] isn’t trying to take credit for the idea. He explains that researchers at Stanford University first documented the phenomenon back in 2015, and that his goal was to recreate their initial results as a baseline and go from there. The process is pretty simple: put small metal ball bearings into a tray of oil, apply high voltage, and watch them self-assemble into “wires” that branch out in search of the ground terminal like a plant’s roots looking for water. With the encouragement of his 500,000 volt Van de Graaff generator, the ball bearings leaped into action and created structures just like in the Stanford study.

With the basic pieces now in place, [Jay] starts to push the envelope. He experiments with various oils to see how their viscosity impacts the ball’s ability to assemble, finding that olive oil seems to be the ideal candidate (at least of those he’s tried so far). He also switches up the size and shape of the tray, to try and find how far the balls can realistically stretch out on their own.

In the end we’re no closer to finding a practical application for this wild effect than the good folks at Stanford were back in 2015, but at least we got to watch the little fellows do their thing in glorious 4K and with the exceptional production value we’ve come to expect from Plasma Channel. That said, [Jay] does hint at his ongoing efforts to turn the structures into works of art by “freezing” them with clear resin, so keep your eyes out for that.

Continue reading “High Voltage Gives Metal Balls A Mind Of Their Own”

Ptychography Shows Atoms At Amazing Resolution

Cornell University enhanced electron microscopy using a technique known as ptychography in 2018. At the time, it allowed an electron microscope to resolve things three times smaller than previously possible. But that wasn’t enough. The team has now doubled that resolution by improving on their previous work.

The team says that the images are so precise that the only blurring is due to the thermal motion of the atoms themselves. This could mean that you won’t see a further improvement in resolution in the future.

Continue reading “Ptychography Shows Atoms At Amazing Resolution”

Putting LEDs In Motorcyle Tail Light Shows How Trivial Becomes Tough

[Maarten Tromp]’s replacement of his motorcycle’s tail light with LED equivalents is a great example of something that every hacker learns sooner or later: interfacing to and working around existing parts can turn a trivial-seeming task into a much bigger job than expected. The more one has to work within the constraints of an existing system, the more opportunities there are for roadblocks and surprise issues to stall progress, and this project is a great example of that.

[Maarten]’s 1999 Honda ST1100 Pan European motorcycle had no aftermarket options for an LED rear light assembly, and he wasn’t too keen on just installing a generic module to replace the original. Instead, he resolved to purchase and disassemble a used factory assembly, and replace the incandescent lamps with some equivalent LEDs. Replacing bulbs with LEDs sounds easy, but doing the job right took [Maarten] almost two weeks in the end.

Problems started early with simple things like how to open up the light assembly itself. The unit isn’t user-serviceable and isn’t intended to be opened, and the parts are sealed shut with a waxy substance. Fortunately, heat does the trick. Another early hitch was the curved base of the light assembly, which made mounting flat perfboard or veroboard a challenge. In the end, [Maarten] settled on a triangular grid of high-brightness LEDs,  driven with LM317 regulators configured as constant-current supplies, mounted on some protoboard cut to fit the unique curve of the assembly. The result accepts the wide voltage range of the motorcycle’s battery (from 10.5 V to 14.5 V) and can still function even if some individual LEDs stop working.

The project has one more example of how working around existing hardware can be a pain. [Maarten] had originally intended to swap out the turn signal lamps for LEDs as well, but there is a glitch. The motorcycle’s turn signal relay will do a fast blink pattern if burnt-out turn signal lamps are detected. Since LEDs consume considerably less current than the original bulbs, the relay will remain stuck in the fault condition. There are a few different ways around this, but it’s a problem for another day. For now, the tail light LED replacement is a success.

Working around existing hardware frequently brings unexpected challenges, but when safety systems (such as lights on a vehicle) are involved, it’s extra-important to make sure things are done right.

3D Printed Joystick Using Spherical Flexure Joint

One of the many advancements brought about by 3D printing is the rapid development of compliant mechanisms and flexure joints. One such example is [jicerr]’s joystick, which uses a pair of spherical flexure joints recently developed by researchers from Delft University of Technology in the Netherlands, See the videos after the break.

Both flexure joint designs make use of tetrahedron-shaped elements, allowing an object to pivot around a fixed point in space like a ball-and-socket joint. One of the joints, named Tetra 2, is perfect for printing on a standard FDM printer, and the 3D files were uploaded to Thingiverse by [Jelle_Rommers], one of the researchers. [jicerr] took the design and created a base to mount an HMC5883 3-axis magnetometer a short distance from the focal point, which senses the rotation of a small magnet at the focal point. An Arduino takes the output from the magnetometer, does the necessary calculation, and interfaces to a PC as a joystick. Demonstrates this by using it to rotate and pan the design in Solidworks. One thing to keep in mind with this design is that it needs a fixed base to prevent it from moving around. It should also be possible to integrate the design directly into the housing of a controller.

Another amusing application is to turn it into a pen holder with a chicken head on the front, as demonstrated by [50Pro]. If you have any ideas for other applications, drop them in the comments.

Compliant mechanisms have a number of interesting applications, including harmonic drives, dial indicators and thrust vectoring mounts.

Continue reading “3D Printed Joystick Using Spherical Flexure Joint”

Robot Arm Adds Freedom To 3D Printer

3D printers are an excellent tool to have on hand, largely because they can print other tools and parts rapidly without needing to have them machined or custom-ordered. 3D printers have dropped in price as well, so it’s possible to have a fairly capable machine in your own home for only a few hundred dollars. With that being said, there are some limitations to their function but some of them can be mitigated by placing the printer head on a robot arm rather than on a traditional fixed frame.

The experimental 3D printer at the University of Nottingham adds a six-axis robotic arm to their printer head, which allows for a few interesting enhancements. Since the printer head can print in any direction, it allows material to be laid down in ways which enhance the strength of the material by ensuring the printed surface is always correctly positioned with respect to new material from the printer head. Compared to traditional 3D printers which can only print on a single plane, this method also allows for carbon fiber-reinforced prints since the printer head can follow non-planar paths.

Of course, the control of this printer is much more complicated than a traditional three-axis printer, but it is still within the realm of possibility with readily-available robotics and microcontrollers. And this is a hot topic right now: we’ve seen five-axis 3D printers, four-axis 3D printers, and even some clever slicer hacks that do much the same thing. Things are finally heating up in non-planar 3D printing!

Thanks to [Feinfinger] for the tip!

Continue reading “Robot Arm Adds Freedom To 3D Printer”

Getting Started With Aluminum Extrusions

T-slot extrusions used to be somewhat mysterious, but today they are quite common thanks to their use in many 3D printers. However, it is one thing to assemble a kit with some extrusions and another thing to design your own creations with the material. If you ever had a Play-Doh Fun Factory as a kid, then you know about extrusions. You push some material out through a die to make a shape. Of course, aluminum extrusions aren’t made from modeling clay, but usually 6105-T5 aluminum. Oddly, there doesn’t seem to be an official standard, but it is so common that there’s usually not much variation between different vendors.

We use extrusions to create frames for 3D printers, laser cutters, and CNC machines. But you can use it anywhere you need a sturdy and versatile frame. There seems to be a lot of people using them, for example, to build custom fixtures inside vans. If you need a custom workbench, a light fixture, or even a picture frame, you can build anything you like using extrusions. Continue reading “Getting Started With Aluminum Extrusions”

Custom Music Box Cylinder Puts A Spin On Romance

Music boxes are awesome little mechanical devices. These days, they even make some with slightly more modern tunes, like the Zelda and Star Wars themes.  But they don’t have everything, of course — certainly not that one song from that TV series that [RandomPrototypes]’ girlfriend absolutely adores.

But it’s 2021, and there are options for making your own music box. [RandomPrototypes] could have printed the whole thing, but those don’t sound as good with their plastic combs. Then there’s those paper punch ones, but you have to sit there and crank the thing continuously to hear the song. In the end, [RandomPrototypes] mixed methods and made a custom cylinder that’s playable with a standard music box mechanism.

[RandomPrototypes] started by taking the music box apart to measure the cylinder, and then created a software representation of a cylinder that’s designed to pluck the eighteen notes from low to high rather than play a song. Then he used a Python script to turn it in a 3D model. The slicing preview showed a lot of stops and starts and weak points, so [RandomPrototypes] generated the Gcode directly so that it would print in one continuous spiral and be much stronger.

In order to generate a cylinder with the song his girlfriend likes so much, [RandomPrototypes] printed this scale cylinder and used it to record the notes as a single mp3 and make note of the start times of each note. Finally, he built the new score based on the available notes built into the music box comb. If you want to do this yourself, the code is freely available. The hard part will be choosing a music box mechanism, because they tend to come with a single comb that’s designed to play a specific song. You’ll have to figure out which tune has most or all of the notes you need.

If you don’t mind doing the cranking to listen to the tune, then the paper-punched type of music box is going to be much easier. But why do all that punching yourself, when you could build a machine?

Continue reading “Custom Music Box Cylinder Puts A Spin On Romance”