Have you seen this yet? YouTuber [VK’s Channel] claims to have a permanent fix for Joy-Con drift — the tendency for Nintendo Switch controllers to behave as though they’re being moved around when they’re not even being touched. Like everyone else, [VK’s Channel] tried all the usual suspects: compressed air, isopropyl alcohol, contact cleaner, and even WD-40. But these are only temporary fixes, and the drift always comes back. None of the other fixes so far are permanent, either, like shimming the flat cable that connects the stick to the mobo, adding graphite to the worn pads inside, or trying to fix a possible bad antenna connection.
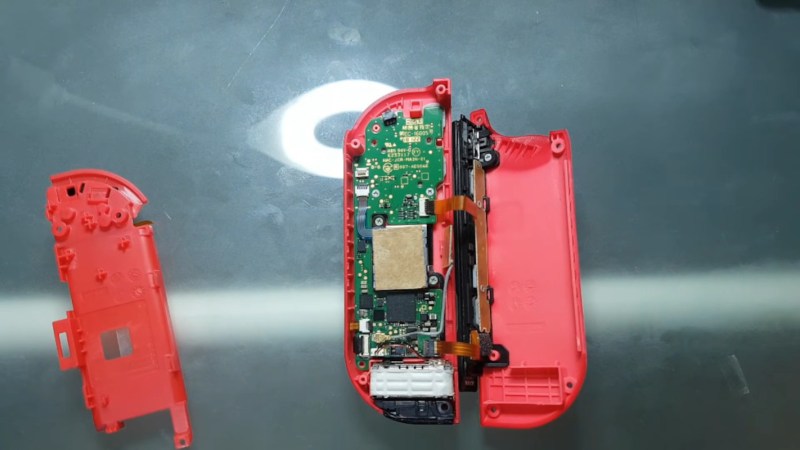
 While calibrating a drifting Joy-Con, [VK’s Channel] noticed that applying pressure near the Y and B buttons corrected the issue immediately, so they got the idea to add a 1mm thick piece of card stock inside. [VK’s Channel] believes the issue is that there is no fastener connecting the plastic part of the joystick to the metal part on the bottom. Over time, using the joystick causes the bottom to sag, which makes the metal contacts inside lose their grip on the graphite pads. It’s been two months now and there is absolutely no drift in either of the Joy-Cons that [VK’s Channel] has shored up this way.
Nintendo is now fixing Joy-Cons for free. The problem is that they are replacing irreparable ones outright, so you have to agree that you will settle for a plain old gray, red, or blue instead of your special edition Zelda controllers or whatever you send them. Hopefully, this really is a permanent fix, and that Nintendo gives [VK’s Channel] a job.
You could forego the joysticks altogether and swap them out for touchpads. Suffering from XBOX drift instead? We have just the thing.
Via Kotaku


Now, this is a hack, its great that he took his time to figure out why the fix works.
Be interesting to see how universal this fix proves, it is certainly a plausible cause, but I would have expected to get lots of drift myself by now if it is just this sagging bottom idea. I’m not exactly known for being gentle, and those joycons are so horrible to hold its even harder to treat them delicately.
Seems to me it might be the other way round you wear the contact patch down and the shim effectively adjusts the position of the contacts to make up for it, at least for a while.
If it is genuinely an issue of worn graphite pads then it adds some unfortunate merit to the “stop banging on your joycons so hard” argument
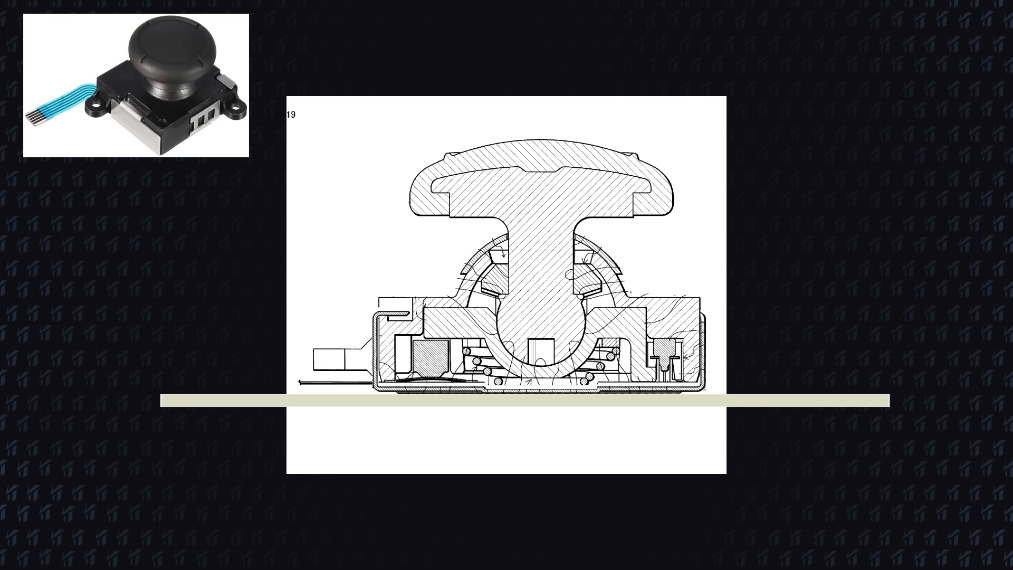
It really is just a temporary fix – the JoyCon analogue module uses an FPC and contact patches that wear down. Adding pressure to the rear of the module might temporarily abate drift, but the contacts will continue to wear down and eventually it will drift again.
I used Paul Allen’s card, the tasteful thickness, the watermark. Problem solved.
If you’ll excuse me, I have to return some videotapes.
Using the shim to transfer the force to the case is a good idea as you don’t want to also flex the thin main PCB. I would cut a piece of metal sheet to match the base of the joystick as a stiffener and fasten that to the 2 screw mounts. Metal is stiffer and less compressible than paper, so it can helps to spread out the force more evenly onto plastic case.
The designers of the joystick probably assumed that the device is supposed to be mounted with the back side onto something stiff and didn’t communicated it well into the datasheet or mechanical drawings for their customers.
BTW I ran into a solder joint issue for those rotary encoder module. There was a small gap between the part and the PCB. The solder joints become the only mechanical support and eventually gave up under flexing. Mounting it flush transfer the force to the PCB. The surprising thing is the Chinese encoder is reliable enough for a few years of daily regular use.
I guess I know what my son and I will be attempting to do this afternoon. Wish us luck!
we want a writeup on the results to validate the fix :)
WD40? Ugh. The stuff has a nasty habit of doing the exact opposite of what most think is its job. Now if you need something that slowly polymerizes over time into a tacky yellow film, it’s a winner.
I bought replacement sticks off ebay for my 4 drifting joycons. $20 total shipped and about a half hour of assembly time. Going on 1.5 years now and no more drift.
Reminds me old the old Apple iBook g3 that had the issue with its graphic chip. Would get microscopic cracks in the solder joints. Using a penny put pressure onto the chip when you reinstated the bottom casing. Too bad I already ordered new joycons for my daughter, guess I can try this hack now on her old joycons.
It’s not a permanent fix – it is a temporary solution to existing drift as the contacts will still continue to wear down.
Depends if its wear like you suggest, or bend casing like the YT creator showed.
If it is just a matter of the casing bending then adding a rear stiffener may just end up increasing the contact pressure, thus accelerating wear. We need empirical data of joycon failure rates after this fix is applied and if possible autopsies of the failed joysticks to see if there is accelerated wear compared to say joysticks that have failed but the fix wasn’t applied. A single test sample from a youtube video with unknown post fix runtime till failure doesn’t prove anything.