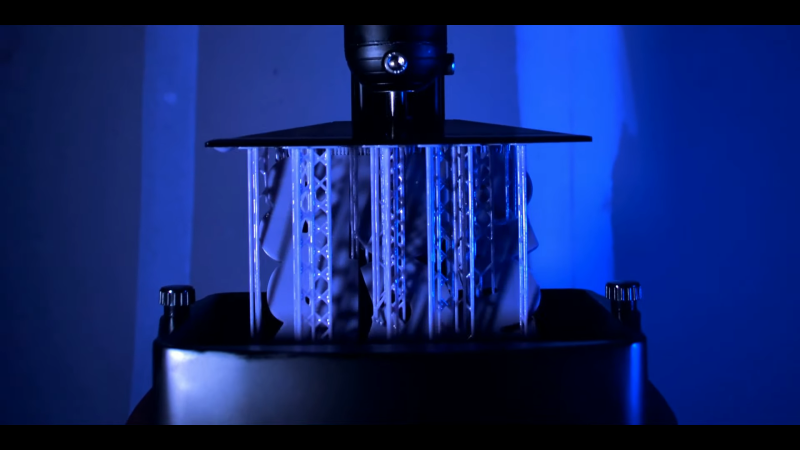
The fascination of watching a 3D printer go through its paces does tend to wear off after you spent a few hours doing it, in which case those cool time-lapse videos come in handy. Trouble is they tend to look choppy and unpleasant unless the exposures are synchronized to the motion of the gantry. That’s easy enough to do on FDM printers, but resin printers are another thing altogether.
Or are they? [Alex] found a way to make gorgeous time-lapse videos of resin printers that have to be seen to be believed. The advantage of his method is that it’ll work with any camera and requires no hardware other than a little LED throwie attached to the build platform of the printer. The LED acts as a fiducial that OpenCV can easily find in each frame, one that indicates the Z-axis position of the stage when the photo was taken. A Python program then sorts the frames, so it looks like the resin print is being pulled out of the vat in one smooth pull.
To smooth things out further, [Alex] also used frame interpolation to fill in the gaps where the build platform appears to jump between frames using real-time intermediate flow estimation, or RIFE. The details of that technique alone were worth the price of admission, and the results are spectacular. Alex kindly provides his code if you want to give this a whack; it’s almost worth buying a resin printer just to try.
Is there a resin printer in your future? If so, you might want to look over [Donald Papp]’s guide to the pros and cons of SLA compared to FDM printers.


Nice solution, but I’m having trouble understanding why taking timelapses is difficult on resin printers.
Why does the build platform have to move back and forth during printing? Is this needed to fully peel the newly exposed layer from the vat?
Also, for a filament printer, all the motions are encoded in gcode, and some timelapse tools add special commands in gcode to trigger a camera at the right point. Is this more difficult with resin printers?
What I understand of resin printers, they print at the bottom of the tank, and then lift the part to flush fresh resin into the gap.
Also, moving farther, and then gently moving to the proper layer height may make Z-resolution more constant.
I could not watch the video. I’m allergic to fake emotions such as forced happiness, especially at those volume levels so I stopped after 3seconds or so.
SLA printers don’t use gcode; they instead take as input a stack of images that are displayed in sequence on the LCD in order to mask the UV light for each layer. The platform motion between layers is preprogrammed, so there’s no straightforward way to manipulate it.
While initially a big obstacle, there are now tools that allow you interact with .photon files as easily as gcode: https://github.com/fookatchu/pyphotonfile
Can’t speak for other SLA printer file formats.
They move to peel the section just completed from the FEP film, lift to a certain height/duration to allow new resin to flow in the gap that was created, then move back down to expose the next layer.
MSLA printers don’t use gcode. Instead, they use a bundle of images which are the “masks”, where dark pixels create the masks and unlit pixels let UV light through to cure whatever is in the layer. As such, an external trigger is required. I guess an optical trigger (LED throwie) makes the most sense,
Hope this helps.
There actually is usually Gcode in the resin file formats. I believe most of the file formats used are some form of archive with a stack of images, gcode and a preview image. The gcode is how you can set your print speeds and exposure times from the slicer.
The problem however is that most of these printers use closed source hardware/firmware (mostly a chitu systems board) that gives you no way to make a call to a gpio pin on the board for something like that.
I dunno, maybe a smart camera trigger would make for a much simpler approach. Using a microcontroller like Arduino or teensy and a distance sensor, you could measure the height of the platen (? or what ever it’s called) and issue a camera trigger for each new height. Then you a) don’t have to rearrange the photos, b) remove duplicate ones and c) do interpolation. Your photo stream is ready to join into a time-lapse video.
The smart trigger you are describing would be similar to the ResinLapse add-on mentioned at the beginning of the video. With this approach, I was looking to create a more general purpose method that would work without any hardware mods to either the printer or my intervalometer. My thinking here was that 1.) it would make it easier for anyone with a non-Canon camera and MSLA 3D printer to make timelapses even if they didn’t have any hardware modding experience, 2.) it would be more general purpose since it wouldn’t require modification of a specific intervalometer model, and 3.) it wouldn’t require me to sacrifice my intervalometer since I also use it for landscape timelapses. That being said, I definitely agree that this comes with trade-offs, namely in needing a fiducial and post-processing analysis. There are definitely multiple ways to tackle this problem and get a similar end result!
I don’t understand. a) why can you not tell when each picture was taken, since they were taken in a sequence at regular intervals and are automatically numbered by the camera, and b) why can’t you just detect when a photo is at a local minimum or maximum of the z motion of the red ball? It seems like the method used can choose pictures that were taken during either upward or downward motion of the z carriage, which doesn’t seem like a good way to do this, especially since it will be shuffling the images. It seems like this can only work at all because the bottom of the work part is hidden by the tank. Since the carriage goes through exactly the same motion for each layer, it really shouldn’t be a problem to choose the pictures such that they are all taken at the same point in the carriage’s motion cycle. There shouldn’t be any image processing necessary. Seems like a $5 solution to a $0.05 problem.
The intervalometer runs open-loop and is completely independent of the printer, so it’s not possible to analyze the camera stream and take a photo when the build platform is at a minimum/maximum. Definitely a cool idea though — I could see an implementation like this working with OpenCV analyzing an OBS stream coming in via a capture card or something similar.
That’s looong path, because he doesn’t know basic electronic. On beginning he shows UV transistor remote trigger for other cameras, has a remote trigger for his camera but he doesn’t know how to combine those 2.
Interesting approach nonetheless :)
(ps: is there any cheap resin printer that could operate outside on balcony in winter? )
My main motivation here was to create a process that would work without any printer or camera hardware mods. The approach you are describing is similar to the ResinLapse add-on shown at the beginning, except the photoresistor would interface with the intervalometer instead of with the camera directly. Definitely a cool idea, though a bit less generalizable, since how the intervalometer would need to be modified would depend on the make and model of the intervalometer itself.
(As for a “winter compatible” printer, I’m not really sure. You could try building a heated enclosure for it — it would be interesting to test at what temperature ranges UV resin still works as intended!)
I use a sauna insulation box with a 60W incandescent light bulb for filament printing ABS at 65’C air temperature.
You will likely need a thermostat control as Acrylic resin printers kind of have a sweet spot at around 24’C, and are an exothermic chemistry while printing (usually cooling is more important).
The longed3d Orange printers offer incredible value for the price, and the consumable FEP Films last over a year. Also, you will need two sealed alcohol wash buckets, and a 395nm to 405nm UV curing chamber.
Cheers,
J
Machine setup:
1. always use a fresh set of nitrile gloves when handling the machine (I use an old cookie sheet with paper as a liner to work on)
2. when you first get your printer, loosen the 4 screws on the plate/holder (head will crash if this is not done)
3. install your plate/holder, and empty membrane tray on the Longer Orange
4. open the Gear setting icon, and the manual bed move motion icon
5. press the home z-axis button (bottom middle), and ok warning
6. when build plate homes z-axis, you will see it resting on the membrane
7. lightly push down on each side of plate, and tighten head/plate screws (should sit flat on membrane surface)
8. press the home z-axis button again to check head does not crash
9. fill resin tray 80% full by pouring on to the build plate backing
10. press the home z-axis button again to burp air bubbles off build area a few times
11. press back arrows, select file in root of micro-sdcard
12. press play, and ok
Post print:
1. design your part with an edge so you can leverage it off the build plate (it sticks really well)
2. use roll of tissue paper to absorb uncured surface films prior to solvent bath (important for size accuracy)
3. wash in 99% Isopropyl alcohol to remove uncured resin in smaller areas (I use an all glass canning jar with the snap-top style rubber seal, and shake it…)
4. wash in 50% Isopropyl alcohol/water to remove uncured resin blobs
5. expose each part’s side in a UV lamp chamber to cure remaining resin for 10min (I used the old UV eraser chamber for eproms I had around for a long time, but UVC tends to damage the resin a bit.)
6. let cure for 24 hours to reach full hardness
7. wash with soap and water to remove chemical residues
Machine Clean up:
1. unbolt build tray (clean off any spills on surface immediately as uncured resin dissolves some plastics)
2. empty contents back into container using a funnel
3. scrape slime off platform into container with paper card
4.clean up by wiping things down with tissue/TP paper (dispose in plastic bag, or tub in sun)
5. DO NOT EVER EXPOSE MEMBRANE TO WATER like others suggest (it can cause the plastic to bubble) use 99% alcohol on tissue to mop any residue
6. leave printer disassembled to dry solvents (the tray and plate sit propped up at 45 deg next to mine)
No resin I know of works particularly well at low temps. They tend to become thick set slower and tend to “blob” as they set. Usually you want to keep a resin printer somewhere around 20C.
Why not use this same interpolation to create higher resolution SLA prints (i.e., create/add missing “slices” inbetween two slices)
You can already make almost arbitrarily fine slices with resin printing, this is a parameter than can be defined in the print software. However additional slices directly cause longer print time, and finer slice resolution gives diminishing accuracy returns.
I wonder how well the commonly available “hyperlapse” algorithms would work for this. Typically they take a bunch of images, and choose a subset of them that has the most consistent rate of movement between the frames.
I love all the armchair engineers telling you that you could have done it a different way. Yeah, there’s probably 50 different ways you could do this. But you did it a really cool way. And I bet you learned a lot the way you did it.
Isn’t that the point of doing little things like this? You solve a task in a creative way, you learn something and then sometime later you’re going to try to do something else and what you learned from this is going to help you immensely.
I am also working on a similar project to this and a lot of the things you talked about were extremely useful to me and I’m going to try to implement them for my own unique application.
Thank you very much for doing this. Even though what I am doing has nothing to do with 3D printing, your idea of using the LED with the clear pla, was really really helpful and I think I’m going to be able to use something similar to solve a problem that I’ve been having for several months.
Thank you.
All this methods are a bit overcomplicated, a guy posted this on facebook group
https://www.youtube.com/watch?v=0PaLNhvgnYw
It’s a clever solution and require only the tune of the light-off delay.