Clear acrylic panels have long been a mainstay of 3D printer enclosure designs, but they can also add significant cost in terms of money, shipping, weight, and hassle. An alternative material worth looking at is corrugated plastic (also known by its trade name coroplast) which is cheap, light, an excellent insulator, and easy to work with. Many enclosure designs can be refitted to use it instead of acrylic, so let’s take a closer look at what it has to offer.
What’s Wrong With Acrylic?
It’s not just the purchase price that makes acrylic a spendy option. Acrylic is fairly heavy, and shipping pieces the size of enclosure panels can be expensive. Also, cutting acrylic without special tools can be a challenge because it cracks easily if mishandled. Acrylic cuts beautifully in a laser cutter, but most laser cutters accessible to a hobbyist are not big enough to make enclosure-sized panels. If you are stuck with needing to cut acrylic by hand, here are some tips on how to get by with the tools you have.
It is best to source acrylic from a local shop that can also cut it to size with the right tools for a reasonable price, but it is still far from being a cheap material. There’s another option: corrugated plastic has quite a few properties that make it worth considering, especially for a hobbyist.
What’s Good About Corrugated Plastic?
Most of us know corrugated plastic as the stuff lawn signs are made of. Using it in enclosure design isn’t a new idea (here’s a printer enclosure made entirely from it, and here is a CNC mill enclosure using it as well) but instead of making an entire enclosure out of it, it can make more sense to use it only as a panel material. There is no need to design a new enclosure from scratch. One can use an existing design and swap the acrylic panels for corrugated plastic ones.
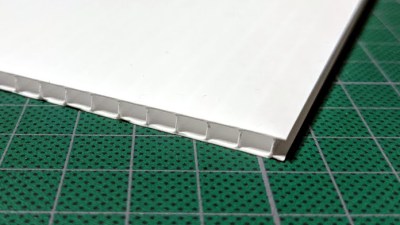
Corrugated plastic offers quite a few advantages:
- It is a fraction of the cost of acrylic.
- It is an excellent insulator.
- It is lightweight.
- Easily cuts with a sharp blade.
- Available in fire retardant versions if needed.
- Can be bent or folded along the corrugation, with or without scoring it first.
It can be easier to source than acrylic sheets, and is certainly much easier to work with. Any sign shop or plastics supplier likely has it on hand in a variety of colors.
There are a few disadvantages, however.
- A standard thickness is 4 mm. Acrylic, however, is commonly used in 3 mm (or 1/8″) thickness.
- It is not transparent (but windows can be cut easily.)
- It is not fireproof. Like acrylic, it can burn if it gets hot enough. But compared to other plastics, combustion doesn’t spew a toxic mess, and is easily extinguished.
Corrugated plastic material being 4 mm thick instead of 3 mm means it is not necessarily a drop-in replacement for acrylic in existing designs. But not every enclosure is constrained by panel thickness.
Using Corrugated Plastic in Enclosures
The two easiest ways to use this material are: create an enclosure by adding panels to an existing structure, or use an existing design but replace the acrylic with corrugated plastic. Below are examples of both.
Make an Enclosure From an Existing Structure
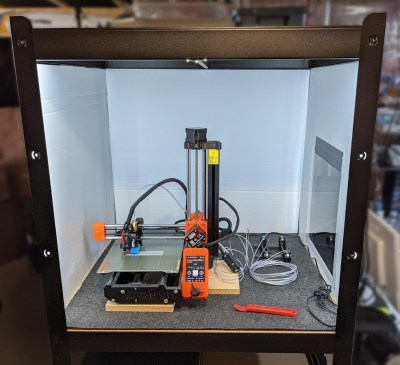
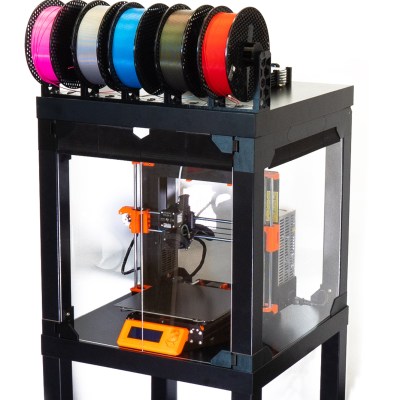
Here is an enclosure I built into a metal IKEA BROR shelving unit, and it easily houses a Prusa Mini 3D printer. The BROR is made from angled metal pieces that contain regularly spaced holes. This makes it very convenient to turn a shelf section into an enclosure just by mounting a few side panels; the regular shelf surfaces provide a top and bottom.
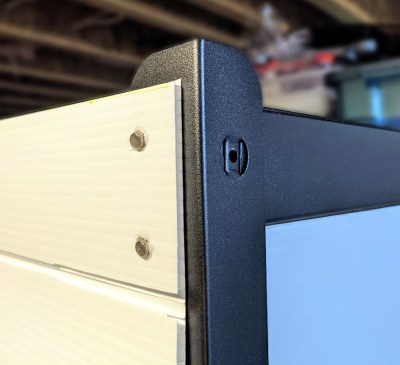
Not only do corrugated plastic panels fit easily behind the angled metal posts, but a few short screws through the convenient holes is all it takes to fully secure them. Windows can be made by cutting a hole, and gluing or taping a clear plastic sheet to one or both sides. CA glue and most other adhesives work fine on corrugated plastic.
The only inconvenience I encountered was when it came to fashioning a door for the front. Instead of making cabinet-style doors with hinges, I took advantage of the lightweight nature of the material to create a simple removable cover. The shelf frame is steel, so I glued several strong magnets into a separate sheet to create a magnetically-attached removable front cover. I can close the front up completely, or leave a gap for airflow as needed. The result is simple, attractive, and cost very little apart from the shelf itself.
Replace the Acrylic in an Existing Enclosure Design
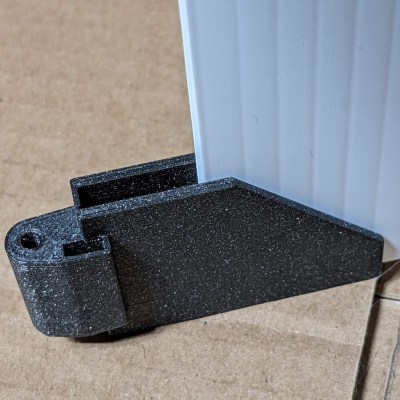
The only problem with refitting an existing enclosure designed for 3 mm acrylic sheets is that 4 mm corrugated plastic may not fit because they are slightly thicker. While it’s always possible to simply cut and peel away material until it fits, for best results, panel-retaining parts should be redesigned to accommodate the thicker material.
For example, I like the Prusa V2 LACK enclosure design and its 3D-printed parts, but the next time I build one I will use corrugated plastic panels instead of acrylic. In preparation for this, I have redesigned the necessary parts to accept 4 mm thick material.
Fortunately, Prusa provides not only STL files for their design, but also the CAD files. While it is possible to modify parts that exist only as STL files, in general having access to CAD format files makes this kind of task much easier.
An Under-Represented Material
For 3D printers, enclosure design is still a problem that isn’t entirely solved. “Soft” enclosure options like photo tents or fabric grow boxes meant for plants are an option for the cost-conscious, but there are also ways to reduce the cost of more traditional designs. Corrugated plastic offers a lot of advantages in that regard.
The idea of using corrugated plastic in enclosures isn’t new, but it does seem under-represented. Do you know of enclosures that make effective or particularly clever use of it, or do you have any tips of your own? We definitely want to hear about it, so share your thoughts in the comments.



Glass can be pretty cost-effective material also. Many local shops will even cut it to size and chamfer the edges if needed. When combined with steel shelving, it should provide some extra chances of stopping a fire if one ever starts.
Yes. Glass would be my preference. I don’t know about corrugated plastic but glass is much cheaper than acrylic and less likely to start a fire.
Even easier to source: pink rigid foam insulation. But usually more like 12mm thick at minimum.
Pink foam is polystyrene which melts, burns, and produces toxic fumes. A better option is to use PIR foam which doesn’t melt, doesn’t burn, and doesn’t produce toxic fumes. Get it at the same place you get polystyrene foam for about the same price or maybe a little higher.
Dind’t know PIR foam, but a quick google search convince me not to use it
“The study evaluated the degree to which toxic products were released, looking at toxicity, time-release profiles, and lethality of doses released, in a range of flaming, non-flaming, and poorly ventilated fires, and concluded that PIR generally released a considerably higher level of toxic products than the other insulating materials studied (PIR > PUR > EPS > PHF; glass and stone wools also studied)”
Corrugated plastic aren’t as durable than acrylic: after 2/3 years, simply dissolves in a mess of pieces…
Could be, but there is an “exterior” version of coroplast meant for roofs. I belive it’s like 10mm thick tho.
Most are transparent, but maybe the increased price would make it not ideal if you compared it to acrylic or glass
Acrylic is what all those junky 3D printer kits frames were made of about 6-8 years ago. The stuff is awful- it cracks under screw pressure. If you want clear plastic, PC is a much better choice.
Took me far too many years to realize this. PC. So good.
Something to be aware of, is that PC also cracks. The trick is that you dont want to leave cut edges, as cracks can run through the plastic. The best way to create small screw holes is to melt them with a soldering iron. You could also make cuts and dress up the edges with a soldering iron or lighter. Probably not valuable knowledge for a 3d printer, but for drone canopies it is vital.
That’s why they have elections every four years.
Came here to say this, leaving satisfied.
Also excellent for prototyping especially when combined with hot glue: https://www.youtube.com/watch?v=2U-Se6spYbo
If you are actually trying to create strong/ structural bonds coroplast can be difficult to use with hot glue as at least name brand coroplast is PP which doesn’t play with a lot of adhesives. I’ve had to fabricate a bunch of structures and packaging using coroplast and needed an industrial hot glue gun and specific 3m glue sticks to bond the stuff together. But for light gluing and in general coroplast can be a nice material to work with.
Also worth considering is sintra and dibond which can be cheap to find due to their ubiquitous use in the signmaking industry. Sintra is basically thick PVC foam often used for signs – it cuts easy with an exacto knife, can be cnc milled and has good rigidity and very light weight. Does not play with fire/laser though as PVC releases chlorine gas when burned. Dibond is a PE sheet with an thin aluminum face on one or both sides – it can be cut and scored with a lot of regular tools, is fire + UV resistant and has some cool structural/aesthetic properties when cut part-way through.
I’ve been looking for a nice looking enclosure that is cost effective and ready to use. As I’m finding out, bread boxes come in a wide range of styles and seem like a great choice. They are typically made out of bamboo, wood, stainless or steel. You can mount to the back surface or the front door. Some have screwed together panels so that allows additional access during construction. This idea came from the recent article about building a computer with 7400 chip. That builder used a bread box for his enclosure.
There is a special UV resistan Corroplast for greenhouses, both a thick one to replace the glass and a thinner one to mount inside the glass. it survives for years in the most hostile enviroment there is.
The thinner 3-4mm stuff is used to diffuse light and insulate a bit on the sunny side of the greenhouse.
I used it to build RC planes
twin walled polycarbonate! I was looking at that as an alternative this time last year as I had a couple of spare sheets in the greenhouse, but its tough to get a really clean cut on it (but easy to trim in a pinch nonetheless with a stanley blade or jigsaw). Instead I ended up using loads of acetate that I had spare from the covid face screens I was making. Bit of scotch tape and the acetate trimmed to size and bobs your uncle!
I used twin wall PC in my printers walls and bottom. Great stuff, 8mm thick so it fits right into the t-slot (but doesn’t add to frame rigidity). It also provides some nice optical effects with the LED light strips built into my printer.
Hey dude. I made my enclosure with thick plastic film. Corrugated plastic is a really good idea too. Unfortunately it is not transparent but it is a good idea.
Check mine here. The door is just a piece of plastic that I fold up. The edges in the bottom have 2 magnets and they are attracted by the screws I have in the frame in the bottom.
https://photos.app.goo.gl/oXA6E7381UpojqLc7
My foldable kayak is made from one corrugated sheet. Very sturdy, as long as you don’t crash into big rocks. I’ve had it down a class 2 river, and on several lakes.
I would be very interested in seeing your boat as I plan to make a skin-on-frame canoe. I knew corrugated plastic is tough but had not considered using it in boat building. Partly due to being hollow and only wanting to bend in one direction.
A cheap source of this would be any election season..
Hi, I read a few election/politic jokes here. Do you want to explain the reference for non native speakers?
I think I miss a connection to understand it.
During elections people place signs all over their yards and wherever they are allowed to. Majority of them are either a sheet plastic or corrugated plastic sign board. Sizes are pretty nice too, very close to the correct size right off the yard. These signs are generally left in place until someone feels like picking them up and throwing them away, as a result they get all over the place on a windy day.
Not in the People’s Republic of Minnesota. No campaign signs can go up prior to 30 days before the election and must be down within 10 days post election. Penalties are severe enough to get candidates’ attention. Pro tip: Volunteer for sign pickup.
Another nice thing is that the thickness of a sheet of coroplast fits in the T-slot of standard 1-inch aluminium extrusion. Makes it easy to build a frame out of 80/20 and then just slide in sheets of coroplast.
In my lab we use this trick all the time (with black coroplast) to make light-tight enclosures for sensitive optical measurements. Custom enclosures that can have complex shapes to go around equipment, in a few minutes. And cheap!
Oh a better link to the CDL Makerspace web site:
https://compdecon.github.io/
I have yet to work with the webmaster on the compdecon.org site (too blah).
I played a bit with acrylic recently and agree that it wouldn’t be my choice for an enclosure. I disagree with the author, however, when it comes to the tools used to work it. I was able to cut my sheet to the sizes I needed using nothing but a couple scrap pieces of plywood, some clamps, painters tape, a utility knife, and some sandpaper. Just took my time and made clean cuts. Didn’t have any cracking. As for cost, I got lucky. My local TAP Plastics gave me a sheet from their scrap pile.
Lowes sells a scoring tool for acrylic. Basically run a deep line several times then fold at the mark.
I’m with one of the – glass is surprisingly cheap if you go to a upstream seller – they will cut it to the exact size and either do/not do the edges for you. What’s more you can get the thickness you want.
In addition, if you ask what they are using in current jobs, and you want small pieces that can be made from the offcuts, it’s even cheaper.
I got a whole lot of 10mm laminated toughed glass for a project a few years ago – they were doing a security application and has pieces left over from their big sheets. Unbreakable and great for stopping sound!
But normally I use 6mm laminated.
I use aluminium composite sheets and it works great. Goes by different trade names like alucobond, for ex.
Definitely not fireproof, but:
1. Frame made of PVC pipe and fittings of the smallest size that will provide adequate rigidity when all sides and top are removed.
2. Sides and top made of dollar store foam board (paper on both sides with foam in the middle).
3. Foam board on all sides and top held in place with magnets.
4. Some cheap hardware item made of steel to create attachment points on the PVC pipe for the foam board magnets
5. Cutouts in the foam board on one of more sides of the enclosure for thin, sheet plastic windows
Many 3D printable PCV pipe fittings are available on Thingiverse. Scale for different pipe sizes. Example:
https://www.thingiverse.com/thing:3619604
I built an enclosure from foam core poster board I had lying around, works great. Low tech, but an old towel is the front cover for accessing the front. I have a camera and don’t need transparent sides, at least all of them don’t need to be transparent… built another enclosure with 1/8″ luan panel and a single sliding PC panel in front. Absolutely no reason to make all 4 sides transparent.
There are several YouTube videos on this. I considered making my own, but being in an apartment, didn’t have the floor space. I bought the Inlet kayak from Oru. It’s not inexpensive, but it is well made. Even if you make your own, it’s worth seeing how Oru did things.
Another option, especially if you are interested in fire safety, is to use drywall (wall-board, plaster board) as your paneling. The different thicknesses actually have fire ratings, and techniques for building things with it are widespread: joint compound and tape for seams, etc. First heard of using it in non-building applications in the context of increasing the fire rating of your fire safe by adding a layer, but for that same reason it would also suit printers. That said my printer is old and abs-centric enough it actually has too much enclosure for many of my prints, so….
I have never seen a Lack table from Ikea being used as an actual coffee table. I guess they are too useful for other things.