BBC Micro:bit Reads Morse Code With MakeCode

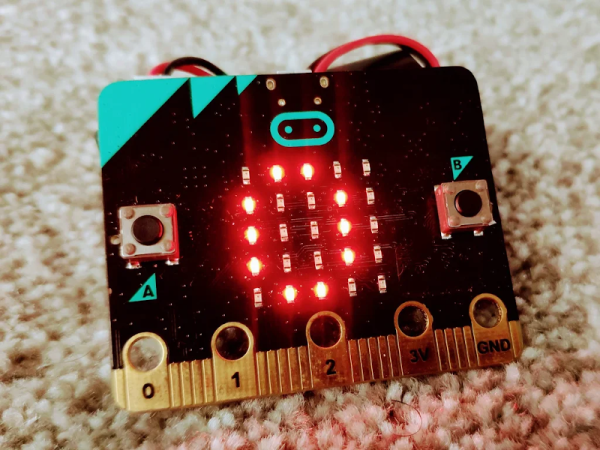
We always have mixed feelings about the drag-and-drop programming languages. But we were impressed with [SirDan’s] Morse code decoder built with the graphical MakeCode. Granted, it is reading 5 element groups from a button on the BBC micro:bit and not worrying about details such as intercharacter or interelement spacing or word spacing. But it is still a nice demo for MakeCode.

Interestingly, the online editor for MakeCode can apparently simulate well enough to test the program. However, [SirDan] only provides the hex file so we couldn’t try it out. There is a screenshot of the visual code, but you’d have to work out the part that didn’t fit on the screenshot (the data arrays are pretty long).

Continue reading “BBC Micro:bit Reads Morse Code With MakeCode”

3D-printed wall builder, circa 1930s

Retrotechtacular: 3D-Printed Buildings, 1930s Style

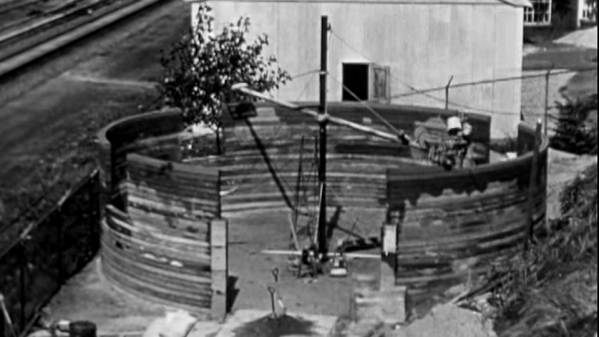
Here we are in the future, thinking we’re so fancy and cutting edge with mega-scale 3D printers that can extrude complete, ready-to-occupy buildings, only to find out that some clever inventor came up with essentially the same idea back in the 1930s.

The inventor in question, one [William E. Urschel] of Valparaiso, Indiana, really seemed to be onto something with his “Machine for Building Walls,” as his 1941 patent describes the idea. The first video below gives a good overview of the contraption, which consists of an “extruder” mounted on the end of a counterweighted boom, the length of which determines the radius of the circular structure produced. The boom swivels on a central mast, and is cranked up manually for each course extruded. The business end has a small hopper for what appears to be an exceptionally dry concrete or mortar mix. The hopper has a bunch of cam-driven spades that drive down into the material to push it out of the hopper; the mix is constrained between two rotating disks that trowel the sides smooth and drive the extruder forward.

The device has a ravenous appetite for material, as witnessed by the hustle the workers show keeping the machine fed. Window and door openings are handled with a little manual work, and the openings are topped with lintels to support the concrete. Clever tools are used to cut pockets for roof rafters, and the finished structure, complete with faux crenellations and a coat of stucco, looks pretty decent.

Continue reading “Retrotechtacular: 3D-Printed Buildings, 1930s Style”

an up-close of the PCB hotplate

Using A PCB To Reflow PCBs – Take 2!

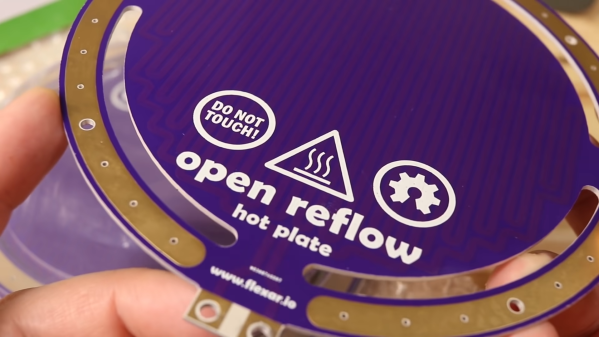
It’s not too hard to make your electronics project get warm. Design your traces too small, accidentally short the battery inputs together, maybe reverse the voltage going to your MCU. We’ve all cooked a part or two over the years. But what about making a PCB that gets hot on purpose? That’s exactly what [Carl Bugeja] did in his second revision of a PCB hot plate, designed to reflow other PCBs.

[Carl’s] first attempt at making a hot plate yielded lukewarm results. The board, which was a single snaking trace on the top of an aluminum substrate, did heat up as it was supposed to. However, the thin substrate led to the hot plate massively warping as it heated up, reducing the contact against the boards being soldered. On top of that, the resistance was much greater than expected, resulting in much lower heat output.

The new revision of the board is on a thicker substrate with much thicker traces, reducing the resistance from 36 ohms on the previous design to just 1 ohm. The thicker substrate, paired with a newer design with fewer slots, made for a much sturdier surface that did not bend as it was heated.

Continue reading “Using A PCB To Reflow PCBs – Take 2!”

Dave went from a passive decoy to a high-speed boating machine.

Dave The Drive-able Duck Does Donuts

[Hey Jude] is tired of the machismo dripping from most modern electronic toys, especially stuff like monster trucks and police/military sets. He grew up on weird stuff, not aggression, and wanted to share the experience of kit-bashing a new toy together alongside his son.

This is essentially an R/C boat stuffed into a decoy duck, but there’s more to it than that. After removing the ballast that made him stay upright, [Hey Jude] performed plastic surgery on both sides of Dave the duck, creating a boat-shaped hole in the bottom, and a hinged bonnet out of the top which serves as an access panel for the boat’s innards. Everything is sealed up with Sugru, though you could probably use caulk or even hot glue (if you wanted something more temporary and less expensive).

The smartest bit has to be the loop on Dave’s back — this makes it easy to lower him into a pond from a footbridge, or rescue him if he stalls in the middle of the water. Check out the footage of Dave’s maiden voyage after the break.

Remote control of things will never get old. Do you have an old Nintendo Zapper lying around? Why not make it do your home automation bidding?

Continue reading “Dave The Drive-able Duck Does Donuts”

Lots of parts printed at once with a resin printer

Making The Most Of Your Resin Printer Investment

To the extent that we think of 3D printers as production machines, we tend to imagine huge banks of FDM machines slowly but surely cranking out parts. These printer farms are a sensible way to turn a slow process into a high-volume operation, but it turns out there’s a way to do the same thing with only one printer — as long as you think small.

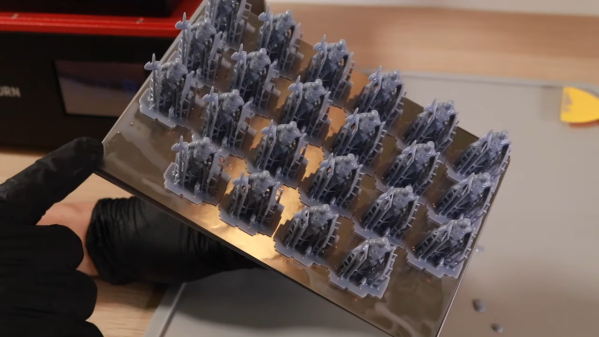
This one comes to us by way of [Andrew Sink], who recently showed us a neat trick for adding a dash of color to resin printed parts. As with that tip, this one centers around his Elegoo resin printer, which is capable of intricately detailed prints but like any additive process, takes quite a bit of time to finish a print. Luckily, though, the printer uses the MSLA, or masked stereolithography, process, which exposes the entire resin tank to ultraviolet light in one exposure. That means that, unlike FDM printers, it takes no more time to print a dozen models than it does to print one. The upshot of this is that however many models can fit on the MSLA print platform can be printed in the same amount of time it takes to print the part with the most layers. In [Andrew]’s case, 22 identical figurine models were printed in the same three hours it took to print just one copy.

It seems obvious, but sometimes the simplest tips are the best. And the next step is obvious, especially as MSLA printer prices fall: a resin printer farm, with each printer working on dozens of small parts at a time. Such a setup might rival injection molding in terms of throughput, and would likely be far cheaper as far as tooling goes. Continue reading “Making The Most Of Your Resin Printer Investment”

Decoding SMD Part Markings

You’ve probably encountered this before — you have a circuit board that is poorly documented, and want to know the part number of a tiny SMD chip. Retro computer enthusiast [JohnK] recently tweeted about one such database that he recently found, entitled The Ultimate SMD Marking Codes Database. This data base is only a couple of years old judging from the Wayback Machine, but seems to be fairly exhaustive and can be found referenced in quite a few electronics forums.

Unlike their larger SMD siblings, these chips in question are so small that there is no room to print the entire part number on the device. Instead, the standard practice is for manufacturers use an abbreviated code of just a few characters. These codes are only unique to each part or package, and aren’t necessarily unique across an entire product line. And just because it is standard practice does not imply the marking codes themselves follow any standard whatsoever. This seemingly hodgepodge system works just fine for the development, procurement and manufacturing phases of a product’s lifecycle. It’s during the repair, refurbishment, or just hacking for fun phases where these codes can leave you scratching your head.

Several sites like the one [JohnK] found have been around for years, and adding yet another database to your toolbox is a good thing. But none of them will ever be exhaustive. There’s a good reason for that — maintaining such a database would be a herculean task. Just finding the part marking information for a known chip can be difficult. Some manufacturers put it clearly in the data sheet, and some refer you to other documentation which may or may not be readily available. And some manufacturers ask you to contact them for this information — presumably because it is dynamic changes from time to time. Continue reading “Decoding SMD Part Markings”

Vintage Computer Festival East Reboots This Weekend

We don’t have to tell the average Hackaday reader that the last two years have represented a serious dry spell for the type of in-person events that our community has always taken for granted. Sure virtual hacker cons have their advantages, but there’s nothing quite like meeting up face to face to talk shop with like-minded folks and checking out everyone’s latest passion project.

Luckily for classic computer aficionados, especially those on the East Coast of the United States, the long wait is about to end. After being forced to go virtual last year, Vintage Computer Festival East will once again be opening their doors to the public from October 8th to the 10th at the InfoAge Science & History Center in Wall, New Jersey. Attendees will need to wear a mask to gain access to the former Camp Evans Signal Corps R&D laboratory, but that’s a small price to pay considering the impressive list of exhibits, presentations, and classes being offered.

In fact, it’s shaping up to be the biggest and best VCF East yet. The Friday classes cover a wide range of topics from CRT repair to implementing a basic video controller with a FPGA, and the list of speakers include early computer luminaries such as Michael Tomczyk, the Product Manager for the VIC-20, and Adventure International founder Scott Adams. A little birdie even tells us that if you bring your copy of Back into the Storm, our very own Bil Herd will be sign it for you after his talk on the history of the Commodore wraps up Saturday evening.

If you’d rather get hands-on you can always take a walk over to the Computer Deconstruction Laboratory, InfoAge’s on-site hackerspace. Glitch Works will be on hand with several popular kits such as the XT-IDE, an 8-bit ISA adapter that lets you connect (relatively) modern drives to classic machines, and the R6501Q/R6511Q Single Board Computer. A bit rusty with the iron and would rather start on something a little easier? Not to worry. Neil Cherry, a staple of the Hackaday comment section since before we switched to color pictures, will be instructing hackers young and old in the ways of the flux during his all-day soldering classes.

Of course, no VCF trip is truly complete until you’ve searched for treasure in the consignment room. The space has been expanded for 2021, and considering how long folks have had to clean out their attics and garages thanks to the pandemic, we’re expecting a bumper crop of interesting hardware to wade through. If the turnout for the VCF Swap Meet in April was any indication, we’d suggest bringing some extra cash with you.

As a proud sponsor of the 2021 Vintage Computer Festival East, Hackaday will naturally be bringing you a first-hand account of the overall event as well as a deeper look into some of the incredible exhibits on display in the very near future. But words and pictures on a page can only go so far. If you’ve grown tired of virtual events and are looking to peek your head out, we can guarantee a trip to InfoAge this weekend will be well worth the gas money for anyone within driving distance.