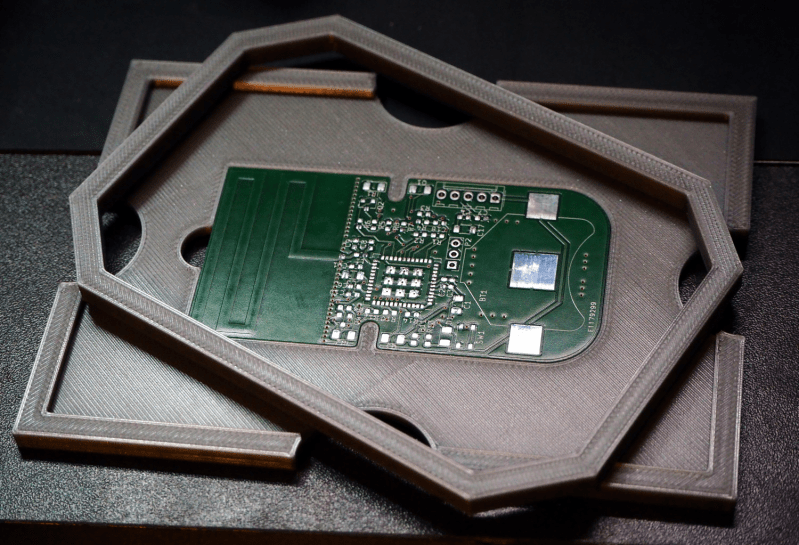
Your brand-new PCBs just showed up, and this time you even remembered to order a stencil. You lay the stencil on one of the boards, hold it down with one hand, and use the other to wipe some solder paste across…. and the stencil shifts, making a mess and smearing paste across the board. Wash, rinse (with some IPA, of course), repeat, and hope it’ll work better on the next try.
Maybe it’s time to try Stencilframer, a 3D-printable jig generator created by [Igor]. This incredibly useful tool takes either a set of gerbers or a KiCad PCB file and generates 3D models of a jig and a frame to securely hold the board and associated stencil. The tool itself is a Python script that uses OpenSCAD for all 3D geometry generation. From there, it’s a simple matter to throw the jig and frame models on a 3D printer and voilà!– perfectly-aligned stencils, every time.
This is a seriously brilliant script. Anyone whose gone through the frustration of trying to align a stencil by hand should be jumping at the opportunity to try this out on their next build. It could even be paired with an Open Reflow hot plate for a fully open-source PCB assembly workflow.


Very nice project. I used to make 3D printed jigs to hold through hole connectors and stuff while I’m soldering the other side, but modeling these by hand takes time.
I almost expected this to be a ‘part stencil’ of some sort. I like that idea. Why isn’t it already in use? Are printer tolerances to poor? Or does it just have no commonality with industry where pick n place is common?
difficult with tolerances and cleaning. plastic sheets cut with in a hobby vinyl cutter make awesome stencils though. lasts easily 200+ pcbs for me and they have just the right thickness (100µm for me)
You can print stencils on a resin printer: https://blog.honzamrazek.cz/2020/01/printing-solder-paste-stencils-on-an-sla-printer/
I’ve been wondering about “part stencils” myself also – something where you would put parts in holes, put board (with paste already applied) on top, flip and remove. Maybe not that useful for small boards, but for something like 100 LEDs it could be a real timesaver.
Need to do this.
Great!
Nice little helper!
Maybe another improvement would be to put magnets into the top frame and have the top frame the same size as the sencil (+ some alignments).
Then you could first clip the stencil into the top frame, put it into the holder and be able to put it aside after applying solder without worrying about messing up the whole working space with the pasted
stencil (because you just lay it upsidedown on the clean frame).
Actually not a terrible idea for something that is 3D printed.
(And that is a lot of praise from me if you know my normal opinion on anything 3D printed that gets posted here…)
However, I wonder how many boards you have to make to justify the time/faff to make this instead of using… I dunno… Some double stick tape and a square?
Probably more boards than I’d ever want to do.
You know what? I’m going to add a 3rd item to my “The only real use of a 3D printer” list.
Art, Prototypes…
and now Non-Structural, Temporary Parts that require just enough precision that they would be annoying to make by hand.
“the frustration of trying to align a stencil by hand” Hmmm, these 68 year old eyes never had that much trouble. Good lighting makes it about a 3 second job. Getting the support on the sides at the right height is the key task. Not sure how well that works with 3D printing.
Neat, but how do you cut the stencil to that size?
I just watched the video and was wondering the same, how do you cut the stencil to the right shape and maintain alignment?