Sometimes a chance conversation leads you to discover something cool you’ve not seen before, and before you know it, you’re ordering parts for yet another hardware build. That’s what happened to this scribe the other day when chatting on some random discord, to QMK maintainer [Nick Brassel aka tzarc] about Djinn, a gorgeous 64-key split mechanical keyboard testbed. It’s a testbed because it uses the newest STM32G4x microcontroller family, and QMK currently does not have support for this in the mainline release. For the time being, [Nick] maintains a custom release, until it gets merged.
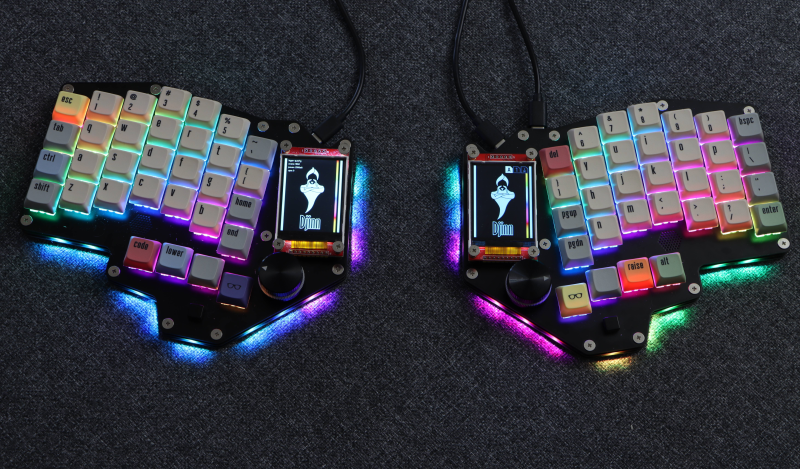
Hardware-wise, the design is fabulous, with a lot of attention to detail. We have individual per-key RGB LEDs, RGB underglow, a rotary encoder, a five-way tactile thumb switch, and a 240×320 LCD per half. The keyboard is based on a three PCB stack, two of which are there purely for structure. This slick design has enough features to keep a fair few of us happy.
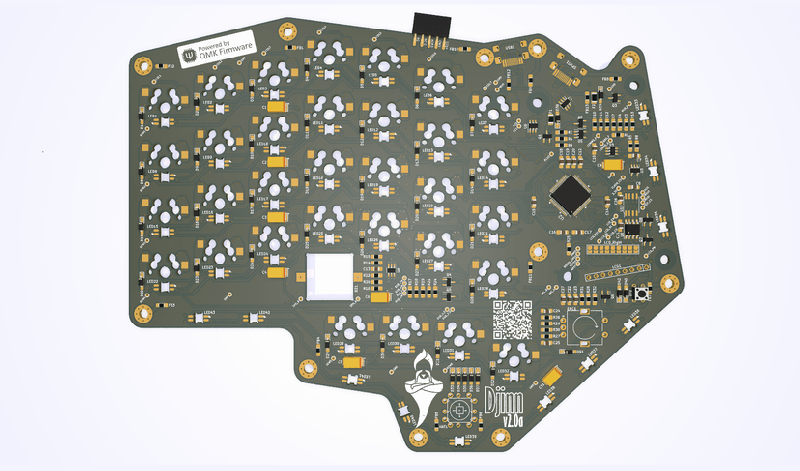
Interestingly, when you look at the design files (KiCAD, naturally) [Nick] has chosen to take a mirrored approach to the PCB. That means the left and right sides are actually the same PCB layout. The components are populated on different sides of the PCB depending on which half you’re looking at! By mirroring footprints on both PCB sides, and hooking everything up in parallel, it’s possible to do it all with a single master layout.
This is a simple but genius idea that this scribe hadn’t come across before (the shame!) Secondarily it keeps costs down, as your typical Chinese prototyping house will not deal in PCB quantities below five, so you can make two complete keyboards on one order, rather than needing two orders to make five. (Yes, there are actually three unique PCBs, but we’re simplifying the situation, ok?)
Now, if only this pesky electronics shortage could abate a bit, and we could get the parts to build this beauty!
Obviously, we’ve covered many, many keyboards over the years. Here’s our own [Kristina’s] column all about the things. If you need a little help with your typing skills, this shocking example may be the one for you. If your taste is proper old-school clackers, there’s something for everyone.


“We have individual per-key RGB LEDs, RGB underglow, a rotary encoder, a five-way tactile thumb switch, and a 240×320 LCD per half. This slick design has enough features to keep a fair few of us happy.”
Funny that none of those features actually matters when it comes to typing.
Never understood bling in keyboards. Isn’t the idea to _not_ look at it while using it?
Looks pretty damn cool to me.
hey we can put a lot of blinky blinky pesky modes to make a good YT video about it!
Light up keyboards help when typing in the dark.
Even though the F and J keys (may) have locator bumps on them, those bumps can be hard to find/distinguish at times.
I feel exactly the same. The only exception might be keys that are displays, so they can show you shortcuts for programs. However, doing something like that would need something same like EPD based keys.
I used to think the same, but I’ve warmed to RGB having some utility especially with highly programmable, multi-layer keyboards like this one. It can be used to highlight and color-code different keys per layer and serve as a reminder of what layer you’re on. Still mixed on whether it’s worth it or not, but I at least don’t think it’s *purely* bling anymore.
My mind went wild on the rotary encoder. How often I use ctrl-tab and shift-ctrl-tab to move the cursor through text. I wonder if Ann accelerated rotary encoder might make this faster or easier to target a particular point.
Well, I think that would depend on which “Ann” does the accelerating.
B^)
Having dated an Anne, an Annie, and marrying an Ann, I have a bit of knowledge in that topic.
B^)
Cool very cool, but what does the display do exactly, if it only shows a logo of the system it isn’t very useful. I assume it can do more in combination with the right software. Anyway, the whole thing looks so pretty and well thought out, but yet the display sticks out like a sore thumb, why? The PCB material of the display can have nasty sharp edges and the tips of the header that connect the display can hurt you too, not something I would like having next to my fingertips. But a subtle 3D printed cover can solve that I guess.
Other than that it looks very nice and solid.
I hear keyboard tamagotchis are the in thing right now. there’s one that i know of called bongo cat that moves paws in time to words per minute.
The thumbwheels randomly change their functions, so you need to look at the screens to see what the settings are before using them.
B^)
This can also be a use for the RGB LEDs per key too. My (pretty common) usage of my Adafruit macro pad has a reference on the OLED, but all the keys on the different modes/layers/sets have different colors so you can see which layout is active based on just the color pattern. (Usually there’s meaning, too: debug is green in my pad for instance)
Let’s see, a musical keyboard (piano) with RGBs under the keys, they light up to let beginners know which key to press next, and the color for how long (whole note, half note, quarter note, eighth note, etc.)
B^)
edit:
Yes, I know that is not the recommended way to learn how to play a piano!
(erstwhile piano student: Carnegie Hall never called -sigh!)
The screens do various things, depending on the keyboard. Showing a WPM count or which layer you’re on is very common. Skimming through the code repo for this keyboard, it looks like it displays image indicators for caps lock, scroll lock, etc. I have an ergo split that shows the last few keys you typed.
They use reverse-mount addressable LEDS! When I did mine, I found you could fit the little 1515 LEDs right under the keys. This is /so/ much better of an idea because all the components are on one side so could be assembled!
(Coincidentally I tried the reversible keyboard thing, but never finished it, it died in firmware hell… Its a very fun challenge to do on a 2 layer board.)
incredible. people still invent old keyboard and still have some new for this project.
and noone, not any bog firm , corpo etc. not create similar project
WHY?
What?
There are several keyboards that do the reversible layout, for example i built an Ergo 42 that has this feature. https://github.com/Biacco42/Ergo42
Back in 2017 [hackaday] covered the Mitosis split keyboard which not only uses the same PCB for both sides but uses it for the switch plates too.
https://hackaday.com/2017/06/05/mitosis-anatomy-of-a-custom-keyboard/