For many of us, the bane of electronic projects is making a professional-looking enclosure. Sure, 3D printing has made it easier to make the actual enclosure, but there’s still the problem of labeling it. [Richard Langner] has the answer with something he calls easy front panels. You can read about it or watch the tutorial video below.
The concept is easy enough. You create your beautiful artwork in your choice of graphics programs. The example uses Inkscape, but you could do it in anything, even PowerPoint. You print it out and cut it to size. You could, of course, print it in color or — as the example does — color it in by hand.
Even if you print in color, [Richard] suggests you print a black border around holes and then use a black marker to color it to hide any imperfections in cutting. For the next step, you place the artwork in a laminator pouch and laminate it. We wondered if any of the self-laminating pouches would work as well.
After lamination, you trim almost to the edge. The instructions say to leave 1 mm to avoid losing the laminate seal. It is best not to cut holes in the laminate (for example, for the display window) unless absolutely necessary. One thing missing was how the finished front panel attaches to the box. We presume some glue that sets thin would do the trick.
The box looks great and this seems easier than using, say, waterslide paper to create labels. You could also get fancy by using laser printer foil or other printing tricks as long as they will survive the lamination step.
A laminator can have many uses around the shop. You can even use it in your PCB fabrication.


Excellent.
If you want to make holes in laminations (e.g. if you want to hang it outside with a thumbtack or so), first make a larger hole in the paper, so the laminate also seals the inside of the hole.
Nice. Old school KISS type hack worthy of a Hackaday comment.
I would like to know how the buttons work. Are they infrared reflective touch switches?
Probly capsense
Looking at the orignal box you will see (rough) holes for the tac switches. These holes should be enlarged, and the switch button should be adjusted to just touch the underside of the laminate. Pressing the button area of the laminate will allow it to flex and operate the switch beneath. If it needs more flexability you can use 75micron laminate and thinner paper.
Using a touch switch such as a TTP223 you need not even cut a hole as they work through a few mm of plastic.
He didn’t explain how he sticks the laminated cover to the enclosure.
The idea is to make something aesthetically pleasing, but if the cover peels off, it will look ugly. So the method to making sure it stays on the enclosure is the critical (missing) step in my opinion.
Maybe use some adhesive? A two-sided tape? Superglue? Epoxy resin? Personally I’d go with resin, as it’s IMHO easier to apply and much less messy than superglue and more robust than two-sided tape.
Also method depends on enclosure material. Some combinations work better than others.
3M 468MP is a very good choice for this kind of thing. It’s similar to double-side tape, but no tape. Just adhesive on a transfer backer, with a very, very consistent thickness.
https://www.thistothat.com
Lol that’s a surprisingly fantastic little webapp. Thank you for sharing.
For Mericans! It resolves to brand/product without mentioning the chemical nature of the glue so in different countries where you have different brands, it’s next to useless.
Ditto!
“… is now ready to be glued on to the box” can be heard in the video.
Did this a while ago for the front & backplate of a Fallout Geiger Counter. On the front i srewed it down, no gluing necessary. On the backplate i glued the borders of the laminated picture onto the plate with superglue before screwing it down. Worked like a charm. On the front i cut s window for the lcd before laminating it, so it doubles as screen protector.
Pics of front/back:
https://photos.app.goo.gl/jbvtbj1WwXrdiM9m9
https://photos.app.goo.gl/aLKfvame3Qt1LBqC6
Nice build!
Is it functional as a Geiger counter?
Yes. The Geiger Tube is the glas thing on the first picture on top.
Love It!
How did you get the green CRT raster effect? Is it a LCD?
It is a LCD. The raster effect came accidently while converting/dithering the gif :-)
I am a klutz. I’d put a cage around my tube.
In a reply to one of the comments he says he used Pritt stick to fix the cover to the enclosure. He mentions that that’s useful as it can be removed by applying heat.
You could model some kind of lip or overhang on your enclosure, pause the print to insert the prepared laminate, and the continue the print, so that your label is trapped.
This is a question that has already beed answered – It sticks on perfectly with Pritt stick!
I’ve used something similar for a while. Low profile tactile switches work well behind the keys – but a dot of thicker plastic helps to prevent wear from the button.
For something a bit more durable, I use a clear acylic panel over the front, with holes milled for buttons and other controls.
Double-sided adhesive tape fixes the laminated panel very well – especially when an overshield is used.
For a while I had an idea to take a piece of acrylic, paint it black on one side and engrave on CNC all the markings I want, these would be illuminated either from the back or from the sides. As for buttons I’d go with capacitive touch ones. The downside is that the acrylic will get scratched a lot, and when used outside it will yellow with UV damage.
That’s exactly what I did on a build: transparent acrylic with laser cut holes for switches and connectors. Masked off a rectangle on the back for the display and painting that side black, engraved and infilling the letters in white on the front. Only problem is the black paint is very prone to scraping off.
You do it on the back side, with mirrored engraving. From the front you will have a black mirrored finish. At least for until it gets scratched. Another option is to print everything on transparency foil, with inverted colors (transparent on black) and put it between the enclosure and acrylic or glass front. I’ve seen this done twice: once for a DIY lab supply and once for a DIY amplifier.
I did exactly this years and years ago on the front panel for a synthesizer. It turned out gorgeous! https://blog.bityard.net/articles/2009/August/x0xb0x-3.html
Some times on hackaday, the best hacks are in the comments!
I used toner transfer to label acylic panel on the back side. Same trick I did for labelling components on a PCB. I used special projector transparency for laser printers. Not sure if they are still around these days.
I use the same technique and it works well. I use the same for making PCBs. There are plenty of toner transfer products now.
Nice tip. You can’t scratch your backside if it’s covered in acrylic!
I don’t mind either you leaving or the GIF. A very large percentage of the population don’t mind either.
Bye bye snowflake.
It’s interesting how one single individual can claim to represent a “very large percentage of the population”.
If you’re challenging me then your challenge has been accepted. I suggest you use google to see my history on this site before you make that decision.
I’ve never seen any ads on this site. How I did it? I installed an ad blocker for my browser. I’d expect that every HaD reader would know about ad blockers and use them instead of whining.
HaD readers also have a reasonable concentration span an don’t confuse a complaint about “continuously moving ads” with ads in general.
Hang around, I generally like 👍your input.
I’ll have to remember this, it really looks sharp.
I recently 3D printed a lid for a project box. Once the blank lid had printed I changed to a contrasting filament and printed the markings right on top of it. It came out looking great. The downside is that I couldn’t print features as small as the ones shown in the article. The smallest I could get the text and still slice properly was 3.5mm tall, but only if I bolded it. I’m also concerned that one day I’m going to accidentally hit one with a tool hard enough to knock it off the front. They seem sturdy enough right now, but I don’t know how much abuse it will take long-term.
Maybe you could apply a layer of something like transparent epoxy on top of it to protect the markings?
Variation on the same theme….
1) Sticky backed paper printer lables
2) Print design in printer onto label
3) Apply sticky backed clear Fablon (Vynil) over the top of label
4) Burnish Fablon onto paper (e.g. with small spoon)
5) Cut label to size
6) Remove label backing
7) Position on housing
8) Burnish label onto housing (e.g. with small spoon)
Hints
a) I didn’t find a clear border helpfull.
Typically I found the Fablon adhered better to paper than plastics (PLA)
b) It’s not mentioned, perhaps obvious. It’s typically necessary to cut out the area of display modules. Lines on many seemingly clear plastics optically interact with some displays to produce fringe type patterns.
c) An artists clear acrylic 1.0 mm thick sheet was found to be a good option on the panel undersides for physical protection of displays. I cut the acrylic with scissors typically.
Current longest life, 3D printer panel >10 years
Just going to add that laser printer toner can be spread onto a white plastic piece and melted into the piece with a low power laser. I’m planning to do this with my mechanical keyboard build so I can add all the little symbols I want. Only trick is getting the pieces squared out right and getting the power right. The video that introduced me to it only used a 300mw laser at low power.
That sounds worthy of its own Hackaday. To hold them in place why not use the keyboard itself, if you have the key spacing in a cad file?
Aluminum PCBs.
They’re dirt cheap now, and work great for front panels.
This sounds interesting. Can you link to any example projects that do this? I’m not having any luck with a web search.
https://www.tindie.com/products/tindiescx/sc131-pocket-sized-z180-romwbw-cpm-computer-kit/
Not aluminum but it is a PCB
Thanks!
https://www.eevblog.com/forum/manufacture/aluminum-pcb-for-front-panel/
There’s not much to explain.
Thanks. I kept getting results for a specific Honeywell controller and somehow missed that eevblog forum post.
Regarding metal panel engraving, I was recently watching the AndysMachines YT channel and was most impressed
by the use of electro-etching (is that the right term?) to etch numerals in steel using nothing more than a 12V supply, vinegar, salt, a cotton bud and a vinyl stencil:
https://youtu.be/VJOem40ggkI?t=447
The result looks fantastic and ought to be achievable for those of us who don’t have access to such tools as Stefan Gotteswinter’s oh-so-loooooovely ex-BMW works pantograph engraver.
Thanks for all the nice comments! A few points to clarify –
Pritt stick is all I had to hand, and it turned out to be ideal. Just put a thin layer on the laminated panel and ensure there are no lumps. The panel in the video was first put onto a spare box as a test, then later heated with a hair dryer and transferred straight on the working box.
Laminating pouches come in different thicknesses. I used 75 and 80 microns and both worked equally well. The paper was copier 80gsm and the spare (blue) front was craft paper of 75gsm.
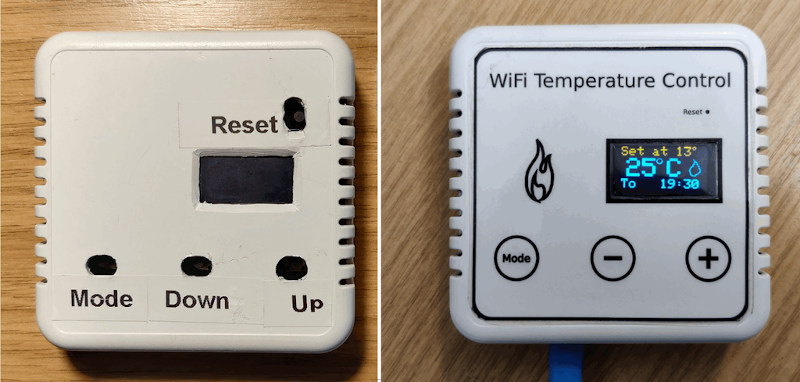
Under the PLUS and MINUS buttons are standard tac switches – look carefully and you’ll see the RESET button before the panel was put on. Cut (or lengthen) the button pins so they just touch the panel underside. The hole in the plastic box should be large enough to allow the panel to flex so the switches operate reliably. You could also use touch switches such as the TTP223 which would operate through the plastic box without making a hole.
The flame icon on the left hand side of the panel will have a hole beneath and an LED will illuminate to indicate when the central heating boiler is on.
Finally it may be worth looking at how I align holes in project boxes without measuring or using special tools https://www.youtube.com/watch?v=GvFrAhnp5uA
I’ve done this on projects in the past, but I used self adhesive laminate sheets, Cut all the holes you want and don’t have to worry about any seals being broken. Still use several of those to this day, years later.
I used to do this years ago for test jigs at work. Gotta make sure the edge of the label is way before the edge of the surface, otherwise you’ll get split edges in no time
I transfer the toner straight onto the panel. It can be done thermally for metal surfaces of anything that remains stable at the toner fusing point. OR you can do it chemically with just the vapor of acetone in a sealed container for a while. A couple of coats of clear acrylic to finish off is always a good idea.
Here’s an example –
https://hackaday.io/project/21344-toner-transfer-decals
I just laser print onto white acetate sheets and stick them on with vhb tape or spray glue
How do you deal with windows for displays?
Design SW: https://www.frontpanelexpress.com/front-panel-designer
I had a look around the net about this service and it seems (as usual) the shipping costs are too much if your in a different country.
Can you print out panels to a laser printer with this software? I could probably use it for that instead of PCB CAD software.
As the above post says, frontpanelexpress.com is great. There are several other sites that do 2 axis / 2.5 axis cutting as well. For true DIY just get a cheap chinese CNC. You can then get dual colored plastic or colored anodized aluminum, and use the CNC to both cut out the overall size and thru-features (like openings for displays & buttons), as well as creating bold permanent labels by cutting through the top layer of your material to expose the different colored material below.
Also, I just use M5Stack Core2 modules for everything where a small interface is needed. You get a ESP32 with tons of onboard accessories, as well as a 2″ touchscreen, all packaged in an aesthetic enclosure for like $44. No wiring buttons / LCDs, no fabricating/modifying enclosures – just program your own beautiful touchscreen interface completely in your firmware!
Years ago I used 3M Scotchcal for stereo power amplifier face plates. It is photosensive so you create a master using a laser printer on clear film. Then expose / develop the film. It comes with an adhesive backing. The white base vinyls are nice if you wanted back lighting.
Back in the day you could get acual brushed aluminium as a base material but now it appears all there is only vinyl film available. Although if you search hard enough, it appears as there are aluminium options for aircarft but probably is more expensive.