Annoyed by excessively-long cables? Tired of the dull drudgery and ugly results of bunching up the slack and wrapping it with a twist-tie? Suffer no longer, because the solution is to make your own coiled cables!
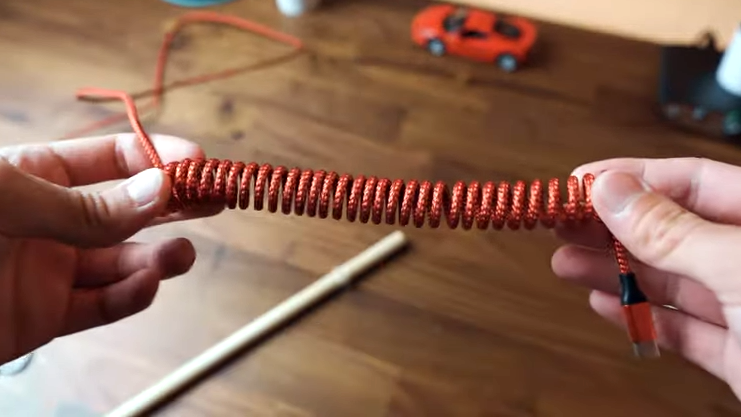
 [Dmitry] is annoyed with long, unruly cables and shared a solution he learned from the DIY keyboards community: coil them yourself with a piece of dowel, a hair dryer, and about 10 minutes of your time. However, it’s just a wee bit more complicated than it may seem at first glance.
The process begins with wrapping a cable around a mandrel, then heating it as uniformly as possible to thermoform the jacket, but the instructional video (embedded below) says that all by itself that isn’t quite enough to yield lasting results. After heating the cable and letting it cool, the coils will be formed but it will not hold the new shape very well. The finishing touch is to “reverse” the direction of the coils, by re-wrapping it backward around the mandrel, inverting the coils upon themselves. This process is awkward to explain, but much simpler to demonstrate. This video by [DailySetupTech] explains this process around the 2:30 mark. That final step is what yields a tightly-wound, springy coil.
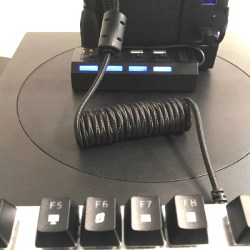
The nice part about using this process as a cable management technique is that it is possible to coil only a portion of a cable, leaving the exact amount of uncoiled slack required for a given application. Keep it in mind the next time some cables need managing. And if you don’t want to coil a cable but still need it out of the way, you might find this design for a DIY cable chain made from a tape measure useful.


I would rather stab my eye with a needle than voluntarily use coiled cables
+1
Never played electric guitar?
I have played electric guitar for decades (including semi-professionally). I wouldn’t be caught dead with a coiled patch cord. I find them awful.
On DMM test leads… horrible.
On a hand-held mike on a transceiver, they make sense, IMO.
A whole new generation are now discovering the perils of untangling a bunch of coiled cables xD also, if cables are messy, longer cables are not the solution, shorter ones are.
If it is a DIY project, why don’t people use a shorter cable?
If you’re connecting two stationary points, I agree. Get (or make) a cable the correct length for the distance. But if you’re connecting points that need to move, that may not be an option. Coiled cables aren’t the solution for every excess cable issue, but there’s a reason every home phone used them for decades.
Could be that you are taking over someone else’s mess…
What’s with all the trolling here today? If you don’t like it move on, no need to post useless comments.
This is a good hack, something I needed a couple of times because of moving parts or to keep things tidy. The reversing is the step I didn’t know and will try it next time.
Agreed, I think this is a great tip that I could use in the future.
You have a point. However, my parents taught me not to say anything if it wasn’t positive. And diners were always fun, although we didn’t speak much either. Some might even say that I grew up in silence.
Regarding this project, I find it very interesting, as I was not aware of the fact that a hairdryer was all it takes to keep in the curls, so I’ve learned something today.
I think the need of reversing the cable wrap is due to the necessity of heating it on the inner side too, so if one could wrap the cable on a heated metal pipe while also using a heat gun on the outside, it probably would work with a single step alone.
Might also be the uneven amount of stretch in the cable’s outer jacket when it is heated. One could also reverse the coil and then heat it again.
I think the asymmetry probably gives it a stronger ‘spring’ effect, pulling itself back together.
Perhaps a toaster oven is the easiest way to test this theory.
This is great. I have been searching for a coiled cable to use in robotic arm just the right length, width and number of conductors. Now I don’t have to keep hoping that I stumble on something that will work, I can make it my self.
Those of you that are complaining need to start thinking “outside the box” a little more.
someone once said “every tip or trick is useless until you need it.”
i’m all for useless knowledge
+1
‘How It’s Made’ did a segment on making industrial ‘Retractile Cord’s. Similar to Dmitry’s process except the final reverse twist was done with an electric drill. Google ‘How It’s Made – Retractile Cord’ for the video.
The video states that the production method isn’t shown as it’s proprietary, but the demonstrated method with a drill is much handier to we ordinary folks.
You can also use an oven instead of a hair dryer. This should result in more even heating.
I’ve made a few coiled cables. I wrap the cable around a dowel, electrical tape the ends in place then put it in a 175F oven for 20 minutes. Then I take it out of the oven and put it in the freezer for 20 minutes. I haven’t needed to reverse the coil using this method
And don’t forget, like the video says (1:20), you can add an extension cable when this coiling process makes your cable too short.
Unless, of course, you just bin it and grab a new undamaged cable.
This is awesome information. Thank you for posting this, Hackaday!
As a cautionary note: Some types of cables (coax, for example) have a manufacturer recommended minimum bend radius. If bent more tightly than this radius, the internal insulation can fail. Probably not an issue with most small USB cables, but anything that carries RF or high-speed data might be subject to this limitation.
Not to mention a maximum temperature spec. The commonly-used polyethylene, for example, turns liquid near 110C, and will allow conductors to touch each other, markedly reducing the utility of the cable.
Other common thermoplastics will deform at even lower temperatures, hence the “max 60C” rating of most cheap cabling.
Only youngsters will actually do that. Those who are too young to remember phone wires.
But good reminder still, you never now when you might need to coil wires for some reason.
you can also use boiling water or just put it in the oven for a while if you have lots of cables to fix
If I used a square dowel would I get a square coil?
HAH! I actually tried with a USB cable. It worked… sort of. The coil loosens a bit once you take it off the dowel, so it didn’t stay as a nice square tunnel, but just a mess of random squares.
I used to do this regularly (the reversal of the coil) on phone handset cords (back when phones had handsets and handsets had cords) that had gotten stretched out.
Coiled cords weigh a lot more when used in suspension like with headphones and guitar. Their affinity for getting tangled even with themselves is always a problem. Just how does the helix reverse direction effortlessly and spoil the appearance of the coil?
But having a short section of coil might be just the thing for getting a cord caught and tugged on hard where a jack or plug breaks or the headphones. This hack makes it possible, and I use telephone cord for headphones but never wanted to use a whole coiled handset cord weighting my phones down on the left.
I’m going to use inductors for all my wires from now on!
Cable management is a pain and should be avoided. Just accept the rats nest and cram it behind stuff.
One word Atenuation, basically when signal degradation occurs over a length of cable. The more twists in is builds up a magnetic field and also losses signal strength. If you have ever experienced lag while gaming that was one of the causes.
I work for a company that makes small character ink jet printers. I have been to companies that use our printers to print the markings on both cable and tubing. From what I’ve seen, coiled cables and tubing are wrapped on mandrels then dipped in boiling water for about 5 minutes (typically on a moving production line). Sometimes multiple mandrels are hung on a rack and placed in a steam chamber. Once cooled, the mandrel is removed and the coil is set for life. I have made similar cables using this technique and it works great. If your cable already has the connectors on it, don’t dip the connectors in the water.
Does this also work for uncoiling a cable? How does this work for polyurethane, rubber and silicone cables?