Silicone Devices: DIY Stretchable Circuits

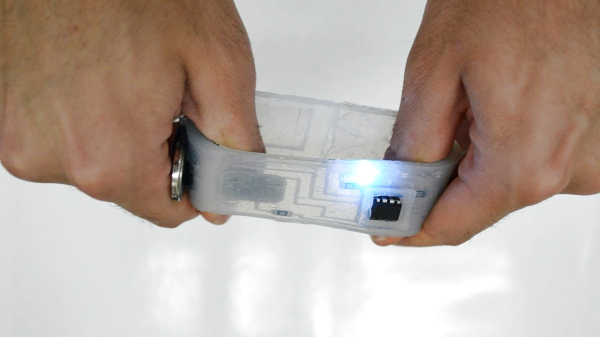
Flexible circuits built on polyimide film are now commonplace, you can prototype with them at multiple factories, at a cost that is almost acceptable to your average hacker. Polyimide film is pretty tough for something so thin, but eventually it will tear, and with larger components, bend radii are quite restricted. But what about stretchable circuits, as in circuits you can flex, twist and stretch? Let us introduce silicone devices. A research group from Hasselt University, Belgium, have been prototyping making truly flexible, silicone-based circuit substrates, managing to integrate a wide range of SMT component types with a dual layer interconnect, with vias and external contacts.

It should be possible to reproduce the process using nothing more special than your average Makerspace CO2 laser cutter, and a couple of special tools that can be easily made — a guide for that is promised — it is purely a matter of gathering a few special materials, and using off-cuts you have lying around for the rest. The interconnect uses Galinstan, which is a low melting point alloy of gallium, indium, and tin. Unfortunately, this material is fairly expensive and cannot be shipped by air due to the gallium content, without specialised handling, at considerable expense. But that aside, other than some acrylic sheets, some vinyl, copper foil and a few sprays, nothing is beyond reach.

The construction process is reverse to what we normally see, with the components and copper contact plates placed first, on to a primed vinyl sheet. This sheet is laser marked with the component outlines to enable them to be corrected placed. Yes, that’s right, they’re using a laser cutter to mark vinyl, a chlorine-containing plastic. Hold on to that thought for a bit.

Insulating layers and substrate layers are constructed by blade-coating with a layer of clear silicone. Interconnect layers are formed by sticking a fresh vinyl sheet onto the exposed contacts and laser cutting just though it to expose the pads and the interconnect traces. Next the fancy Galinstan is applied by brush and the vinyl stencil removed. Rinse and repeat for the next layer of insulating silicone, more circuit traces, then use the laser cutter to precisely etch through the via regions to allow more metalisation to be added. Finally a coating of silicone is applied over the whole assembly, the laser is again used to etch the silicone away from the contact pads, and with a little solder tinning of these, you’re done. Simple, if only our Makerspaces didn’t have rules against laser cutting vinyl.

This was clearly a very brief overview, here is a very detailed instructables guide ready for you, as well as a formal research paper, detailing why this came about and why you might want to try this yourself.

If you’re into custom wearables, you might remember this earlier piece about silicone circuits, and this one weird organic-looking thing from the same time-frame.

Continue reading “Silicone Devices: DIY Stretchable Circuits”

DIY “Solid State Drive” Puts Four Bytes In Your Pocket

In a relatively short amount of time, the average capacity of USB flash drives has skyrocketed. It wasn’t so long ago that two and four gigabyte drives were considered to be on the high end, but today you can grab a 512 GB drive for less than $50 USD. In fact they’ve gotten so large that it can feel wasteful using them for some tasks, and we occasionally find ourselves wishing we could find some modern USB drives that didn’t rival the storage capacity of our whole computer.

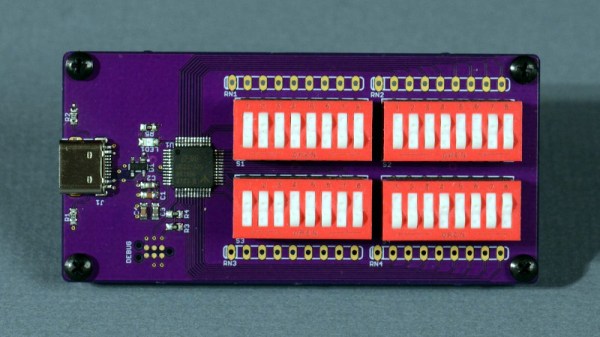
That said, this USB-C tetrabyte drive created by [Glen Akins] might be slightly too small for our tastes. No, that’s not a typo. As in the Greek tetra, this drive can hold a massive four bytes at a time. Even better, you don’t need a computer to write to it: the 32 DIP switches let you key in the content on the fly, bit-by-bit.

Reading out the first byte from the DIP switches.

As explained in a Twitter thread, [Glen] was inspired to create this gadget after another user posted a picture of a 32 position DIP switch with a caption that said it was a “One Tetrabyte SSD” back in December. He apparently couldn’t track down the same switch, but the four red Grayhill 76 Series switches arguably make it a bit clearer when entering in your bytes.

Each of the individual DIP switches are connected to one of the GPIO pins of the 8-bit EFM8UB2 microcontroller, and the code simply reads the state of each pin in order and saves the binary results in a variable to put together the “file” it presents to the OS when plugged in.

We’ve seen our fair share of unusual USB flash drives in the past, but this one is truly in a league of its own. Can’t say we can think of any four bytes of data important enough to hold on a dedicated piece of hardware, but we certainly appreciate the effort to store it in the most robust way possible.

Thanks to [J. Peterson] for the tip.

Hackaday Links Column Banner

Hackaday Links: January 23, 2022

When Tonga’s Hunga-Tonga Hunga-Ha’apai volcano erupted on January 15, one hacker in the UK knew just what to do. Sandy Macdonald from York quickly cobbled together a Raspberry Pi and a pressure/humidity sensor board and added a little code to create a recording barometer. The idea was to see if the shock wave from the eruption would be detectable over 16,000 km away — and surprise, surprise, it was! It took more than 14 hours to reach Sandy’s impromptu recording station, but the data clearly show a rapid pulse of increasing pressure as the shockwave approached, and a decreased pressure as it passed. What’s more, the shock wave that traveled the “other way” around the planet was detectable too, about seven hours after the first event. In fact, data gathered through the 19th clearly show three full passes of the shockwaves. We just find this fascinating, and applaud Sandy for the presence of mind to throw this together when news of the eruption came out.

Good news for professional astronomers and others with eyes turned skyward — it seems like the ever-expanding Starlink satellite constellation isn’t going to kill ground-based observation. At least that’s the conclusion of a team using the Zwicky Transient Facility (ZTF) at the Palomar Observatory outside San Diego. ZTF is designed to catalog anything that blinks, flashes, or explodes in the night sky, making it perfect to detect the streaks from the 1,800-odd Starlink satellites currently in orbit. They analyzed the number of satellite transients captured in ZTF images, and found that fully 20 percent of images show streaks now, as opposed to 0.5 percent back in 2019 when the constellation was much smaller. They conclude that at the 10,000 satellite full build-out, essentially every ZTF image will have a streak in it, but since the artifacts are tiny and well-characterized, they really won’t hinder the science to any appreciable degree.

Speaking of space, we finally have a bit of insight into the causes of space anemia. The 10% to 12% decrease in red blood cells in astronauts during their first ten days in space has been well known since the dawn of the Space Age, but the causes had never really been clear. It was assumed that the anemia was a result of the shifting of fluids in microgravity, but nobody really knew for sure until doing a six-month study on fourteen ISS astronauts. They used exhaled carbon monoxide as a proxy for the destruction of red blood cells (RBCs) — one molecule of CO is liberated for each hemoglobin molecule that’s destroyed — and found that the destruction of RBCs is a primary effect of being in space. Luckily, there appears to be a limit to how many RBCs are lost in space, so the astronauts didn’t suffer from complications of severe anemia while in space. Once they came back to gravity, the anemia reversed, albeit slowly and with up to a year of measurable changes to their blood.

From the “Better Late Than Never” department, we see that this week that Wired finally featured Hackaday Superfriend Sam Zeloof and his homemade integrated circuits. We’re glad to see Sam get coverage — the story was also picked up by Ars Technica — but it’s clear that nobody at either outfit reads Hackaday, since we’ve been featuring Sam since we first heard about his garage fab in 2017. That was back when Sam was still “just” making transistors; since then, we’ve featured some of his lab upgrades, watched him delve into electron beam lithography, and broke the story on his first legit integrated circuit. Along the way, we managed to coax him out to Supercon in 2019 where he gave both a talk and an interview.

And finally, if you’re in the mood for a contest, why not check out WIZNet’s Ethernet HAT contest? The idea is to explore what a Raspberry Pi Pico with Ethernet attached is good for. WIZNet has two flavors of board: one is an Ethernet HAT for the Pico, while the other is as RP2040 with built-in Ethernet. The good news is, if you submit an idea, they’ll send you a board for free. We love it when someone from the Hackaday community wins a contest, so if you enter, be sure to let us know. And hurry — submissions close January 31.

An artistic representation of a red Moon, hovering over the Earth

Is That The Moon Worming Its Way Into Your BIOS?

When facing a malware situation, the usual “guaranteed solution” is to reinstall your OS. The new developments in malware world will also require you to have a CH341 programmer handy. In an arguably inevitable development, [Kaspersky Labs] researchers have found an active piece of malware, out in the wild, that would persist itself by writing its bootstrap code into the BIOS chip. It doesn’t matter if you shred the HDD and replace it with a new one. In fact, so-called MoonBounce never really touches the disk at all, being careful to only store itself in RAM, oh, and the SPI flash that stores the BIOS code, of course.

MoonBounce is Microsoft-tailored, and able to hook into a chain of components starting from the UEFI’s DXE environment, through the Windows Loader, and finishing as a part of svchost.exe, a process we all know and love.

This approach doesn’t seem to be widespread – yet, but it’s not inconceivable that we’ll eventually encounter a ransomware strain using this to, ahem, earn a bit of extra cash on the side. What will happen then – BIOS reflashing service trucks by our curbsides? After all, your motherboard built-in BIOS flasher UI is built into the same BIOS image that gets compromised, and at best, could be disabled effortlessly – at worst, subverted and used for further sneaky persistence, fooling repairpeople into comfort, only to be presented with one more Monero address a week later.

Will our hardware hacker skills suddenly go up in demand, with all the test clip fiddling and SOIC-8 desoldering being second nature to a good portion of us? Should we stock up on CH341 dongles? So many questions!

This week’s installment of “threat vectors that might soon become prevalent” is fun to speculate about! Want to read about other vectors we might not be paying enough attention to? Can’t go wrong with supply-chain attacks on our repositories! As for other auxiliary storage-based persistence methods – check out this HDD firmware-embedded proof-of-concept rootkit. Of course, we might not always need the newfangled ways to do things, the old ways still work pretty often – you might only need to disguise your malicious hardware as a cool laptop accessory to trick an average journalist, even in a hostile environment.

Continue reading “Is That The Moon Worming Its Way Into Your BIOS?”

Display Your Speech In Realtime To Help Lipreaders In The Mask Era

Masks are all well and good when it comes to reducing the spread of deadly pathogens, but they can make it harder to understand people when they speak. They also make lipreading impossible. [Kevin Lewis] set about building something to help.

The system consists of a small screen that can be worn on the chest or other part of the body, and a lapel microphone to record the wearer’s speech. Using the Deepgram AI speech recognition API running on a Raspberry Pi Zero W, the system decodes the speech and displays it on the Hyperpixel screen.

The API is quite capable, and can be set to only respond to the wearer’s voice, or in a group mode, display speech from multiple people in the area, displaying other voices in another colour. There’s also a translation feature using the iTranslateApp API as well.

It’s a neat tool that could be of great use in conferences or in situations where a quick simple machine translation could majorly ease communication. Video after the break.
Continue reading “Display Your Speech In Realtime To Help Lipreaders In The Mask Era”

A bird-shaped yellow PCB with legs wound out of wire, perched on its creator's arm. The bird has a lot of through-hole components on it, as well as an assortment of different-colored LEDs.

Printed Circuit Bird Family Calls For Us To Consider Analog

On our favourite low-attention-span content site, [Kelly Heaton] has recently started sharing a series of “Printed Circuit Birds”. These are PCBs shaped like birds, looking like birds and chirping like birds – and they are fully analog! The sound is produced by a network of oscillators feeding into each other, and, once tuned, is hardly distinguishable from the bird songs you might hear outside your window. Care and love was put into making this bird life-like – it perches on Kelly’s arm with legs woven out of single-strand wire and talons made out of THT resistors, in the exact same way you would expect a regular bird to sit on your arm – that is, if you ever get lucky enough. It’s not just one bird – there’s a family of circuit animals, including a goose, a crow and even a cricket.

Why did these animals came to life – metaphorically, but also, literally? There must be more to a non-ordinary project like this, and we asked Kelly about it. These birds are part of her project to explore models of consciousness in ways that we typically don’t employ. Our habit is to approach complex problems in digital domains, but we tend to miss out on elegance and simplicity that analog circuits are capable of. After all, even our conventional understanding of a neural network is a matrix of analog coefficients that we then tune, a primitive imitation of how we assume human brains to work – and it’s this “analog” approach that has lately moved us ever so closer to reproducing “intelligence” in a computer.

Kelly’s work takes a concept that would have many of us get the digital toolkit, and makes it wonderfully life-like using a small bouquet of simple parts. It’s a challenge to our beliefs and approaches, compelling in its grace, urging us to consider and respect analog circuits more when it comes to modelling consciousness and behaviours. If it’s this simple to model sounds and behaviour of a biological organism, a task that’d have us writing DSP and math code to replicate on a microcontroller – what else are we missing from our models?

Kelly has more PCBs to arrive soon in preparation for her NYC exhibit in February, and will surely be posting updates on her Twitter page! We’ve covered her work before, and if you haven’t seen it yet, her Supercon 2019 talk on Electronic Naturalism would be a great place to start! Such projects tend to inspire fellow hackers to build other non-conventional projects, and this chirping pendant follows closely in Kelly’s footsteps! The direction of this venture reminds us a lot of BEAM robotics, which we’ve recently reminisced upon as something that’s impacted generations of hackers to look at electronics we create through an entirely different lens.

Continue reading “Printed Circuit Bird Family Calls For Us To Consider Analog”

Cables Too Long? Try Cable Management Via DIY Coiling

Annoyed by excessively-long cables? Tired of the dull drudgery and ugly results of bunching up the slack and wrapping it with a twist-tie? Suffer no longer, because the solution is to make your own coiled cables!

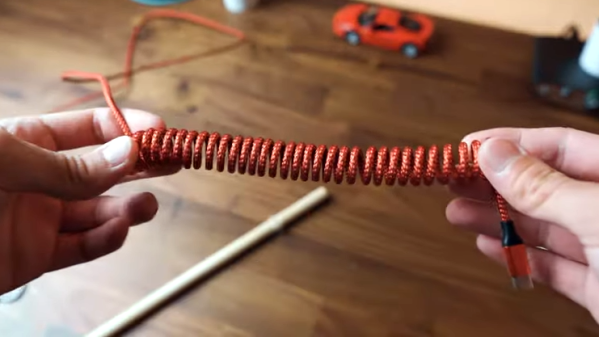
[Dmitry] is annoyed with long, unruly cables and shared a solution he learned from the DIY keyboards community: coil them yourself with a piece of dowel, a hair dryer, and about 10 minutes of your time. However, it’s just a wee bit more complicated than it may seem at first glance.

The process begins with wrapping a cable around a mandrel, then heating it as uniformly as possible to thermoform the jacket, but the instructional video (embedded below) says that all by itself that isn’t quite enough to yield lasting results. After heating the cable and letting it cool, the coils will be formed but it will not hold the new shape very well. The finishing touch is to “reverse” the direction of the coils, by re-wrapping it backward around the mandrel, inverting the coils upon themselves. This process is awkward to explain, but much simpler to demonstrate. This video by [DailySetupTech] explains this process around the 2:30 mark. That final step is what yields a tightly-wound, springy coil.

The nice part about using this process as a cable management technique is that it is possible to coil only a portion of a cable, leaving the exact amount of uncoiled slack required for a given application. Keep it in mind the next time some cables need managing. And if you don’t want to coil a cable but still need it out of the way, you might find this design for a DIY cable chain made from a tape measure useful.

Continue reading “Cables Too Long? Try Cable Management Via DIY Coiling”