Cables Too Long? Try Cable Management Via DIY Coiling

Annoyed by excessively-long cables? Tired of the dull drudgery and ugly results of bunching up the slack and wrapping it with a twist-tie? Suffer no longer, because the solution is to make your own coiled cables!

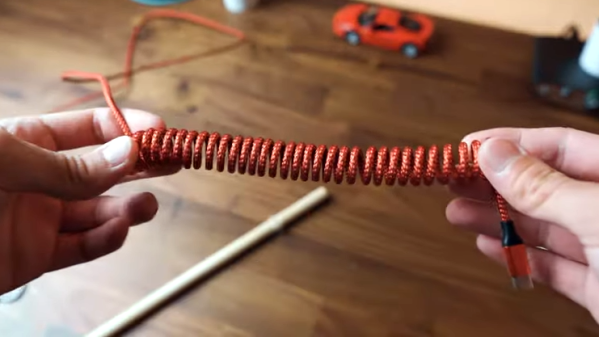
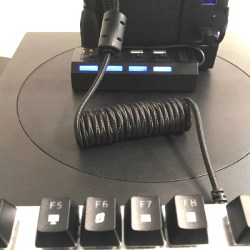
[Dmitry] is annoyed with long, unruly cables and shared a solution he learned from the DIY keyboards community: coil them yourself with a piece of dowel, a hair dryer, and about 10 minutes of your time. However, it’s just a wee bit more complicated than it may seem at first glance.

The process begins with wrapping a cable around a mandrel, then heating it as uniformly as possible to thermoform the jacket, but the instructional video (embedded below) says that all by itself that isn’t quite enough to yield lasting results. After heating the cable and letting it cool, the coils will be formed but it will not hold the new shape very well. The finishing touch is to “reverse” the direction of the coils, by re-wrapping it backward around the mandrel, inverting the coils upon themselves. This process is awkward to explain, but much simpler to demonstrate. This video by [DailySetupTech] explains this process around the 2:30 mark. That final step is what yields a tightly-wound, springy coil.

The nice part about using this process as a cable management technique is that it is possible to coil only a portion of a cable, leaving the exact amount of uncoiled slack required for a given application. Keep it in mind the next time some cables need managing. And if you don’t want to coil a cable but still need it out of the way, you might find this design for a DIY cable chain made from a tape measure useful.

Continue reading “Cables Too Long? Try Cable Management Via DIY Coiling”

Epoxy lenses

The Ins And Outs Of Casting Lenses From Epoxy

If you need a lens for a project, chances are pretty good that you pick up a catalog or look up an optics vendor online and just order something. Practical, no doubt, but pretty unsporting, especially when it’s possible to cast custom lenses at home using silicone molds and epoxy resins.

Possible, but not exactly easy, as [Zachary Tong] relates. His journey into custom DIY optics began while looking for ways to make copies of existing mirrors using carbon fiber and resin, using the technique of replication molding. While playing with that, he realized that an inexpensive glass or plastic lens could stand in for the precision-machined metal mandrel which is usually used in this technique. Pretty soon he was using silicone rubber to make two-piece, high-quality molds of lenses, good enough to try a few casting shots with epoxy resin. [Zach] ran into a few problems along the way, like proper resin selection, temperature control, mold release agent compatibility, and even dealing with shrinkage in both the mold material and the resin. But he’s had some pretty good results, which he shares in the video below.

[Zach] is clear that this isn’t really a tutorial, but rather a summary of the highs and lows he experienced while he was working on these casting methods. It’s not his first time casting lenses, of course, and we doubt it’ll be his last — something tells us he won’t be able to resist trying this all-liquid lens casting method in his lab.

Continue reading “The Ins And Outs Of Casting Lenses From Epoxy”

Lead Former Makes LED Cubes A Little Easier To Build

There’s no doubting the allure of a nicely crafted LED cube; likewise, there’s no doubting that they can be a tremendous pain to build. After all, the amount of work scales as the cube of the number of LEDs you want each side to have, and let’s face it – with LED cubes, the bigger, the better. What to do about all that tedious lead forming?

[TylerTimoJ]’s solution is a custom-designed lead-forming tool, and we have to say we’re mighty impressed by it. His LED cubes use discrete RGB LEDs, the kind with four leads, each suspended in space by soldering them to wires. For the neat appearance needed to make such a circuit sculpture work, the leads must be trimmed and bent at just the right angles, a tedious job indeed when done by hand. His tool has servo-controlled jaws that grip the leads, with solenoid-actuated lead formers coming in from below to bend each lead just the right amount. The lead former, along with its companion trimmer, obviously went through a lot of iterations before [TylerTimoJ] got everything right, but we’d say being able to process thousands of LEDs without all the tedium is probably worth the effort.

We’re looking forward to the huge LED cubes this tool will enable. Perhaps this CNC wire bender and an automated wire cutter would come in handy for the supporting wires?

Continue reading “Lead Former Makes LED Cubes A Little Easier To Build”

Wire Bender Aims To Take Circuit Sculptures To The Next Level

It doesn’t seem as though bending wire would be much of a chore, but when you’re making art from your circuits, it can be everything. Just the right angle in just the right place can make the difference between a circuit sculpture that draws gasps and one that’s only “Meh.”

[Jiří Praus] creates circuit sculptures that are about as far away from the “Meh” end of the spectrum as possible. And to help him make them even more spectacular, he has started prototyping a wire-bending machine to add precision to his bends. There’s no build log at the moment, but the video below shows progress to date. All the parts are 3D-printed, with two NEMA 17 steppers taking care of both wire feed and moving the bending head. It appears that the head has multiple slots for tools of different shapes. For now, the wire is rotated around its long axis manually, but another stepper could be added to take care of that job.

[Jiří] tells us that while he loves making circuit sculptures like his amazing mechanical tulip, he hates repeating himself. He hopes this bender will make repeat jobs a little less tedious and a lot more precise, and we hope he goes forward with the build so we get to see both it and more of his wonderful works of circuit art.

Continue reading “Wire Bender Aims To Take Circuit Sculptures To The Next Level”