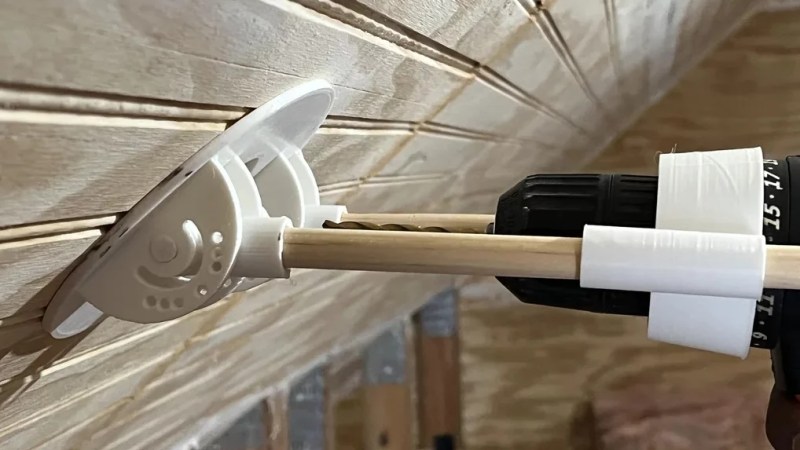
If you’ve ever tried to drill a hole on an angle with a power drill, you’ve probably drilled some pretty shocking holes. To do it right, you really need some mechanical assistance, and this jig from [Kartik_Nandrui] should do the trick.
The device uses a guide that sits on the surface to be drilled, with a pair of angled connectors that fit two wooden dowels. These connect the guide to a corresponding sleeve that fits around the drill body. The sleeve then slides up and down the dowels, allowing the drill to move in a straight line towards the targeted area.
It’s a useful hack, but we can see room for some improvements that would take it to the next level. Having a way to lock the angle of the guide base would be great for accuracy. As it’s 3D printed, it would also be simple to create a version with a curved guide base that could fit over pipes, or other designs to fit complex geometries like roof sheeting or other corrugated materials.
Sometimes the most interesting hacks are the ones that get us thinking about our own potential projects. If you’ve got any creative tool hacks you’ve been brewing up in the lab, be sure to let us know!


Psst… glue a protractor to the side
Alternative method. Find a scrap block of hard wood. Drill a nice perpendicular hole into it. Use a drill press if you have one. Take the block to the radial arm saw or a miter saw and cut any angle you think you need. rotate your jig when you’re using it if you think you need a compound angle. it will wear out eventually because you’re running a drill through a wood block, but it might not take that long to make a new one.
3D print a block using wood filled filament. Proceed as above
This guy extrudes.
+1
came here to make the same point.
“Trees, the original 3D polymer printer”
Looks like there is (or is supposed to be) a pin for locking the angle.
The addition of a holder for a drill bushing would go a long way too. If you can shorten the effective length of the drill it will be more rigid.
Drilling wood at an angle is what drill point auger bits are for. Start perpendicular then rotate to the angle you need. A hand Brace make this drill even easier than using a power drill.
Came to say this, essentially. Start your hole perpendicular to the plane, go in just a wee bit, then pivot to the correct angle and finish the cut. It just takes a little practice. I also use my thumb and forefinger along the bit as a guide… Not recommended, but it’s common practice on a construction site.
Sorry. There is nothing new here? I had a similar metal guide for years. I believe that it was from Stanley.
One quick search shows current products:
https://www.harborfreight.com/angle-drill-guide-95622.html
https://www.amazon.com/angle-drill-guide/s?k=angle+drill+guide
https://www.amazon.com/ANGLE-DRILL-GUIDE-increments-settings/dp/B006ZBCS1M
The Amazon tool ($41) and the HarborFreight ($15.47) seem identical except for the price! Check the pictures.
Yep, totally not a hack. I’ve used a similar commercial product for decades, but ooohhh… look – this one is 3D printed!
Exactly this. I don’t know how this qualifies as a hack. It’s just a 3D printed version of a commonly available tool … and a significantly inferior one at that.
Agreed. The commercial ones have heavy bases to help with wander as well.
None of these have predefined angles.
Last time I checked my walls didn’t have predefined angles either.
You could also just put a standard washer on the drill bit. if it starts wandering to the drill, move the drill up, if its wandering to the wall, move the drill down.
Doesn’t help in the horisontal plane though.
i like it. though for this sort of work, i have always (like other commenters said) started perpendicular or in a pilot hole or divot, and then rotated to the correct angle and gotten pretty alright results. usually if i’m drilling into a wall or whatever where i have to be using a handheld drill, my tolerances are pretty big anyways.
for a recent project, i approached this from the other direction. because of the size of the work piece, i couldn’t use the tilt feature on my drill press to achieve the result…so i printed some angled supports, and taped them to the back side of my work, and then taped a flat piece of plywood under those. i didn’t want to waste a lot of PLA or time, so i made very minimal supports, just two 1mm thick triangles with wedges along the edges so they didn’t flop over. then i just used the drill press, but with the work itself providing the tilt. it worked better than i expected…8 holes and all at the same angle! a new personal best. :)
I’ve had to drill my share of angled holes and I can honestly say getting the bit started in the first place is a tough job with the flutes of the bit bouncing around. Usually start the hole straight on then angle drill. Now the last angled holes I had to drill were to repair broken exhaust manifold bolts on a Ford pickup. Barely enough room to get an angle air drill up in there between the head and the engine support which had to be removed. No way is ANY guide going to help out in that place. I wasn’t the first person to have to go up in there to fix this on that truck and a previous tech sure could have done a much better job of drilling, it took some diligent attention, going over sized and installing a thread repair insert Of course this isn’t a place to be drilling angled holes. So we’re considering a different sense of the word angled. Either way, just getting the hole started for a job like shown in the photo is first and hardest part, without making a mess of the surface, Wood, but then most times something will be covering where that hole goes.