We don’t have to tell the average Hackaday reader that desktop 3D printing has been transformative for our community, but what might not be as obvious is the impact the technology has had on the scientific community. As explained in Thermal Post-Processing of 3D Printed Polypropylene Parts for
Vacuum Systems by [Pierce Mayville], [Aliaksei Petsiuk], and [Joshua Pearce], the use of printed plastic parts, especially when based on open source designs, can lead to huge cost reductions in the production of scientific hardware.
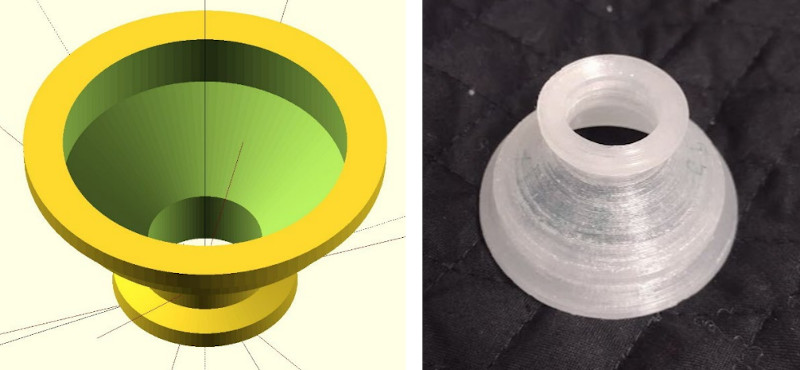
More specifically, the authors wanted to examine the use of 3D printing components to be used in a vacuum. Parts produced with filament-based printers tend to be porous, and as such, are not suitable for fittings or adapters which need to be pumped down to below one atmosphere. The paper goes on to explain that there are coatings that can be used to seal the printed parts, but that they can outgas at negative pressures.
The solution proposed by the team is exceptionally simple: after printing their desired parts in polypropylene on a Lulzbot Taz 6, they simply hit them with a standard consumer heat gun. With the temperature set at ~400 °C, it took a little under a minute for the surface of take on a glossy appearance — the result reminds us of an ABS print smoothed with acetone vapor.

In addition to the heat treatment, the team also experimented with increasing degrees of infill overlap in the slicer settings. The end result is that parts printed with a high overlap and then heat treated were able to reliably handle pressures as low as 0.4 mTorr. While the paper admits that manually cooking your printed parts with a heat gun isn’t exactly the ideal solution for producing vacuum-capable components, it’s certainly a promising start and deserves further study.


How good is OpenSCAD?
Pretty good.
It works well! If you find yourself annoyed by some of the quibbles others have with it, I find CadQuery to be a better-rounded option, and it’s a Python library.
Always warms my heart to see CAD images in their yellow and green goodness. Long live OpenSCAD!
they promised a lot, visual buttons and changing values, etc., but none of this has been realized for years.
for now, it’s simply a library overlay that you can safely drop into any language.
maybe in some time something will come of it
Well I have been using OpenSCAD to design and export parts used in the lab that I work in. Granted it’s a mineral lab so I’m not printing vacuum parts just high wear mechanical parts used in the robotics system.
Maybe filling the part with water to keep the inner surface cool while heating the outside?
But I imagine there has to be a material that can be painted on to seal the part and that can withstand a vacuum.
Would dipping in Resin and curing the part have a similar effect?
Guess this is covered by: “The paper goes on to explain that there are coatings that can be used to seal the printed parts, but that they can outgas at negative pressures.” ;)
Given how well discussed various 3D printing annealing techniques are if you go digging for them even gently, it feels a little awkward that this wasn’t done more… well, scientifically? (especially when presumably having access to related equipment).
For example, embedding the parts in foundry sand and then using an oven/kiln often comes up as an approach for annealing at temperatures above the HDT much less the melting point, in order to avoid part deformation.
“While the paper admits that manually cooking your printed parts with a heat gun isn’t exactly the ideal solution for producing vacuum-capable components”
Heat gun, or would simply baking them accomplish the same thing?
It’s not like it’s particularly unusual to have a finishing step in a process.
(This idea that the beginning and end of the process for 3D printing requires that the item can be retrieved off the print bed and used as-is is artificially limiting.)
Focussed heating may be preferable to heating the entire part at once. As long as heating is localised, slumping may be minimised by reducing the mass of the part that is softened at any one time, and providing support via the surrounding areas that are not currently softened. Yes, differential heating can cause its own headaches too, but that depend son what distortions are acceptable and which are not for a given part (e.g. for a hose barb, as long as the circumference is the same an oval hole may work just as well as a perfect circle, but an undersized perfect circle is no good).
The paper mentions that when they tried to bake them, they parts deformed. There’s probably a “sweet spot” in the oven where you get just enough heat to seal them but not so much to cause damage, but presumably it’s easier to finesse it manually with the heat gun and direct observation of how the part’s surface is changing.
There is also the technique of curing printed items in an oven, embedded in fine table salt. This allows to keep the original shape, but supposedly only works with 100% infill. Or thick walls if the salt is preheated so that there is no heat-up time. Haven’t tried for myself though.
no, I can vouch from my own experiments with a small butane torch, you need to flash the surface with heat to let the surface layer flow without letting the heat sink into the part, which can cause deformation. lots of perimeters/surface infill is needed, and you have to let it cool completely before doing another area/second pass. if it’s even noticably warm to the touch when you do a second pass, you run risk of deformation due to heat penetration.
you also need to avoid overheating the surface and causing Scorching or Foaming
Honestly. This gives me an odd idea. How about using high speed air cooking. Like the subway sandwich machines, that way it is an even high temperature treatment, but doesn’t penetrate the part? An air fryer? Not sure how I would set one up but I think it it’s worth a shot.
Consistency is likely problematic with this this method as well. perhaps “baking” in a air fryer set to a low temperature.. just high enough to glaze the whole surface for 1 minute or something
My guess is that they are searing the surface rather than cooking the whole part volume. Still, a convection oven at high temperature might work.
or a quick dip in some hot liquid.
Time to deep fry our prints!
Their shape affords it mounted on a mandrel and spun with a point flame source. It works for glassblowing, although I have no idea whether it would be suitable for plastics though.
Maybe a hot-air soldering iron🤔
This is interesting, unfortunately most high vacuum systems I’ve worked with get incredibly hot. I can only imagine building a fusor out of 3D printed parts only for it to melt and slowly fall in on itself. Granted, in a pinch it’s good to know this works fine!
High vacuum systems will definitely require baking out, and there may also be heat sources in vacuum deposition systems. However the 0.4 mTorr mentioned in the article would be fine for sputter pressures, maybe 4e-3 mBar.
Hmm, wonder how nylon would perform with this task. I’ve successfully printed working hose parts with nylon, although I might have leaned into the temperature a bit higher on the print (than was standard).
> Parts produced with filament-based printers tend to be porous,
Are they though? We just had an article here last week about food grade printing, where someone inspected printed parts under a high power microscope and saw no evidence of any kind porosity.
I think in this case, they mean that air can pass through it in some spots.
Ok, but what spots? If a hot air gun can seal those “pores”, why didn’t the nozzle do so when laying down those lines while the filament is also fully melted?
This only makes sense if the filament is wet leading to sizzling and popping and thus inconsistent extrusion, in which case the hot air gun is just a post-processing hack to fix a mistake made in the printing step, and the proper fix is to correct the printing step.
You also have the weaker layer-layer bond with the layers at different states of cooling – be easy for the cooling and shrinking of top layers to pull open cracks lower down.
Its actually pretty hard to get a print to be really properly water tight, let alone gas tight. Not saying it can’t be done, but there are so many variables and I’d go as far as to say it can’t be done without some form of post processing for some materials.
And the Nozzle only acts on the filament its just laid down, and perhaps adjacent perimeter – its very very very focused heat, it won’t heat more that maybe 3mm circle where the heatgun is able to soften/melt the top few nanometers of maybe as big an area as 10cm (heck there are even bigger heatguns than the normal hand held paintstripping kind) – its working on the top surface of huge numbers of layer at once.
the difference between *material* porosity (the plastic) and *structural* porosity (the voids between extrusion lines)
The plastic is fully melted when laying down layer lines, that’s how 3D printing works at all. So I’m not sure where this “material porosity” is coming from if blasting it with a hot air gun does the trick. Something just doesn’t add up.
Best comments I’ve read in this entire month. Cool things start to happen, when you combine additive technology with heat-treated technology, like polimer clay, or liquid solutions, like epoxy resin, or wax, or alebaster, or some metals. Not sure why so many people stop on 3d printing step solely.
Crazy thing is I have a vacuum pump, an air fryer, a convection oven, and a pretty decent heat gun. This article makes me want to experiment.
And the oldschool way, (Used prior to 3D printing, but application described here is 3D prints) because heat guns are too boring… https://hackaday.com/2018/05/03/smooth-pla-through-the-fire-and-flames/
Since I was just now experimenting with annealing PETG parts for better z strength and surface…
The essence of the technique is timing: long enough for surface melting but short enough that the bulk of the part retains rigidity. That’s why oven techniques aren’t the way. This detailed investigation is a very nice guide to finding that balance. Obviously it takes some practice to get it just so.
I used my indispensable butane soldering iron with the hot gas tip, moderate red heat like a torch but no external flame. With a very thin part similar to their adapter on the first try it got soft enough to deform in the fingers. Second try I used powdered salt (coffee mill) to support it. Deformation was minor and the important dimensions were retained. Oven baking 235F/113C unsupported parts deformed to oblivion. Salt supported, the part retained its shape but shrank so that the essential diameter was no longer serviceable.
But, a chunkier part of similar shape, salt supported, could withstand the hot gases long enough for observable surface change without noticeable deformation. I didn’t go as far into surface melting as they did, but their results are encouraging. And maybe someday I’ll check out polypropylene too.
I would imagine it’s like painting with a rattle can, an empirically determined speed and distance is required for best results.
Seems like a forge, kiln or heat treat oven – something that can get uniformly very much hotter than most ovens might be a good solution, as then it really is just down to timing (which could perhaps be made a little more forgiving by cooling the part bellow ambient first – so its own internal mass needs more energy to get soft.)
I just have a few cans of DCM laying around for sealing, smoothing, and gluing all my filaments (except ABS and Nylon).
I’d recommend the team referenced in the article take a look Stefan at CNC Kitchen’s latest video on printing transparent FDM and resulting strength and toughness. I’d be surprised if the technique he used didn’t also result in impermeable pressure-resistant parts: https://www.youtube.com/watch?v=9qb25Gi4Jv0
I call shenanigans…. Those KF sealing surfaces are going to leak like a sieve. What happens when stress gets put on the joint from the rest of the foreline? Seems like a great recipe for turbo salad.