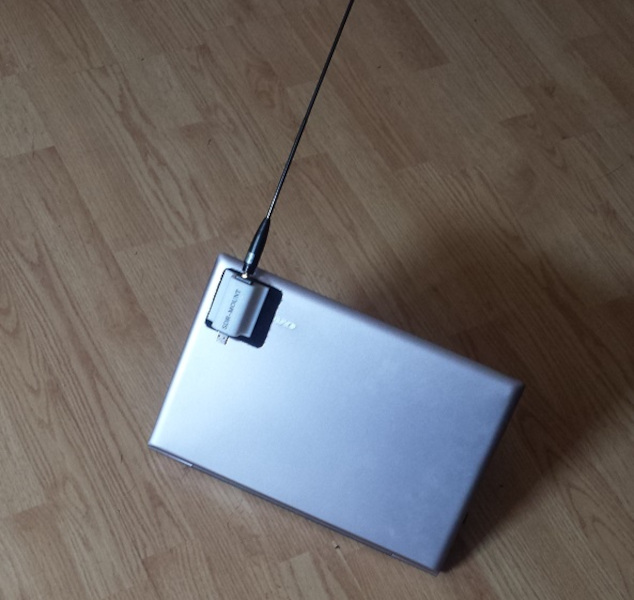
Software-defined radio is all the rage these days, and for good reason. It eliminates or drastically reduces the amount of otherwise pricey equipment needed to transmit or even just receive, and can pack many more features than most affordable radio setups otherwise would have. It also makes it possible to go mobile much more easily. [Rostislav Persion] uses a laptop for on-the-go SDR activities, and designed this 3D printed antenna mount to make his radio adventures much easier.
The antenna mount is a small 3D printed enclosure for his NESDR Smart Dongle with a wide base to attach to the back of his laptop lid with Velcro so it can easily be removed or attached. This allows him to run a single USB cable to the dongle and have it oriented properly for maximum antenna effectiveness without something cumbersome like a dedicated antenna stand. [Rostislav] even modeled the entire assembly so that he could run a stress analysis on it, and from that data ended up filling it with epoxy to ensure maximum lifespan with minimal wear on the components.
We definitely appreciate the simple and clean build which allows easy access to HF and higher frequencies while mobile, especially since the 3D modeling takes it a step beyond simply printing a 3D accessory and hoping for the best. There’s even an improved version on his site here. To go even one step further, though, we’ve seen the antennas themselves get designed and then 3D printed directly.


I like how the SDR dongle was integrated, so it beyond just a antenna mount. I also like the Velcro attachment. Maybe not rocket science, but still a solid, practical design.
I do too!
But, I think encapsulating the SDR in epoxy (as well as attaching it to a laptop) will result in overheating.
heh i didn’t even think of overheating — i just thought it seemed way overkill. i have had great luck even with thin 1mm walls and mechanically-abusive use cases. i guess you can get thermally conductive – electrically insulated epoxies?
but i clicked through to see if he used one of those epoxies, and now i think i understand. the epoxy is just around the coax connector, because that winds up seeing a bit of lever-arm loading. if i understand correctly, the majority of the board surface is not epoxied. seems reasonable to me!
The epoxy just goes into the holes in the back to prevent the SDR module from sliding out. It doesn’t surround the part.
Velcro is rocket science! NASA used a lot of it. :)
It’s just cargo culting nature. ;)
Duct tape, bailing wire, velcro, and bubble gum, it’s all rocket science! 🚀
I just uploaded the 3D part to my ShapeWays shop. You can get it there if you don’t have a 3D printer. The link is at the very bottom of the linked page.
The second version has much better reception.
What is the purpose of the 3D printed part? Why not apply the velcro directly to the SDR itself?
Aesthetics and increased surface area…
Both projects were updated again today. Please revisit the website. Another idea… try SDR module #2 with short SMA antenna. Very discrete and strong. Easier to store in laptop bag.
Would it make sense if you used those magsafe stickers? They are not to expensive and are likely easier to stick and remove as needed than velcro
Here are parts for a better version of the laptop SDR…. You’ll need an L bracket to mount it though. Check at a local hardware store.
SDR: https://www.amazon.com/gp/product/B073JZ8CC2/
$34.95
CABLE: https://www.amazon.com/SDTC-Tech-Coaxial-Extender-Connector/dp/B07N1QZVHR/
$9.99
ANTENNA: https://www.amazon.com/gp/product/B00UJATBX8/
$6.09
VELCRO: https://www.amazon.com/Self-Adhesive-Strips-Sticky-Fastener-COCOBOO/dp/B07R1H53M1
$16.99
Just velcro the SDR to the laptop lid – done!