Kids’ Jukebox Based On Arduino With RFID

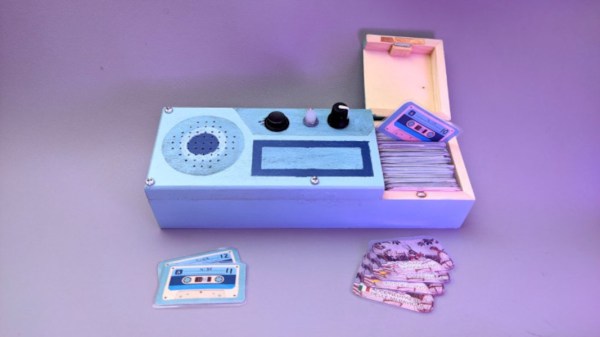
Consumer electronics aimed at young children tend to be quite janky and cheap-looking, and they often have to be to survive the extreme stress-testing normal use in this situation. You could buy a higher quality item intended for normal use, but this carries the risk of burning a hole in the pockets of the parents. To thread the needle on this dilemma for a child’s audiobook player, [Turi] built the Grimmboy for a relative of his.

Taking its name from the Brothers Grimm, the player is able of playing a number of children’s stories and fables in multiple languages, with each physically represented by a small cassette tape likeness with an RFID tag hidden in each one. A tape can be selected and placed in the player, and the Arduino at the center of it will recognize the tag and play the corresponding MP3 file stored locally on an SD card. There are simple controls and all the circuitry to support its lithium battery as well. All of the source code that [Turi] used to build this is available on the project’s GitHub page.

This was also featured at the Arudino blog as well, and we actually featured a similar project a while ago with a slightly different spin. Both are based on ideas from Tonuino, an open source project aimed at turning Arduinos into MP3 players. If you’re looking to build something with a few more features, though, take a look at this custom build based on the RP2040 microcontroller instead.

A scan (x-ray?) of a human skull. Electrodes trace around the skull and are attached to the brain. These implants are for reducing Parkinson's tremors.

What Happens When Implants Become Abandonware?

You’ve probably had a company not support one of your devices as long as you’d like, whether it was a smart speaker or a phone, but what happens if you have a medical implant that is no longer supported? [Liam Drew] did a deep dive on what the failure of several neurotechnology startups means for the patients using their devices.

Recent advances in electronics and neurology have led to new treatments for neurological problems with implantable devices like the Autonomic Technologies (ATI) implant for managing cluster headaches. Now that the company has gone out of business, users are left on their own trying to hack the device to increase its lifespan or turning back to pharmaceuticals that don’t do the job as well as tapping directly into the nervous system. Since removing defunct implants is expensive (up to $40k!) and includes the usual list of risks for surgery, many patients have opted to keep their nonfunctional implants. Continue reading “What Happens When Implants Become Abandonware?”

Antenna Mount Designed For On-The-Go SDR

Software-defined radio is all the rage these days, and for good reason. It eliminates or drastically reduces the amount of otherwise pricey equipment needed to transmit or even just receive, and can pack many more features than most affordable radio setups otherwise would have. It also makes it possible to go mobile much more easily. [Rostislav Persion] uses a laptop for on-the-go SDR activities, and designed this 3D printed antenna mount to make his radio adventures much easier.

The antenna mount is a small 3D printed enclosure for his NESDR Smart Dongle with a wide base to attach to the back of his laptop lid with Velcro so it can easily be removed or attached. This allows him to run a single USB cable to the dongle and have it oriented properly for maximum antenna effectiveness without something cumbersome like a dedicated antenna stand. [Rostislav] even modeled the entire assembly so that he could run a stress analysis on it, and from that data ended up filling it with epoxy to ensure maximum lifespan with minimal wear on the components.

We definitely appreciate the simple and clean build which allows easy access to HF and higher frequencies while mobile, especially since the 3D modeling takes it a step beyond simply printing a 3D accessory and hoping for the best. There’s even an improved version on his site here. To go even one step further, though, we’ve seen the antennas themselves get designed and then 3D printed directly.

A Simple High-Fidelity DIY Mic Pre Amp

If you’re doing any serious work with microphones, you’ll typically find yourself in want of a dedicated preamp. [ojg] needed just such a thing for acoustic measurement duties, and set about working up a cheap DIY design by the name of ThatMicPre.

The design is based around the THAT1510 preamp IC, known for its good frequency response and low harmonic distortion and noise. The design is also compatible with THAT1512, SSM2019, and INA217 chips as well. [ojg] gave the design switch-controlled gain levels, providing greater accuracy than a potentiometer adjustment, and the ability to supply phantom power for mics that require it. The PCB is designed to rely on through-hole parts and common connectors for easy assembly.

The design is open source, and has already been built by others on the DIYAudio forums. Built into a simple case, it looks like a handsome and well-built piece of audio equipment. We’ve featured quite a few unique preamps over the years, and if you’ve been building your own, we’d love to see those too!

Foot Pedal Ups Vim Productivity, Brings Ergonomic Benefits

Vim is the greatest or the worst text editor of all time, depending on the tribe you’re in. Either way, members of both camps can appreciate this build from [Chris Price], which uses a foot pedal to ease operations for the user.

The basic concept was to use a pedal to enable switching between normal and insert modes. In Vim’s predecessor, vi, switching modes was easy, with the ESC key located neatly by the Q on the keyboard of the ADM-3A terminal. On modern keyboards, though, it’s a pain, and so a foot pedal is a desirable solution. In the Vim world, it’s referred to as a “Vim clutch.”

The build used a cheap pedal switch sourced from eBay, into which a Raspberry Pi Pico was installed. The Pico was hooked up to the switch contacts, and programmed to act as a USB HID device. When the pedal is pressed down, the Pico sends an “i” keypress to enter Vim’s insert mode. Releasing the pedal has the Pico send a “ESC” keypress to return to normal mode.

Those that use Vim on a regular basis would likely appreciate the productivity improvements of such a device. Plus, there’s some ergonomic benefits to not having to strain one’s hand over to reach the ESC key. Of course, it’s an old-school solution, but there’s still something so compelling and next-level about having a foot pedal hooked up to one’s dev rig.

Battery Engineering Hack Chat Gets Charged Up

Turn the clock back a couple of decades, and the only time the average person would have given much thought to batteries was when the power would go out, and they suddenly needed to juice up their flashlight or portable radio.  But today, high-capacity batteries have become part and parcel to our increasingly digital lifestyle. In fact, there’s an excellent chance the device your reading this on is currently running on battery power, or at least, is capable of it.

So let’s get to know batteries better. What’s the chemical process that allows them to work? For that matter, what even is a battery in the first place?

It’s these questions, and more, that made up this week’s Battery Engineering Hack Chat with Dave Sopchak. Our last Hack Chat of 2022 ended up being one of the longest in recent memory, with the conversation starting over an hour before the scheduled kickoff and running another half hour beyond when emcee Dan Maloney officially made his closing remarks. Not bad for a topic that so often gets taken for granted.

Continue reading “Battery Engineering Hack Chat Gets Charged Up”

Hackaday Podcast 197: Decoding VHS, Engineering The TV Guardian, And Gitting Code Into Your ESP32s

This week, Editor-in-Chief Elliot Williams and Assignments Editor Kristina Panos delighted in the aural qualities of Kristina’s brand new, real (read: XLR) microphone before embarking on creating a podcast highlighting the best of the previous week’s hacks.

This week in the news, NASA returned to the Moon with Artemis I, and this time, there are CubeSats involved. After that, it’s on to the What’s That Sound results show, marred by Kristina’s cheating scandal (listening ahead of time) and Elliot’s reading the filename aloud before we started recording. Finally, we move on to the hacks — they start with a trip to the 90s both sonically and visually, and end with a really nice alarm clock that’s decidedly 70s, and definitely Hackaday.

Check out the links below if you want to follow along, and as always, tell us what you think about this episode in the comments!

And/or download it and listen offline.

Continue reading “Hackaday Podcast 197: Decoding VHS, Engineering The TV Guardian, And Gitting Code Into Your ESP32s”