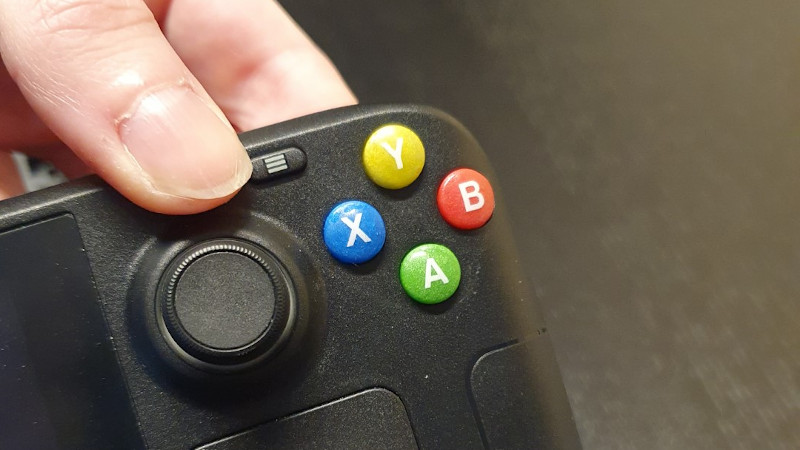
If you play games on multiple consoles, you’re probably familiar with the occasional bout of uncertainty that comes with each system’s unique button arrangement. They’re all more or less in the same physical location, but each system calls them something different. Depending on who’s controller you’re holding, the same button could be X, A, or B. We won’t even get started on colors.
Overhearing her partner wish the buttons on his Steam Deck matched the color scheme of the Xbox, [Gina Häußge] (of OctoPrint fame) decided to secretly create a set of bespoke buttons for the portable system. There was only one problem…she had no experience with the silicone molding process or epoxy resins which would be required for such an operation.
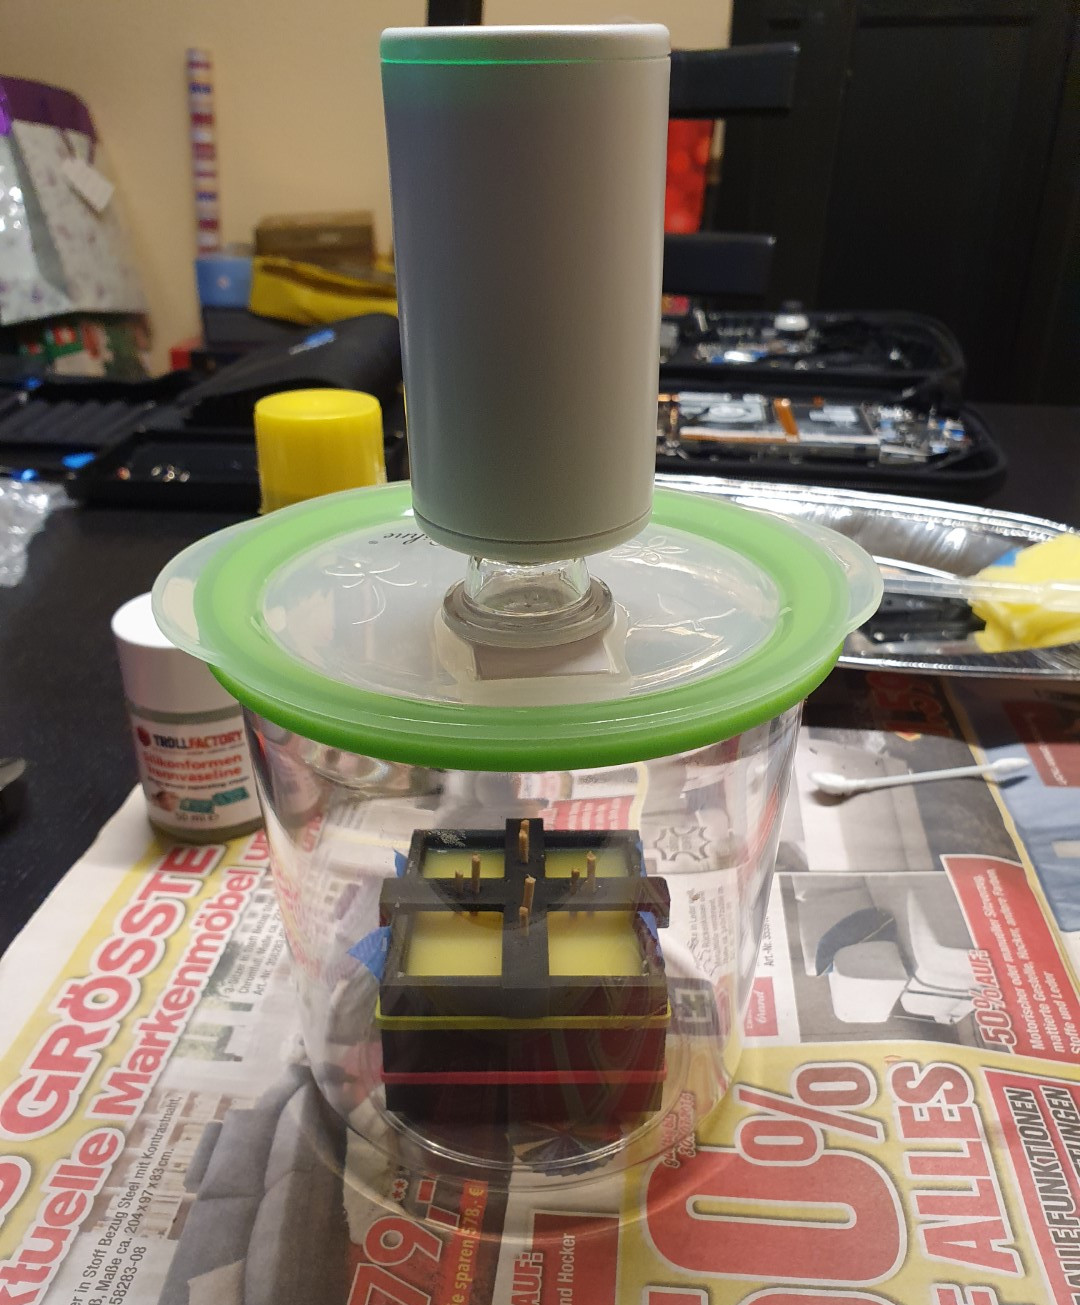
Luckily we have the Internet, and after researching similar projects that focused on other consoles, [Gina] felt confident enough to take apart Steam’s handheld and extract the original plastic buttons. These went into a clever 3D printed mold box, which was small enough to put into a food vacuum container for degassing purposes. The shape of the buttons necessitated a two-piece mold, into which [Gina] embedded two channels: one to inject the resin, and another that would let air escape.
The red, green, blue, and yellow resins were then loaded into four separate syringes and forced into the mold. It’s critically important to get the orientation right here, as each button has a slightly different shape. It sounds like [Gina] might have mixed up which color each button was supposed to be during an earlier attempt, so for the final run she made a little diagram to keep track. After 24 hours she was able to peel the mold apart and get a look at the perfectly-formed buttons, but it took 72 hours before they were really cured enough to move on to the next step.
[Gina] applied the legends with a sheet of rub-on lettering, which we imagine must have been quite tricky to get lined up perfectly. Since the letters would get worn off after a few intense gaming sessions without protection, she finally sealed the surface of each button by brushing on a thin layer of UV resin and curing it with a flashlight of the appropriate wavelength.
There are a fair number of steps involved, and a fair bit of up-front cost to get all the materials together, but there’s no denying the final result looks phenomenal. Especially for a first attempt. We wouldn’t be surprised if the next time somebody wants to head down this particular path, it’s [Gina]’s post that guides them on their way.


Gina always comes up with great ideas, but this is particularly awesome in using that food container as a vacuum chamber. I do a lot of stuff that could use a cheap somewhat-low-pressure vacuum, for debubblizing, and this is a great way to do it.
I got that idea from a Hackaday post from December 2019 (also by Tom): https://hackaday.com/2019/12/19/degassing-epoxy-resin-on-the-very-cheap/
Jasper Sikken tried it with resin with great results, I just figured it should work just as well with silicone, and that turned out to be the case indeed ^^ But all credit for the food container approach should go to Jasper!
A vacuum pump (at least suitable for this) is pretty darn cheap its the oil it will burn through that actually works out a little expensive (though you can catch and reuse most of it). I suspect that food one used here is a bit anaemic – still better than nothing just likely to be too slow and low power vacuum to really work well on the tricker molds and faster setting resins.
I’ve found that for resin work at least normal cheap airline fittings and quick releases work just fine at keeping the atmospheric pressure out. For myself I use a thick sheet of polycarb with a hole drilled in it for the vacuum fitting and some left over old silicon as a gasket on top of an old pressure cooker base. I also use that pressure cooker whole for pressure casting. It is a little leaky in both directions but way more than good enough for this role, and cost basically nothing but the pump – just have to be a little paranoid that the pressure release valve is working right and (or) that your airline regulator works properly, as I’d not trust that bodged pressure pot with 100+psi compressors usually run at – it aught to be fine even at that complete overkill pressure, but threaded fittings into relatively few thin metal (I guess I could always weld or braze it in but I haven’t) and small lugs that hold the lid down against a pretty big pan lid area…
Just put a pressure gauge on it, please!!!!
In college, we sometimes used a venturi vacuum generator to pull a vacuum on carbon fiber layup molds. That could be an even more economical option if you have access to an air compressor.
Other than the power cost, as it can’t be nearly as efficient. I also have doubts on if a normal sized shop compressor can actually supply enough air to pull enough vacuum to be really good for the job – working window on the resin vs volume to evacuate and just how deep a vacuum it can pull wise… Still going to be way way better than nothing of course, and may be entirely sufficient – the fluid dynamics of such things I don’t have a good instinctive feel for or the interest to try and calculate/look up…
(And I’ve never done vacuum bagging myself, only resin casting. So the requirements for vacuum bagging may be rather lower – I expect they are no higher at least – as fibre resins always seem to be quite thin and slow set.)
M&Ms!
Hey! You said my comment! XD
+1
forgot to mention: very good writeup in the linked source.
I did this but with a 3D printer https://www.reddit.com/r/SteamDeck/comments/10c5el5/since_you_all_asked_glow_dpad/?utm_source=share&utm_medium=android_app&utm_name=androidcss&utm_term=1&utm_content=share_button