Having an enclosure around an FDM 3D printer is generally a good idea, even when printing only with PLA, as it keeps the noise in, and the heat (and smell, with ABS) inside. With all the available options for enclosures out there, however, [David McDaid] figured that it should be possible to make an enclosure that does not look like a grow tent and is not overly expensive. He also shared the design files on GitHub.
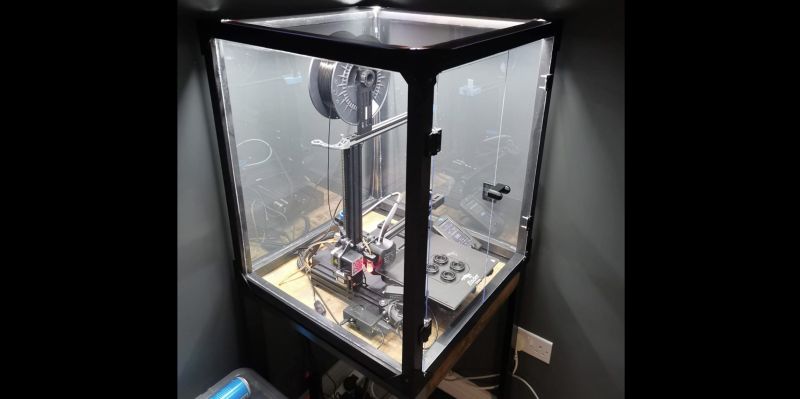
The essential idea is very simple and straightforward: the structural part is cut out of pine beams that are cut to size and joined into a cube by (3D-printed) corner brackets, with acrylic (Perspex) sheets filling in the space between the wooden beams. A door is formed using (also 3D-printed) hinges and door handles. The whole enclosure is rounded off with a lick of paint on the wooden elements, and a diffused set of LED lights for internal illumination.
It definitely has to be admitted that it makes for a very stylish enclosure, with a lot of modding potential. It can also easily be adapted to differently sized printers and filament material demands.


On my ‘to do’ list now
Very nice looking. But I think its better to do something more isolated in order to have less temp loss and keep things warm in order to print higher temps materials. Saving it for my enclosure! Thanks!
Don’t want to be a safety sally here, but there are a few things I would improve for safety reasons. There are tons of images available of burned out printers and even houses burned down because of failures. These things can happen, sadly. Those tents are designed to be fire resistant. If you design this, at least try to accomplish the same thing, which isn’t difficult at all. Order a bunch of 2020 or 4040 extrusions, which are cheap. Replace acrylic with polycarbonate, which is fire resistant unlike acrylic. For hinges, you can use cheap steel ones from the hardware store. With 2020/4040 you don’t need corner brackets as you can tap and bolt them, which is also safer.
Then it’s also a good idea to take mainboard and psu and place them outside the case (can’t tell if that’s done in the picture) to prevent heating it up. Adding a temperature fuse for the bed is another good upgrade for an enclosure.
Good feedback – absolutely nothing wrong with taking fire safety seriously. It’s noted in the blog that I use OctoPrint, not mentioned is that I have the TemperatureFailsafe plugin installed as a precaution. And as like many others, I don’t leave the printer unattended.
I need to stress though that the purpose here was to keep the build costs way down for a basic build. Not using 2020/4040 extrusions was intentional – pricing is just not comparable to stripwood. Same thing with polycarbonate.
Personally, I would recommend you take necessary steps to get as much of the electronics outside of this enclosure possible, specifically the power supply. Running this long term with that PSU in there will lead to an early failure. Ask me how I know.
One often-overlooked aspect of 3D printing is preventing conditions that promote fires to begin with.
Sure, there’s some fail-safes built into things like Marlin (which Creality left disabled for way too long on some of their builds), and those work well at what they can do, but they can only act on what they can observe, and they can only control what they can control.
I’m talking about even simpler, low-tech steps: Using appropriate overcurrent fuses for each powered wire, including things like the tiny little wires for the parts cooling fan: Marlin can’t detect a short here, but a little wire can start a little fire (and a little fire can quickly turn into a big fire).
And using thermal fuses on things like the heated bed: If the SSR or MOSFET driving the bed fails short, then Marlin can detect the problem but can’t turn it off. A thermal fuse, though? It’ll open right up if things get too hot.
This stuff isn’t free, and it’s a pain to integrate because it takes time to sort it all out and make it happen.
But it isn’t difficult to make a nice, neat job of it: They make DIN rails and fuse holders in factories every day and the parts cost a lot less than houses cost.
The stuff he’s using I think is polystyrene, I’ve used it before and yes it is flammable. My first printer case was made out of this stuff.
My second was some IKEA lack tables and I used some clear binder covers taped together for the back and the sides. It provides draft protection but it’s cheap and can be easily removed when I need it. Only the doors on the front aren’t and they’re made from glass I got cut to measure for very cheap.
Sheet glass (the stuff used in greenhouses) itself is really cheap and most glass places will cut to size and would highly recommend it. The edges can be sharp though but a printed bracket and a bit of tape on the edge make a big difference.
I don’t want to be a spokesman for safety, but there are a few things I would change for them. There are several photographs of burned-out printers and even houses on fire as a result of mistakes. Sadly, these things can happen. Those tents are made to withstand fires. If you design this, at least try to achieve the same goal—not it’s at all challenging. Purchase a lot of the affordable 2020 or 4040 extrusions. Instead of acrylic, choose polycarbonate since it is fire resistant. You can use inexpensive steel hinges from the hardware store. Corner brackets are not necessary with 2020/4040 because they can be bolted instead, which is safer.
Glass is an excellent option. Regular non-tempered window glass is very, very inexpensive and there are shops everywhere that will cut it to size. (There’s also a bunch of standard sizes that are stocked by places that deal with it, which an enclosure could be designed around to save more money.)
There is also extruded plastic edging that can be attached to cover the sharp edges and provide a mechanical buffer.
Sure, it’ll make a mess if you drop it, but it won’t burn and may even be able to contain a fire until it suffocates (instead of becoming melty, drippy fuel).
Is there an exhaust for heat on the bottom? I’d be worried about cooking my printer.
The whole thing sits raised on the 4 corners, so there’s air flow gaps running all along the bottom. I also left gaps around the doors as well. Internal temp never climbs above 30°C which I’m happy with.
There’s the potential to easily add a ventilation hole and fan but the purpose here was to keep the build costs way down for a basic build.
Ah brilliant to hear you checked all that hadn’t followed the links yet to see if you talked about it. Might have to give the build a try then.
totally agree, I have 3D printer at vteams but never think in that way
Very nice. I think my next enclosure will use this design. I made a Prusa Lack enclosure and it was a pain in the butt to build in the US – especially cutting the polycarbonate. It’s not impossibly hard … just overengineered. This one looks MUCH easier and cheaper and has more ways to substitute parts.
May not look like a grow tent … but it does remind me of an aquarium. Need some fish floating around in there :) . Ha!
Neat build. I like it.
I would say decorating it for the fishes. 3D printer will save lot of wastage
To those of you concerned about fire… Check out elide fire extinguishing ball. Cheap and automatic! Other brands as well. But pretty awesome!
I don’t want to be a spokesman for safety, but there are a few things I would change for them. As a result of mistakes, there are several photographs of burned-out printers and even houses on fire. Unfortunately, these things do happen. Those tents have been designed to withstand fires. If you design it, at least try to achieve the same goal—not it’s difficult. Purchase a large quantity of the low-cost 2020 or 4040 extrusions. Polycarbonate is a fire-resistant alternative to acrylic. Steel hinges from the hardware store are an inexpensive option. With 2020/4040, corner brackets are not required because they can be bolted instead, which is safer.
I have built an enclosure that might be of interest to some.
https://www.instructables.com/Yet-Another-3D-Printer-Enclosure-and-Dry-Box/