
Linux users have a lot of software to be proud of. However, there is the occasional Windows program that does something you’d really like to do and it just won’t run. This is especially true of low-level system programs. If you want to poke around your CPU and memory, for example, there are tons of programs for that under Windows. There are a few for Linux, but they aren’t always as complete or handy. Recently, I had half the memory in my main desktop fail and I wanted to poke around in the system. In particular, I wanted to read the information encoded in the memory chips configuration EEPROM. Should be easy, right? You’d think.
Not Really Easy
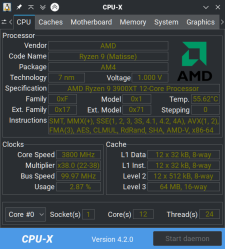
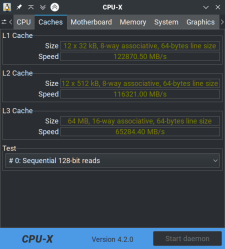
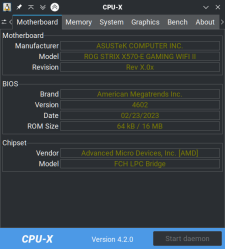
One nice tool a lot of Windows users have is CPU-Z. Of course, it doesn’t run on Linux, but there is a really nice imitator called CPU-X. You can probably install it from your repositories. However, the GitHub page is a nice stop if for no other reason than to enjoy the user name [TheTumultuousUnicornOfDarkness]. The program has a gtk or an ncurses interface. You don’t need to run it as root, but if you press the “start daemon” button and authenticate, you can see some extra information, including a tab for memory.
Don’t get excited. It doesn’t read the EEPROM information, so it failed for me, but it’s still a nice tool. What it does, though, is tells you what the current speed of the RAM is along with the vendor. It also shows you lots of other things, including some benchmarks for your cache and your computer.
So What Do We Want?
A modern stick of DRAM has a little EEPROM on it that the CPU can read via I2C. This is the “serial presence detect” or SPD memory. Each generation of DRAM has a slightly different layout, but in general, it lets the CPU adjust itself to the memory’s speed and any other strange requirements it might have. In addition, there is extra room in there, and Intel defined an area to store enhanced parameters if you want to ask the RAM to go faster than it is rated. Most AMD motherboards can also read that information — the XMP profile — and use it. AMD also has a similar technology called AMP and, for DDR5, EXPO, which all have the same purpose.
Among the information that should be in the SPD is the RAM chip vendor and the “rank” of the memory: that is, does it use one set of chips or two. Of course, Linux can read I2C, so no problem, right?
Next Try
Of course. There’s even a nice tool called decode-dimms that should do the trick for us. If you run it, there is a pretty good bet that you will get an error saying you need to load at24, eeprom, or ee1004 drivers. The at24 drivers are generic, and if you try ee1004, it won’t help yet, anyway. So you dutifully load eeprom using:
sudo modprobe eeprom
Running decode-dimms now works. Kind of. For DDR4 DRAM (and probably others), it will complain that the EEPROM device is the wrong size and you should have used ee1004. That’s nice, but it doesn’t seem to work. Perhaps you need both? Nope. In fact, if you load eeprom, it will grab up the SPD devices and ee1004 won’t be able to find them. If you have eeprom loaded (lsmod can tell you), you need to unload it:
sudo modprobe -r eeprom
sudo modprobe ee1004
Finding SPD
The real issue is that ee1004 doesn’t know how to find the SPD by itself. You’ll have to help. The first thing you need to do is find the SMBus adapters on your motherboard. You may have more than one (I do). Here’s how to do it:
i2cdetect -l

i2c-0   smbus           SMBus PIIX4 adapter port 0 at 0b00      SMBus adapter
i2c-1   smbus           SMBus PIIX4 adapter port 2 at 0b00      SMBus adapter
i2c-2   smbus           SMBus PIIX4 adapter port 1 at 0b20      SMBus adapter
i2c-3   i2c             NVIDIA GPU I2C adapter                  I2C adapter
i2c-4   i2c             NVIDIA i2c adapter 1 at b:00.0          I2C adapter
i2c-5   i2c             NVIDIA i2c adapter 3 at b:00.0          I2C adapter
i2c-6   i2c             NVIDIA i2c adapter 4 at b:00.0          I2C adapter
i2c-7   i2c             NVIDIA i2c adapter 5 at b:00.0          I2C adapter
i2c-8   i2c             NVIDIA i2c adapter 6 at b:00.0          I2C adapter
Your list will be, of course, different. I have three different SMBus adapters, and the SPD for each device will be in the range of 0x50 to 0x57. So we can do a little hunting (I am using -y 0, because I want to look at i2c-0):
i2cdetect -y 0 0x50 0x70

0  1  2  3  4  5  6  7  8  9  a  b  c  d  e  f
00:
10:
20:
30:
40:
50: -- -- 52 53 -- -- -- --
60:
70:
A few notes. If you don’t see any numbers here, try the other busses (in my case, -y 1 and -y 2). If you see “UU” instead of a number, then there is a device there already in use. You probably forgot to unload eeprom or it refused to unload. You’ll need to fix that before you go much further.
By the way, I’m assuming you have the base i2c drivers loaded, and you probably do. If not, you may need to load something like i2c-amd-mp2-pci or i2c-i801. It all depends on your motherboard. Try an lsmod to see what looks like i2c-something-something. You can also do shell completion on modprobe if you have that setup or search your /lib/modules directory for things that start with i2c.
Back to ee1004
If you don’t have ee1004 loaded, this is the time to ensure it is there. It won’t hurt to load it twice, but if that bothers you, use lsmod. If it isn’t there or you just want to be sure:
sudo modprobe ee1004
Of course, if you don’t have this, then you need a new kernel, or you need to build the module. Both of those things are beyond what I want to talk about here, but if you have a newish kernel from a major distro, you should be fine.
The next step is to create the devices using the numbers i2cdetect gave you on the bus you found. So in my case, I need i2c-0 0x52 and 0x53. Remember, half of my RAM is missing, so that’s why there are two devices. You may have four, and your numbers may be different. Don’t just assume my numbers are your number.
To create a new device, we need to write into the /sys directory. When you use sudo, your redirections don’t get root privilege, so you have to do it another way. Personally, I just use sudo -i to start a root shell, but you can use sudo tee if you like:
# This is one way if you are already root
echo ee1004 0x52 >/sys/bus/i2c/devices/i2c-0/new-device
# If you aren't root, try this:
echo ee1004 0x53 | sudo tee /sys/bus/i2c/devices/i2c-0/new-device
Once you’ve made all the devices, probably either two or four unless you have an odd number of memory sticks, you are ready to dump the EEPROMS. If you mess up, you can remove a device like this, assuming you are root:
echo 0x53 >/sys/bus/i2c/devices/i2c-0/delete-device
Decoding
Now you only have to run the decode-dimms command. The output is a lot, but you can save some space by asking it to do side-by-side mode. You can also ask it to output HTML (-f) if you want to look at it nicely formated in a browser. There is a lot of output, but this is the start:
decode-dimms --side-by-side

Memory Serial Presence Detect Decoder
By Philip Edelbrock, Christian Zuckschwerdt, Burkart Lingner,
Jean Delvare, Trent Piepho and others

Decoding EEPROM                                  0-0052           0-0053
Guessing DIMM is in                              bank 3           bank 4
Kernel driver used                               ee1004

---=== SPD EEPROM Information ===---
EEPROM CRC of bytes 0-125                        OK (0xFE45)
# of bytes written to SDRAM EEPROM               384
Total number of bytes in EEPROM                  512
Fundamental Memory type                          DDR4 SDRAM
SPD Revision                                     1.1
Module Type                                      UDIMM
EEPROM CRC of bytes 128-253                      OK (0xDF74)

---=== Memory Characteristics ===---
Maximum module speed                             2400 MT/s (PC4-19200)
Size                                             16384 MB
Banks x Rows x Columns x Bits                    16 x 16 x 10 x 64
...
XMP Profiles
Unfortunately, this still doesn’t read the XMP profile. However, you can easily dump a hex dump of the EEPROM. If you want a raw dump try:
dd if=/sys/bus/i2c/drivers/ee1004/0-0052/eeprom out=/tmp/dump.bin # bus 0, device 52 for me
If you want a hex dump, try:
hexdump -C /sys/bus/i2c/drivers/ee1004/0-0052/eeprom # or use xxd, od, etc.
Note that the Wikipedia page on SPD shows the XMP offset for DDR3 RAM. If you have something else, the offset will differ, but you should still find the header magic number. For my DDR4, it is at location 0x180, for example.
You can pick it apart for the hex or here’s an idea: write a decoder and put it on GitHub. Sure, I thought about it, but this post is long enough already! Luckly, hardinfo — which is a great tool, already has a decoder, but the Ubuntu repository version doesn’t grok ee1004. If you build the version from GitHub, it works just fine. However, you still have to configure the drivers, so it was worth the exercise of getting decode-dimms to work.
Wrap Up

There are a few other tools that will give you some information about your RAM that it gets either from the system or the SPD, including, of course, hardinfo. The lshw utility can tell you a little about your DRAM (try -C memory to limit the output). The dmidecode -t memory command can also display a few things. There are probably more.
It would be nice if the i2c drivers would pick up your memory chips independently. Still, once you have it set up it isn’t that hard, and you may only need to do it once. DDR5 probably has its own wrinkles. If you want to learn way too much about DDR4 memory, there’s a video you should probably watch.


“One nice tool a lot of Windows users have is CPU-Z. Of course, it doesn’t run on Windows”
*snicker*
It is a short path from only runs on Windows to doesn’t run on Linux. Can I blame ChatGPT? lol
Aw, I was hoping more for a “does anything actually *run* on Windows?” wisecrack.
In a similar vein: “Most AMD motherboards can also read that information — the XMP profile — and use it. AMD also has a similar technology called AMP[…]”
*Marathon*
Great article, from the title I presumed it was simply going to be a matter of reading /dev/men. Thankfully at present, I don’t have a need to deal with all of this very deeply but it’s great to know the resources.
Thank you, I learnt a lot but am left hoping I never need it!
Generally displaying hardware information is mere naval gazing so of course windows has all the glitz and glamor of doing nothing important. However, when you really want to the really low level stuff then Linux is usually your only option.
Here’s a list of useful utilities:
* cpuinfo provides detailed CPU info
* hardinfo provide detailed hardware info
* usbutils provide info about USB stuff
* pcutils provide info about PCI stuff
* mtd-utils for manipulating solid state mass storage devices
* dmidecode provides info from BIOS tables (useful even with UEFI)
* memdump for dumping sections of memory
* memtool for reading and writing memory mapped registers
They are all CLI tools so you will need to do more than just point and click but they will get you where you need to go. However, these tools are just scratching the surface what you can do by using their corresponding libraries.
There’s also
lspci
lsusb
lscpu
lshw
lsmem
and more…
RWEverything and HWINFO are windows programs. Also CheatEngine. Thiaphoon Burner would probably have got the info you needed on Windows.
I did need to use Linux to write my laptop panel EDID chip however. PowerStrip used to work for that in Windows, but with ‘progress’ I couldn’t get it to work.
Too bad this didn’t get into re-writing the SPD EEPROM table, for which there is a (paid) app, which of course can also read SPD for free on windows.
I needed to re write some ram SPD, I had 4 identical sticks of memory, but they had been branded in different ways. So one set had JEDEC table of 1333 and the other 1600. Even though the XMP of both was 1600. I wound up copying the SPD from the JEDEC 1600 modules to the other set.
This story seems unfinished, and it might be a good idea to get an external reader (I bought one, but the only software I found to run it is in Chinese, Google Lens helped me translate some of the buttons) or use an Arduino or Raspberry Pi to read the EEPROM
I always wondered how linux’s I2C drivers could really do much at all without being informed of what devices were attached at what addresses. It’s not like there’s a universal “identify” command; and sending the wrong commands to the wrong devices/addresses could result in misconfiguring registers, or even overwriting eeprom data. Looks like I wasn’t tpo far off, that it’s not so easy as just ‘modprobe i2c’!.
Btw, ee1004 is the jedec number for the SPD on DDR4 standard. To put some meaning to the ‘strange driver’.
Also I guess it doesn’t auto load and doesn’t ayto-detect stuff, cause it might end up being writable, and thus changeable …
I tried to do this recently and noticed that the normal decode script didn’t understand the extensions in ee1004 until I used the script written by the person who added the eprom support to the kernel:
https://users.suse.com/~jdelvare/hackweek/0x10/decode-dimms-DDR4
That decoded it properly for me. Your article nicely covers all the other magic needed to get the driver loaded and configured properly.
You can’t just dump the eeprom like you used to be able to as there’s some magic with having to read a specific location in the eeprom to trigger a page switch. It’s a huge kludge, but I guess they felt it was necessary–instead of just making the darn thing bigger like every other SPI flash chip has since time began…..
I wonder about all the places you could hide information outside of the “designated” storage places like hard drive partitions and memory on a modern pc. There’s probably dozens of places where you can store a few bits, or sometimes multiple megabytes.
Exactly. Complexity breeds bugs, and allows malware to be hidden.
Next you’ll have to wonder about how many sub-processors are hidden everywhere, like 8051 Processora in your system chips and USB controllers, even your LCD panel runs on a processor. Not to mention a platform controller, or ‘EC’ as ThinkPads refer to it. Alienware has a particularly nasty bug in a recent model (3070 GPU) where the keyboard disappears until you manually un install some hardware in device manager. Although since they haven’t fixed it, it would appear to be a hardware problem. (If you think you need an Alienware, buy anything else. Razer, Clevo ThinkPad (not Legion), even if you have to /shudder/ HP). They ‘work’ but if you are used to a desktop with a tower cooler and good airflow don’t be surprised when the laptop throttles *AND* melts, quite a trick but they sure know how.
Now now, they were referring to extra space ACCESSIBLE FROM WITHIN THE OS, but not ordinarily checked or considered an attack surface. Firmware attacks are whole different issue since it’s a known risk, even if we don’t always properly mitigate it with update verification etc. Your platform controller will even let you read out the firmware if you convince it, PIC micros like the ones used in some dell laptops are pretty easy to glitch, but it’s pretty hard to mess with it from within the OS without some serious effort. Even then, there would be almost no way to detect it from within the OS if someone got around the firmware protections, so it’s kind of moot. It’s much easier to write a script using semi-common shell commands to use quirks of system devices like RAM, CPU, or GPU in an unexpected way than it is to take control of your LCD controller, USB controller (actually that’s a pretty big threat surface with USB-C), or random micros on your motherboard.
Memory timings and settings can be directly read from the memory controller integrated in Processor or the north-bridge chipset for the oldest.
You should get the same values as those programmed by the BIOS or UEFI
Based on registers listed in datasheets, one can query various values such as the CAS Latency. Those are not the values read on DIMM through its SPD (i2c) but they are the current settings the PC is running with.
Providing human reading from the MC registers is one feature you will find in the CoreFreq software @ github.com/cyring/CoreFreq
Hello! Thank you very much!
I was getting a permission denied when
echo ee1004 0x52 >/sys/bus/i2c/devices/i2c-0/new-device
I had to change to new_device for it to work.
I’m using kernel 6.9.1
For DDR5, in case anyone is interested, there is a module written by Rene Rebe for SPD-5118 available on T2 packages. (https://t2sde.org/packages/linux)
Also, there is this github project that is very handy:
https://github.com/Steve-Tech/SPD5118-DKMS
This will allow to read temps with sensors, but decode-dimms probably needs work…