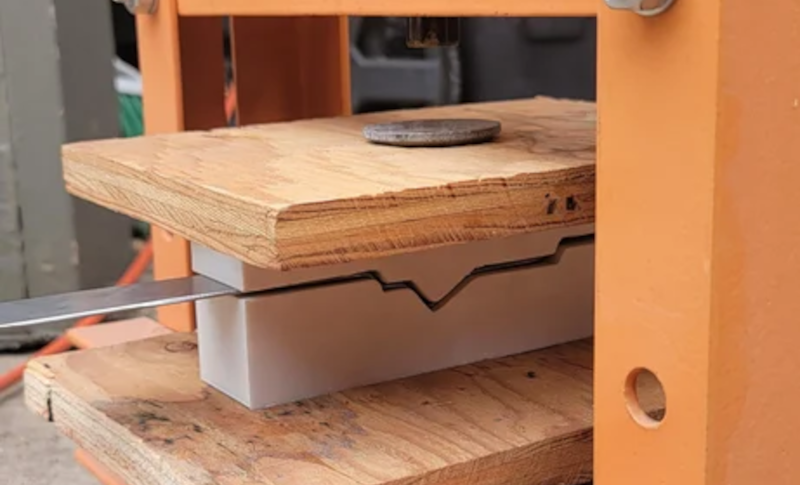
How do you use a 3D printer to bend metal? One way would be to take it to a machine shop and offer to trade the owner your printer for some time in their shop. A smarter way is to do like [Jaba 3D], and print dies using the printer. You can then use those dies in a press to make the shapes you want.
In the case of [Jaba], the Harbor Freight press uses a hydraulic cylinder to develop about 6 tons of pressure. We don’t think Harbor Freight carries this particular press, but for between $150 and $250, you can get a 12-20 ton press, and, of course, there are other suppliers, as well.
The target object, in this case, was an automotive bracket. The process of grabbing an image, converting it to an SVG, and then creating a 3D part has many uses. Apparently, PLA is sufficient for this purpose, although the print uses ten top and bottom layers along with 80% infill. That does make the prints take a long time.
As you might expect, the dies don’t last very long. In this case, they needed two shots, and they got them, but PLA is probably not the right material if you wanted to go for mass production.
Metal forming does occur at large scales, too. If you want to make your own press-forming tools, we have advice for you.


Interesting. I wonder if the concept could be used to created hollow shells instead of solid PLA blocks. These could then be filled with epoxy or concrete or something to take the compressive loads and act as a backer for the printed shell.
Yup. Or even use a porous infill, fill with water (which is incompressible), and seal? A solid wooden box around it should help prevent it ballooning.
Or even fill with liquid wax and let it set?
Maybe a sand-printer to do the mold?
https://www.exone.com/en-US/3D-printing-systems/sand-3d-printers
I *think* the pressure would push against your seal and sidewalls and you’d burst your balloon. Not hard to test though.
Filling with water! For sure it will leak immediately even before burst. Do not waste time trying.
That’s a good and useful idea.
I bet in most cases it would be easier to make the dies from wood, unless it is a very irregular shape. That particular die from the picture I could cut out with a jig saw in less time than it takes the printer to boot.
Whether it’s easier depends on one’s skill set. My jigsaw cuts are always messy and crooked. To get it right would take a long time for me, and might not even be possible without additional training. Additionally, transferring the drawing to the wood neatly would take a bit of time, too. (I suppose I might print the design, punch the bend points, join with a ruler.)
Sooo…20 hours of wasted electricity and how much wasted plastic, vs a saw and maybe some sandpaper?
Art.
Prototyping.
If you are using a (residential) 3d printer for anything else, you are doing it wrong and you need to stop.
I’ll continue to use my printer as I see fit.
Cool story Ian. Happy to see some great projects you’ve worked on rather than being a great detractor.
Irregular shapes can be quite common. Many of the 3d printed dies I’ve seen were used to stamp louvers, reinforcing ribs, and logos, all of which are much more complicated than the example in the article.
In this particular case, a brake would have them made before you’d finished your first cut!
That’s true, but this is more about the technique not the product.
This has my wheels a spinning. No way I would have thought this could work.
The YouTube channel Stuff Made Here has done a couple of videos on using 3d printed dies for metal forming. They may be worth a watch as Shane Wighton walks through a number of his failures which is often really helpful when trying to learn.
Couldn’t you cut plywood in the same pattern and use that instead?
Oops… TS was faster that I was. :D
Bending metal always has to account for springback, because the metal has to first strain beyond the proportional limit before non-elastic deformation takes place. If you assume an additional 0.2% stretch throughout and design the entire mold to bend the piece that much more, it should spring back closer to the desired shape.
The example is really a bad choice, for such a simple 2d profile, a simple vice, without taking of a pressbrake would have been more adapted… but nice…
For repeatability, it is far better than a simple vice. Suppose you need to make ten of these, and you need to thread a rod through every one in a line.
In a similar vein, there are YouTube videos showing how to use sacrificial 3D printed PLA objects in sand molds for aluminum casting. The small forges aren’t even very expensive, and the PLA just burns away during the process. Some pretty complex objects are possible.
Ive seen this done for hammerforming sheet metal which is a better example. The form doesnt last that long but often you only need one or two. You could also print a 3d mold for epoxy and have a more permanent form.
Lube your metal up to allow it to slip and stretch into shape and not tear your PLA surface
There is one choice I do not understand: why having such a tall base? It takes time and material to print, and can only create problems (weaker structure that may bend, less stifness, …). I would reduce it to the minimum height necessary to accomodate upper/lower layer and maximum displacement of the part to bend, and would be more confident in chances of success.