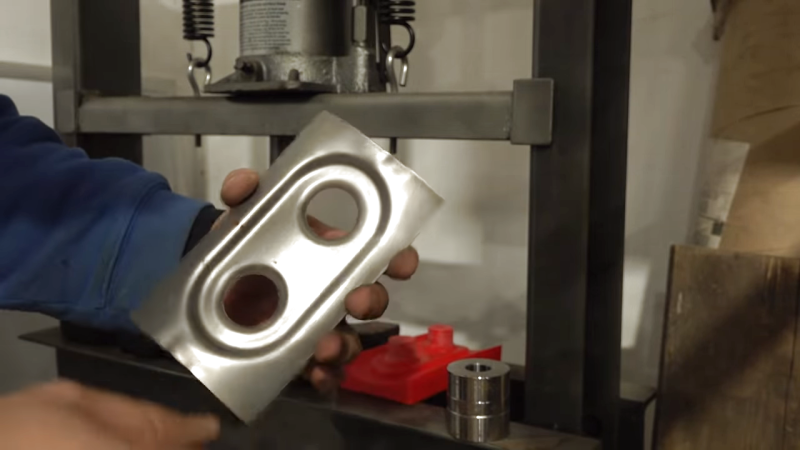
Press-forming is a versatile metal forming technique that can quickly and easily turn sheet metal into finished parts. But there’s a lot of time and money tied up in the tooling needed, which can make it hard for the home-gamer to get into. Unless you 3D-print your press-form tooling, of course.
Observant readers will no doubt recall our previous coverage of press-forming attempts with plastic tooling, which were met with varying degrees of success. But [Dave]’s effort stands apart for a number of reasons, not least of which is his relative newbishness when it comes to hot-squirt manufacturing. Even so, he still came up with an interesting gradient infill technique that put most of the plastic at the working face of the dies. That kept print times in the reasonable range, at least compared to the days of printing that would have been needed for 100% infill through the whole tool profile.
The other innovation that we liked was the idea to use epoxy resin to reinforce the tools. Filling the infill spaces on the tools’ undersides with resin resulted in a solid, strong block that was better able to withstand pressing forces. [Dave] didn’t fully account for the exothermic natures of the polymerization reaction, though, and slightly warped the tools. But as the video below shows, even suboptimal tools can perform, bending everything he threw at them, including the hydraulic press to some extent.
It sure seems like this is one technique to keep in mind for a rainy day. And hats off to [Dave] for sharing what didn’t work, since it points the way to improvements.
Thanks to [Nikša Barlović] for the tip.


Pretty good job. I think I would perhaps have mixed some fine powder like concrete at say 20% by volume as a binder into the resin to reduce the amount required, add some modicum of incompressibility, reduce the rubberyness plus lower the curing heat.
*** 23 Nozzle vendors Liked this post. ***
Oops, wrong resin LOL … though concrete wouldn’t be my first choice, unless it was used and recrushed, think it would do funny chemical things in the curing process.
I think concrete would be ok as it normally (conventionally) sets by being hydrated. In this application there is no water so it never reacts I doubt the resin would do anything to it. And as it’s a very fine powder, it ought to be quite miscible. The beach sand as mentioned below would have larger granules but be just as effective.
You don’t need the “glue” in the concrete.
Just sand is about the cheapest filler you can get.
Next on the list is pebbles and rocks.
For an idea of mixture, it’s sort of start with the biggest rocks that fit (If less then 3 fit next to each other, you start getting into trouble with pouring them in).
Use enough sand to fill the gaps between the rocks.
Add enough epoxy to fill the gaps between the sand.
For more tension strength you can add chopped glass fiber or similar.
I understand just grabbing the nearest epoxy from the shelf for an experiment. There are also epoxies for “epoxy granite”.
But when you start pouring epoxy anyway, I would reverse it (if longevity is beneficial.
1. Print a mold, spray it with a release agent.
2. Lay in some glass fiber cloth (optional).
3. Fill the mold with Epoxy & filler.
4. Remove the mold.
But still,
I’m impressed with the results too.
Interesting video.
I suspect that the “warping” of the die blocks noted in the video has less to do with any heat generated by the cure of the polyester resin, than the fact that polyester resin itself contracts significantly when it sets.
I have run into this very problem myself, though in an unrelated application.
The solution, in my opinion, is either to mix clean beach sand in the polyester resin (after you’ve added the hardener) or fill the print voids with an epoxy resin/sand mix.
That would be my thought as well. Some resins are quite low shrinkage.. but even those ones over such a large part will be visible shrinking I’d think..
S eems like a somewhat backwards way to build ’em too – in compression a 3d print is pretty damn strong anyway even at low infil – the real weakness for a 3d print is forces trying to pull the layers apart, which doesn’t apply much here, so it may not have needed any resin anyway – So print with no infill, just print in vase mode to either create the right internal void shape removing the print later (dissolve the PLA?) or just as the top surface like done here, in both cases fill with your resin (fibre reinforced for good measure) or perhaps just plaster/concrete (cheaper and just as capable I’d suggest) – it should print pretty fast as that geometry doesn’t look like it would need much support. All the internal 3d printed infill really doesn’t do much anything for part when you are filling it so completely…
I would have thought the use of a lubricant would help.
I expect the surface finish and adhesion of the plastic would cause some challenges with getting a smooth draw.
I have done this on some aluminum with great success but used PETG and 100% infill. I also made some nice jigs for my press break that does not mar the aluminum at all with PETG and PLA @ 100% but preferred the PETG.
You mentioned the heat warping the die, but I have not seen any consideration for the thermal coefficient of expansion of the two materials — you do not need to have your die designs warp from heat when it is internally cast with a material that shrinks a few millimetres/meter. Try casting it with a material that does not shrink.
Also, it is a good idea to have a shrapnel/blast shield between you and the die.
Hint:
MoS2 (Molybdenium-Di-Sulfide) + Water
It is well known that when you use MoS2 (also Molycote which is MoS2-powder with oil) will greatly reduce friction but when adding water to it this will furthermore reduce the friction important in areas of the die where huge deformations will appear.
This will decrease the wear of the die.
I did an aluminum seat gusset for a BT-15 aircraft using 100% fill on a PLA die set. A hydraulic press did about 90% of the squish, then came back and slowly pressed using a bench vise.
I could do several more using the same die set (male/female).
I hadn’t seen this article before, but 3D printing seemed like a clever shortcut for building a one off site set.
If you want more than a small number, this is doing it wrong.
Use the 3D printer to make a pattern for a plaster mold. Dry out the plaster mold at 200 F for 24 hours and then pour zinc alloy into the plaster mold. The traditional alloy is called “Kirksite” but most zinc alloys will do for small runs. Use the zinc alloy die to make the parts.
Kirksite dies were used during WW II for airplane parts such as fuel tanks. Think 2000 lb dies. Only good for perhaps 10,000 parts, but the pace of development was such that not very many aircraft models wore out the original dies. To the best of my knowledge this is still how things like car prototypes are made. I have a book that shows a plaster mold for making a car door as the decoration for a chapter heading.
The surface finish you can get is quite spectacular.