Rarely a week goes by that some company doesn’t offer to send us their latest and greatest laser. You know the type — couple of aluminum extrusions, Class 4 diode flopping around in the breeze, and no enclosure to speak of unless you count the cardboard box they shipped it in. In other words, an accident waiting to happen. Such gracious invitations get sent to the trash without a second thought.
Now don’t get me wrong, I have no doubt that the average Hackaday reader would be able to render such a contraption (relatively) safe for use around the shop. Build a box around it, bolt on a powerful enough fan to suck the smoke out through the window, and you’ve turned a liability into a legitimate tool. But the fact remains that we simply can’t put our stamp on something that is designed with such a blatant disregard for basic safety principles.
That being the case, a recent email from WAINLUX nearly met the same fate as all those other invitations. But even at a glance it was clear that this new machine they wanted to send out, the K8, was very different from others we’d seen. Different even from what the company themselves have put out to this point. This model was fully enclosed, had a built-in ventilation fan, an optional air filter “sidecar”, and yes, it would even turn off the laser if you opened the door while it was in operation. After reading through the promotional material they sent over, I had to admit, I was intrigued.
It seemed like I wasn’t the only one either; it was only a matter of days before the Kickstarter for the WAINLUX K8 rocketed to six figures. At the time of this writing, the total raised stands at just under $230,000 USD. There’s clearly a demand for this sort of desktop laser, the simplicity of using a diode over a laser tube is already appealing, but one that you could actually use in a home with kids or pets would be a game changer for many people.
But would the reality live up to the hype? I’ve spent the last couple of weeks putting a pre-production WAINLUX K8 through its paces, so let’s take a look and see if WAINLUX has a winner on their hands.
Watts Up, Doc?
I should start by clarifying that WAINLUX advertises the K8 as a “Laser Engraving Machine”, presumably to keep the user’s expectations in check. In fact, they’ve plastered the phrase all over every flat spot of the K8. That said, the machine is more than capable of cutting many materials, though the results will depend on which version you purchase. The base 2.5 W model would do fine against cardboard and other thin materials, but you’ll really want to spring for the top-tier 10 W version if you want to cut through harder materials like plywood or acrylic.
For the purposes of this review, I was sent the 10 W model. Although the rest of the hardware is identical between all three versions of the K8, keep this in mind as you read through this review — especially when it comes to the real-world results of cutting and engraving different materials that’s documented at the end.
External Overview
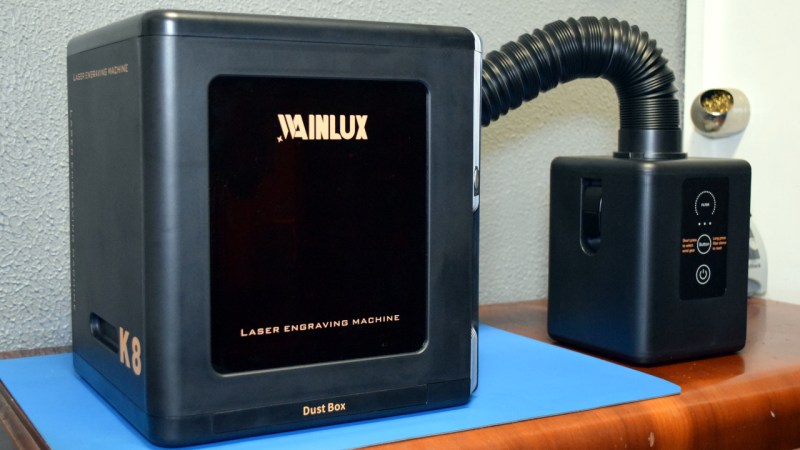
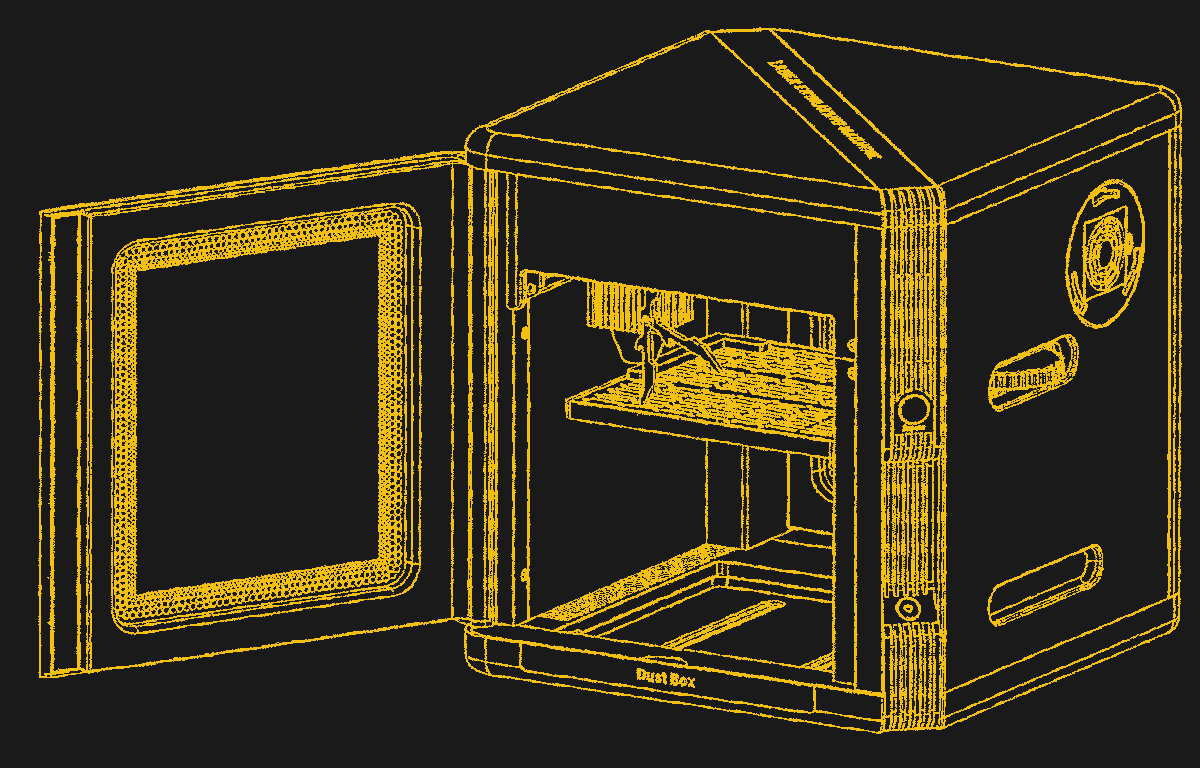
The WAINLUX K8 is somewhat akin to a small microwave, measuring 26.7 centimeters (10.5 inches) along the front and side, and standing 30.5 cm (12 inches) tall. The front features a magnetically latched door that provides an opening roughly 19 cm (7.5 inches) wide. Underneath the main door there is a small “Dust Box” that can be pulled out, which provides a helpful way to collect and dispose of the small bits of waste material that will accumulate during cutting operations.
 Next to the door, there’s a momentary button that turns the unit on and off, as well as a “Repeat” button that can be configured to execute a specific cutting or engraving operation each time it’s pressed. It’s rudimentary, but does enable a certain degree of untethered operation. Above both of the buttons is an integrated status light which indicates the K8’s current state, ranging from a solid white when ready and idle to a blinking blue that signifies the laser is actively firing.
On the right side of the unit there’s the outlet for the ventilation system, which could either be piped out a nearby window, or connected directly to the optional air filter unit. Around the back there’s a USB-C port to connect the K8 to your computer, as well as a DC barrel jack.
Laser Movement
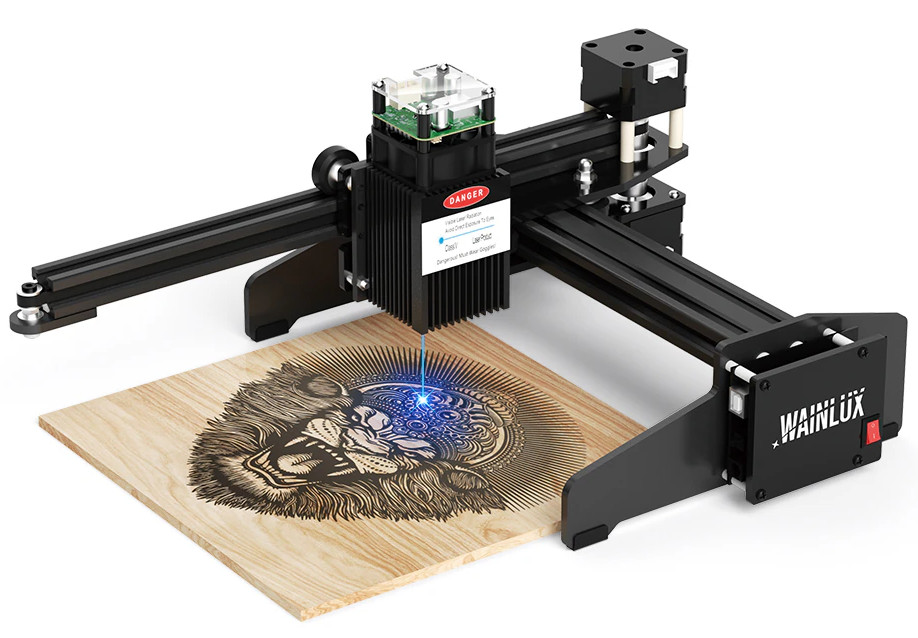
It would be fair to say that for the K8, WAINLUX took a fairly straightforward laser engraver design and simply put it in a box. This isn’t necessarily a bad thing, but if you were hoping for some kind of advanced CoreXY arrangement under the hood, you might be disappointed.
What we’ve actually got is a pretty standard cantilever setup, often used on so-called “portable” laser engravers such as the JL4 pictured above. Two sections of 20 x 20 aluminum extrusion are attached 90 degrees from each other by a wheeled carriage, which is moved back and forth by a stepper motor and belt. A similar setup is used to move the laser module left to right. The K8 does feature endstop switches at the point of origin, which on this laser, is to the front left of the work area.
This cantilever arrangement isn’t used on larger lasers (or 3D printers, for that matter) as you can only extend it out so far before you start getting stability issues. The only reason they can get away with it on the K8 is because, compared to other lasers in this price range, the work area is quite limited — only 130 mm x 130 mm (5.1 x 5.1 inches).
Unfortunately, that’s the trade-off you make when going to a fully enclosed machine like this. While I think the usable area of the K8 is suitable for a wide array of hacker and maker projects, there’s no question that it’s simply too small for many tasks. Whether you’re willing to go for a larger machine and lose the inherent safety features offered by an integrated enclosure is a decision only you can make for yourself.
Manual Z Axis
 With an open-air style laser, there’s usually no provision for a vertical Z axis. To compensate for thicker objects, you’re expected to lift the entire machine off the table. For their earlier lasers WAINLUX even offers “Heightening Modules”, literally just plastic blocks, which you’re expected to prop the machine up with. But obviously that’s not an option with an enclosed machine like the K8.
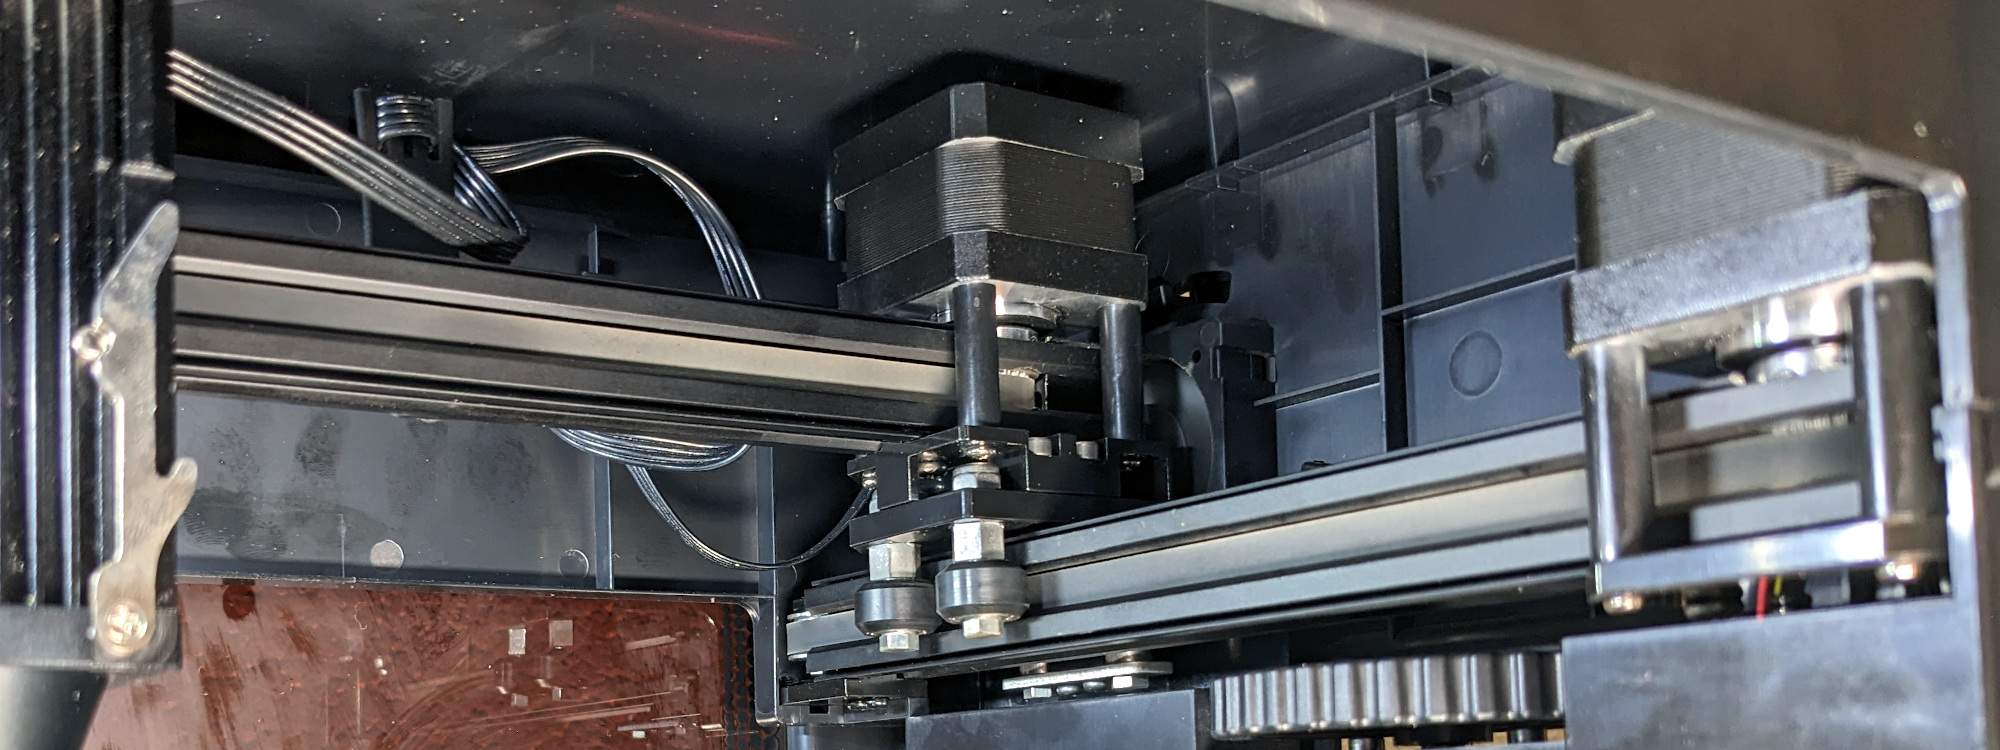
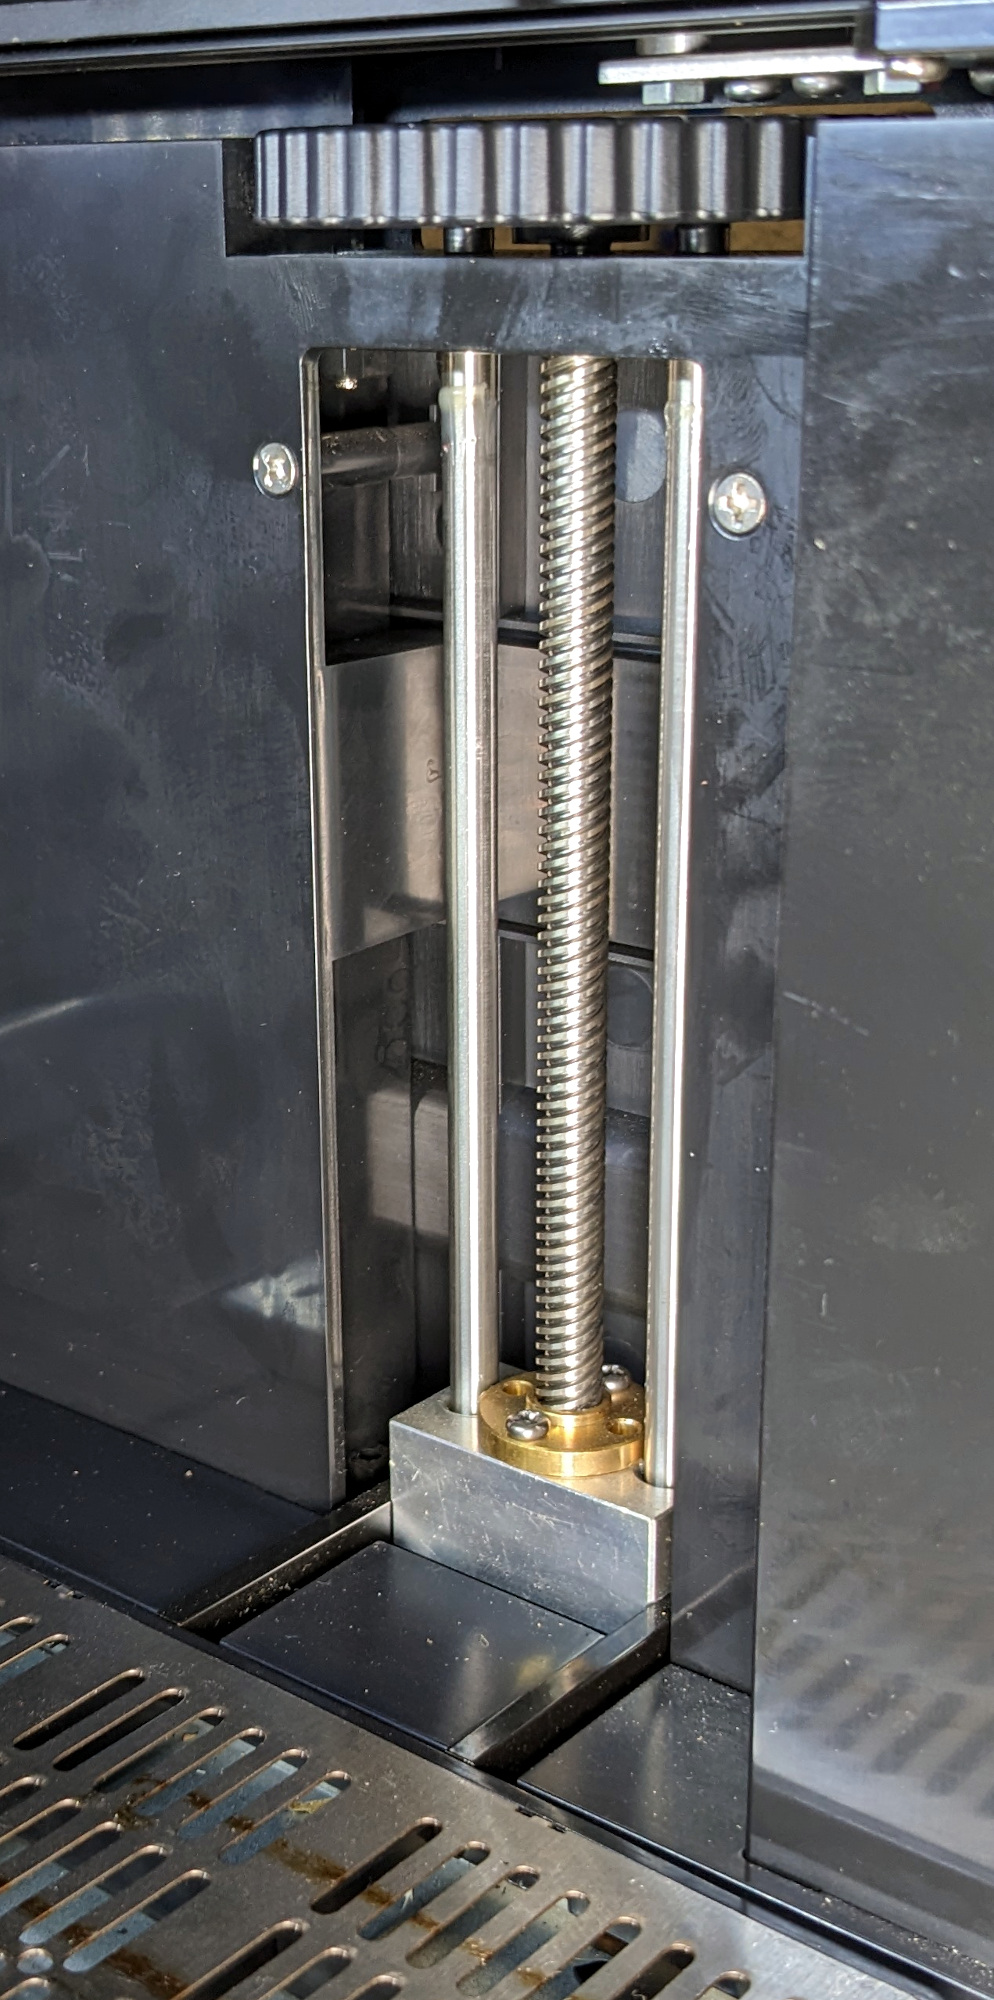
So to adjust the distance of the laser to the target, the K8 features an internal table that can be raised and lowered with a knob on the right side of the machine. The table is attached to a metal block, which rides on a pair of smooth rods and is moved by a leadscrew attached to the knob. The whole arrangement is very similar to the Z axis on a desktop 3D printer, albeit on a much smaller scale. The table has approximately 100 mm (4.7 inches) of travel, and the documentation says it can hold up to 3 kg (6.6 lbs).
Moving the Z axis up and down is something you’re going to have to do fairly often, as it’s how you ensure that the target is the proper distance from the laser. Helpfully, the module has a small flip-down arm that lets you easily dial this in: just drop the arm, move the table until the arm is touching the target, and you’re good to go. It’s a simple system, though the results should you forget to flip the arm back up might not be pretty.
But being able to make fine adjustments to the Z axis also leads to some interesting possibilities, such as the ability to cut deeper into material by lowering the laser’s focal point on each pass. The Z setup on the K8 looks like it would be relatively easy to motorize, which could make such operations automatic when combined with the right software.
Firmware/Connectivity
The WAINLUX K8 understands standard G-code, which offers plenty of freedom in terms of what software you can use with it. Commands can be sent over a direct USB serial connection, or loaded from a micro SD card. The micro SD slot is rather perplexingly located inside the enclosure itself however, so not exactly the most convenient of setups. The K8 also features WiFi that can either be used in Access Point or Station mode. In AP mode, the K8 offers up a WiFi network which you can connect to, which is most useful with a mobile device when using the official Android or iOS application. When in Station mode, the K8 connects to your existing WiFi network and pulls a DHCP lease, which allows you to control the machine even if it’s located in another room.
If there was any question about the firmware running on the machine, you need only look at the network name the K8 creates when in AP mode: GRBL_ESP. That’s right, the machine is running a custom build of Grbl_Esp32. I spent some time poking around with the commands from the official Wiki and most things seemed to work as expected, though for some reason the web UI wouldn’t load properly.
Now, I know what you’re thinking — since the Grbl_Esp32 project is released under the GPLv3, where’s the source code? I contacted WAINLUX about this and was specifically told that their version of the firmware will be open sourced once it is out of testing, which presumably will happen when the machine actually starts shipping out in October.

To be fair, we’ve heard these kind of promises before. But the fact that I was given a direct answer and not some corporate runaround gives me hope that they’ll hold up their end of the bargain. You can be sure that we’ll keep an eye on the situation.
Air Assist and Ventilation
The WAINLUX K8 is unique in that it offers not only an integrated ventilation system, but also air assist. Both features are provided by standard 40 mm fans, one mounted above the laser module and blowing down through a nozzle bolted over the lens, and the other mounted in the side of the enclosure.
 I would be lying if I said these two tiny fans were truly a replacement for the big aftermarket high-flow units that would generally be installed to handle these tasks, but they’re certainly better than nothing, which is what you’d usually get. It seems to me that WAINLUX must have realized selling an optional bolt-on air assist kit for such a compact and integrated laser wasn’t viable, so they included the capability out of the box.
The inclusion of the ventilation fan was arguably a given for an enclosed machine, and it does a good enough job pulling the smoke out of the enclosure. But truth be told, I’m not convinced the little fan has enough power to push the exhaust out of anything but a very short hose. In fact, the K8 doesn’t even come with an exhaust hose, which is a bit telling. So if you’re thinking of venting the K8 out of a window, it better be close. Otherwise, you’ll likely need to invest in an external fan to help it along.
One interesting thing I noticed is that the there’s a small removable hatch that lets you pull the ventilation fan out. There’s nothing mentioned about this in the documentation, and I can’t figure out if this was done to make replacing and cleaning the fan easier, or if you’re supposed to remove the fan entirely when using the optional external air filter. Speaking of which…
External Air Filter (Optional)
One of the things that really interested me in the WAINLUX K8 was the external air filter module. Even when cutting paper or cardboard, these things produce quite a bit of smoke. Readers with long memories may recall I once reviewed the sub-$100 NEJE DK-8-KZ laser engraver, and even when using that tiny machine, it would produce enough smoke to get me in trouble around the house.
From that experience, I realized that any larger of a laser would certainly need to ventilated outside. Unfortunately, due to the layout of my office, there’s no good way to do that. So for the longest time, I just assumed that any laser I got would need to be setup in the garage or basement. Neither would be very convenient, but it seemed like there wasn’t much choice.
But with the air filter attached to the K8, I’ve been able to engrave and cut all manner of materials without anyone else in the house even noticing. Well, that’s not completely accurate — I did get questioned about what sounded like a small jet aircraft getting ready to take off from my desk. But hey, at least they didn’t smell anything.
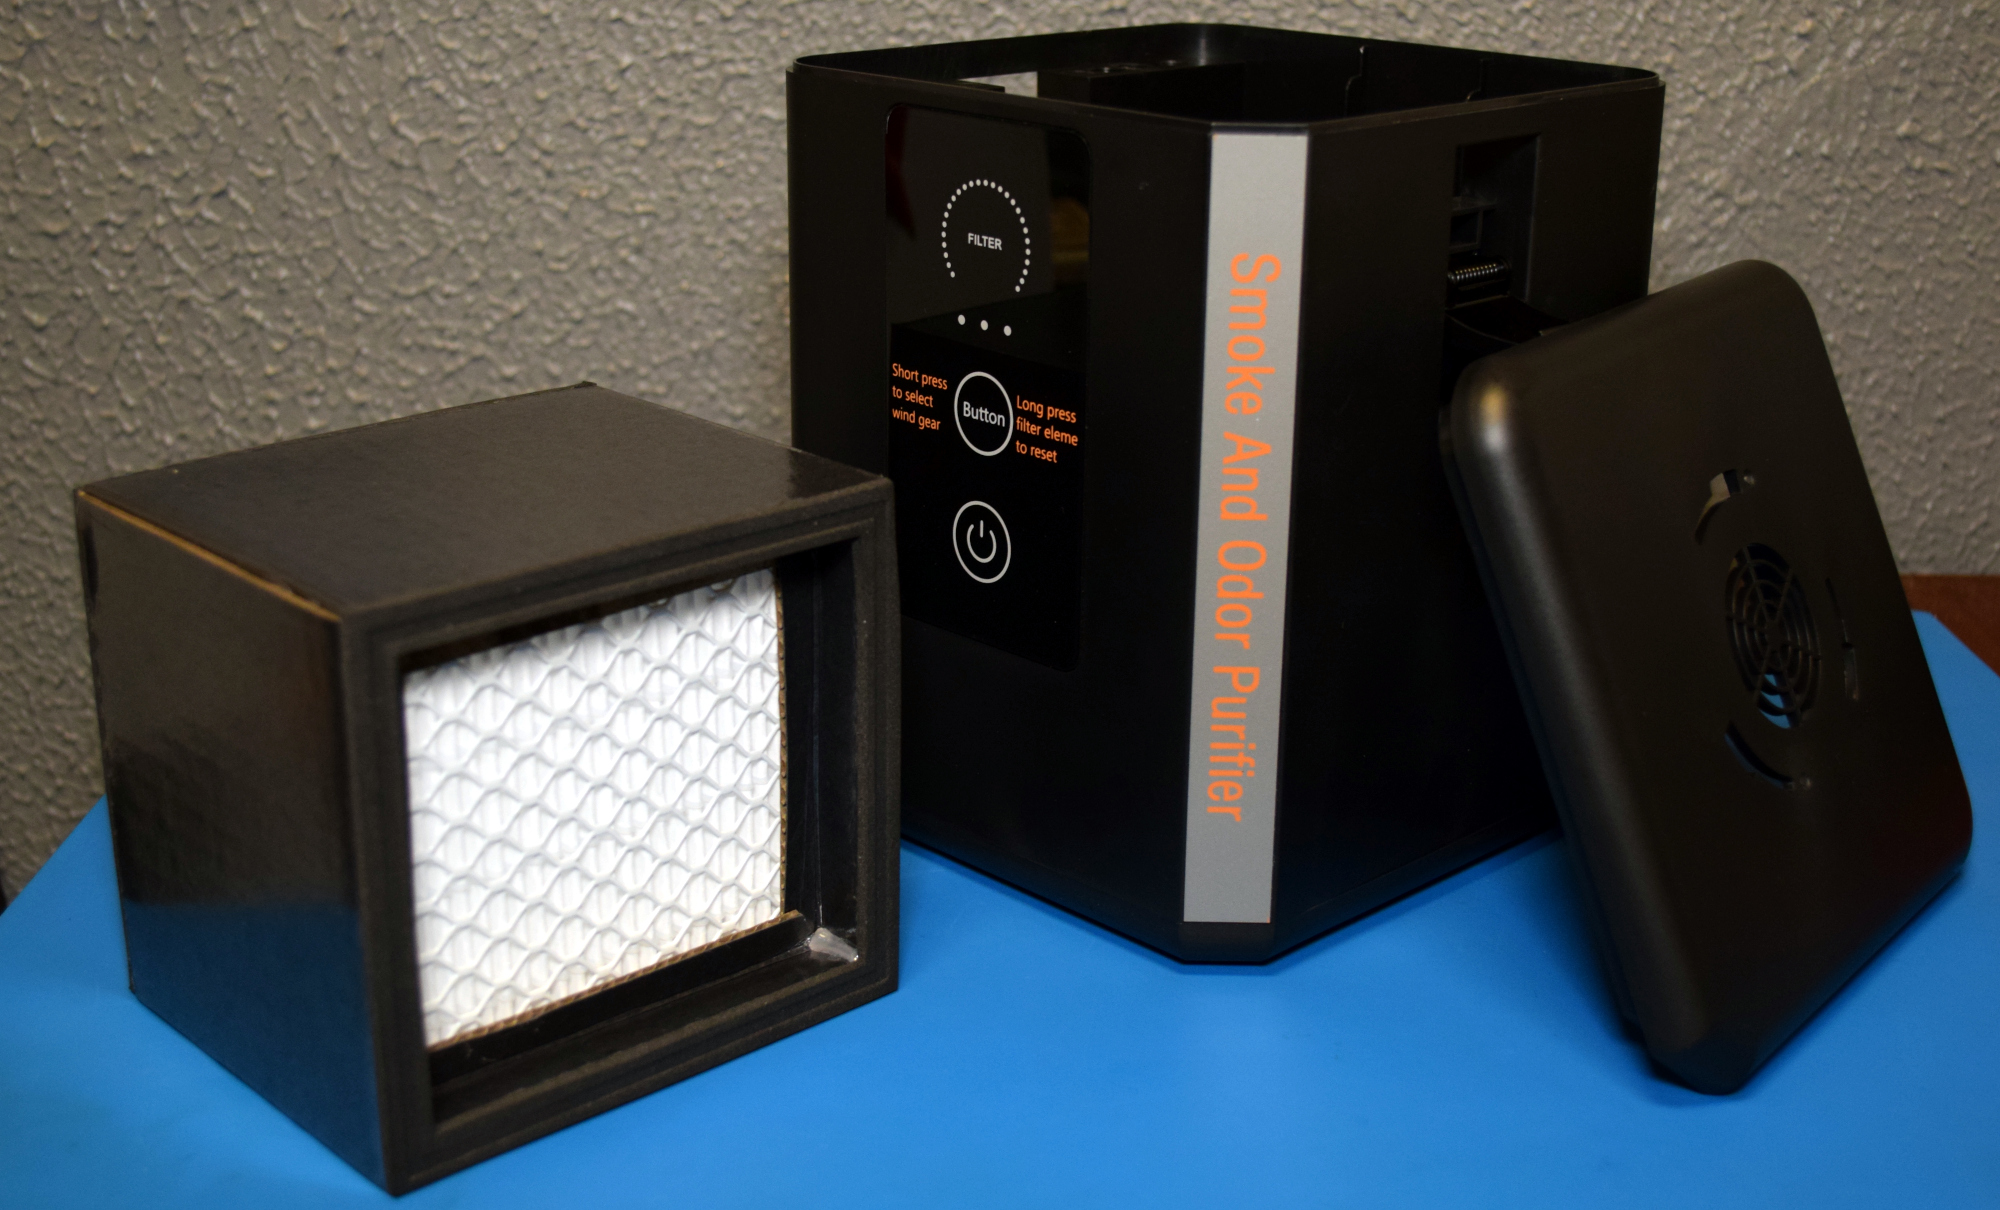
The unit is fairly straightforward, consisting of a large three-speed centrifugal fan and a large removable air filter. It’s solidly built, and beyond the broken English on the front panel, looks very professional sitting next to the K8. My only complaint is that it’s a totally separate unit. By that, I mean it requires its own AC adapter and must be activated independently of the laser. It would have been nice if it got its power and control signals from the K8 so they could truly work in unison.
Software Selection
As I mentioned previously, the WAINLUX K8 shows up as a USB serial device and responds to standard G-code, thanks largely due to the fact that it’s powered by a mature and well-supported open source firmware. That means you can easily configure a wide number of programs to work with the K8 simply be filling in a few variables such as bed dimensions and maximum travel speed.
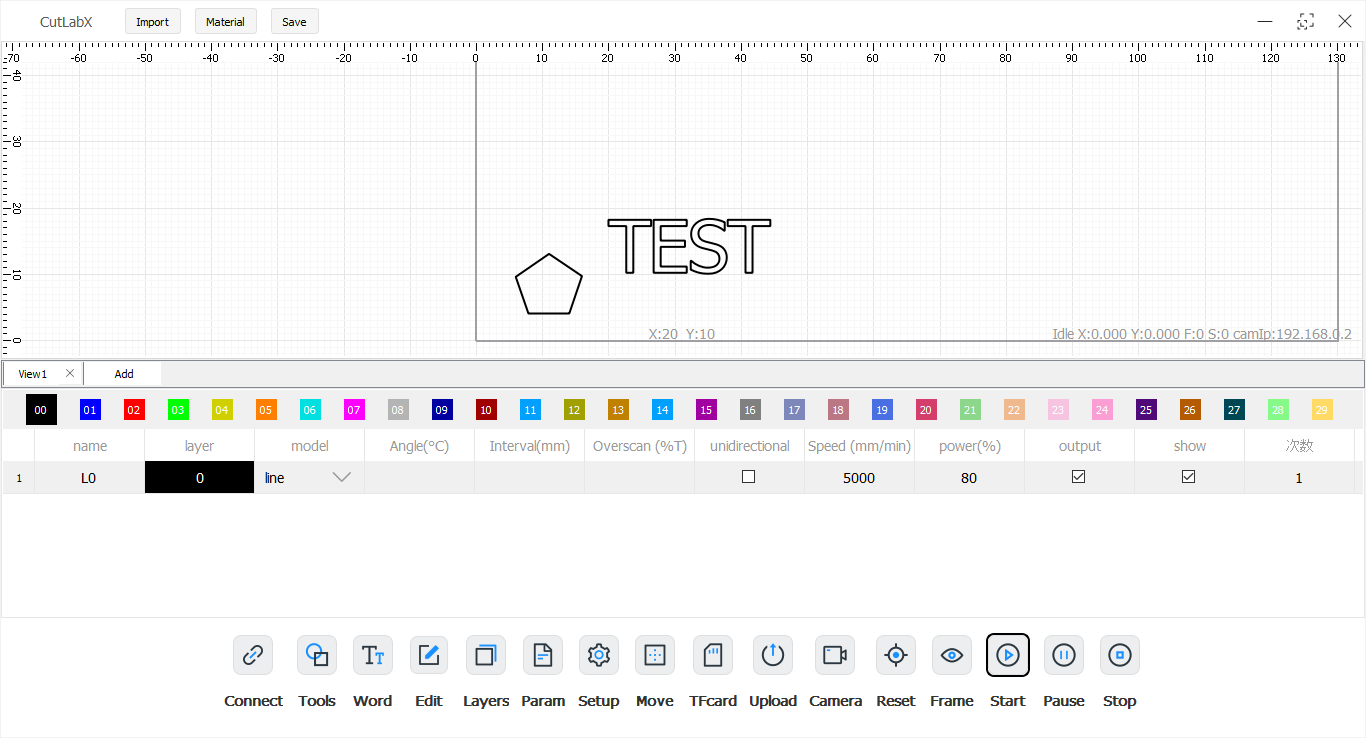
WAINLUX also offers their own software for controlling the laser, but frankly, the less said about it the better. I did track down a Windows computer and installed the in-development version of CutLabX, and even did a few cuts with it to prove it works. That’s more than I’d recommend you do. While functional, the interface (complete with random untranslated Chinese text) is absolutely infuriating to use.
In a future article I plan on looking at some of the open source tools in this space, but for most people, I would recommend downloading LightBurn. While in general I avoid closed source software, it’s a well made program with a fairly forgiving licensing arrangement, and works perfectly out of the box with the K8.
Note: The K8 features a camera at the top of the enclosure, which the promotional material says can be used to visually align the workpiece before cutting or engraving. However I couldn’t get the camera to work in either CutLabX or LightBurn. It could be that the camera hasn’t been enabled yet in the firmware, but the documentation doesn’t mention anything about it. I plan on looking into this further.
Uncensored Hot Photon Action
If you’ve made it this far, you must be really interested in adding a desktop laser to your arsenal. So the least I could do before closing this review out is show some video of the laser in action, as well as a small gallery of some of the things I made with it.


Final Thoughts
After spending some quality time with it, I have to say that the WAINLUX K8 is an impressive piece of hardware. The capabilities and build quality are far beyond what I expected, and while the official software leaves a lot to be desired, the compatible software that’s already out there makes this something of a moot point. The fully enclosed design of the K8, combined with the air filtration unit, mean I can easily and quickly put it to use without needing to setup a dedicated laser work area. This convenience is somewhat offset by the limited internal volume of the enclosure, but for users who are only looking to do occasional one-off projects, the overall package is still very compelling.
The 10 W WAINLUX K8 will set you back $559 (or $419 during the Kickstarter), and that’s not including the optional air filtration system. While that’s more expensive than the far more powerful K40, the advantage here is that you’re getting a turn-key machine that you can just plug in and start using. No cracked tubes, water cooling, mods, or extra parts to buy.
Of course, the Hackaday community isn’t afraid of doing mods and upgrades to bring a cheaper laser up to snuff. But if you’re in the market for a laser that you can use as a reliable tool, rather than a new project to fiddle with, the K8 might be for you.


“It would have been nice if it got its power and control signals from the K8 so they could truly work in unison.”
Even just control signal would be useful. Then when the small jet aircraft sound stops you know the it’s done. Or on fire.
It might be not too hard to hack if the ESP32 exposes a “coolant” signal or some such.
Do you feel like running some experiments to see if you can burn small amounts of material inside the box without kindling the whole thing? Especially with air assist.
edit: it = air filter
What about using a power signature? Attach an INA219 or other sensor, or maybe even just a smart socket, look at the currents/power consumed, generate signal.
For ignition mitigation, you can use a flame sensor and a car-door-lock actuated fire extinguishing spray can.
Nice burnt edges as is typical for something that isn’t ablating, but instead burning the material away.
ablating material with such laser diode gonna be hard…
The Emblaser 2 was designed with safety in mind, so it ticks all the boxes mentioned in the article. It’s a lot more expensive, although still affordable, and has a much bigger cutting area.
It’s nice to see an enclosed, cheap, laser. I hope this is the start of a trend.
Weird intro. Not sure why the author has such a problem with normal diode lasers. Did he flip one upside down and get zapped in the eye?
I think that intro is fair enough – just because some people can responsibly and safely use such a tool doesn’t mean you can endorse an inherently flawed product, even to this audience and it has to be annoying being bombarded by chaff you can’t write about. Also ‘normal’ diode laser have really ramped up to a scary degree of power in recent times.
The only diode laser without enclosure I’ve seen I’d use around here had a skirt that hovered over the work piece and would shut off the laser if the device ever got tilted after the program starts, in effect it was an enclosed laser. And that makes it safe enough to run in less than ideal environments, though now the neighbour has a playful and nosy new cat I’m not sure even one built like that would be a good idea. I doubt I’d actually ever get a finished job unless I left the door closed…
I guess I just don’t see a reason to be that scared of it. If you wear your goggles, don’t flip it over, and don’t try to engrave on a mirror or something, it can’t hurt you.
Cool, now come explain that to my 3 year old.
Maybe they are fine for basement dwellers like yourself that don’t have to worry about anybody but themselves, but running an un-enclosed laser in a house with children or pets is insane.
If you really want to keep kids from doing things that cause problems, you just can’t let them access a lot of things, including whole rooms oftentimes. Eye safety is just not the only thing you need to worry about with kids.
For fire/smoke reasons, if you must do it in the house, you really want to make sure that it’s both unable to catch the house on fire and of course venting outdoors. A bathroom will have a vent for the smoke, generally won’t have a transparent window, will often use materials more safe against fire like tile and ceramic, and often has a lockable door. If you’re doing it in the living room, you already shouldn’t be leaving either it or young kids/pets unsupervised even with a cover, although admittedly you can’t do it at all without one since you can’t just require eye protection.
And have everyone in the area wear googles too, or do you lock yourself in an isolated room? Sounds like the lack of guarding means it can’t be used in a shared shop.
I’m not saying there’s no place for these machines, clearly a lot of people live alone and want lasers, but pretending they don’t have flaws is disingenuous. A fully enclosed machine is an absolute requirement in many environments.
I think it’s less that they’re pretending it doesn’t have flaws, than that they literally don’t care about people who aren’t exactly like them.
Locking yourself in an isolated room doesn’t seem like an uncommon option to me if someone’s doing this at home even if other people live there; that would either be a shed/workshop or a converted room in their house. It’s not like the only danger of such things is eye safety. Even for 3d printing I’d not want to share ventilation with the rest of the house, so I’d need an isolated room or shed.
That to me says you are not respecting the laser enough, they are scary things. These diodes are getting so powerful now they and even the scatter can easily be dangerous enough to blind at pretty long distances. You might be wearing the right goggles but is your workspace locked and lightproof (at least in the laser wavelength) so everyone else in the radius it could be harmful to is safe and nobody can just walk in without the right protection?
As I said in my case my workshop is small and I’ve not yet got round to putting in the active ventilation (Other than having our plumber friend with the giant holesaw cut through the wall and fitting the external cover), so I’d need the door to be open when using an unenclosed laser every time. At which point anybody can walk in, including the pesky but fun cat mentioned earlier.
It’s less of a matter of being scared of it, and more of a matter of it being quite unsuitable for a wide range of use cases that are of interest to this crowd. Any exposed laser of significant power is generally unsuitable for use in any uncontrolled-access workspace, even with competent coworkers who have had the safety briefing. It’s even less safe for portable or mobile-lab workspaces.
Separate from any liability issues, some people feel uncomfortable about recommending things that embody avoidable hazards and may end up hurting members of their audience.
Or, of course, you could assume it’s simple nanny-ism and avoid exposing yourself to such an author, if you prefer.
You “literally” throw laser diodes, stepper motors, and controller boards in the trash?
A parts/junk box would be more appropriate.
Read again, the *invitation* to review gets thrown in the trash, figuratively I expect as it would likely be an email.
It’s a legitimate error if someone is reading HaD on their break or otherwise in a rush, but even if it wasn’t, what’s the point of rushing to excoriate someone for poor reading comprehension, in writing? That seems like a fairly ineffective use of time to me, although I’m risking making the same error myself, here :)
Would a tool actuated vacuum switch or automatic vacuum switch work to turn on the filtration unit? It looks like an interesting tool, though the size limitation makes it not so useful for my varied needs.
I hope it’s better than their earlier creations which were complete garbage. My Wainlux K6 worked once and then never again 😐
Nice to see cheaper lasers coming about, but to be fair, there are expensive lasers that can work poorly as well. Expenses don’t necessarily equal quality. For instance, the time it takes Glowforge to load your files onto its server is laughable, even with their “Premium” membership.
I am amazed Hackaday didn’t just recommend doing a DIY air filter. They’re not the *cheapest* to build but for the cost of these “add-ons” you can easily roll your own with common sized filters and a fan with the right CFM, which saves way more money in the long run.
In case if someone is interested, I made a blog post about using Lightburn with Wainlux K8
https://hubcio.dev/posts/using-lightburn-with-wainlux-k8-engraver/
I am currently using an iMac with Ventura OS 13.6.3 (22G436). Unable to use the K8 now as it stalls out when pressing the start button . . . file uploading stays at 0%. Being told that the current CutlabX software is not compatible. Should Invest in a chromebook? Or are there any other ideas? Can I get a previous version of the CutLabX software?
Please help, haven’t been able to use my laser in over two weeks.