Layer lines are a dead giveaway to non-normies that a thing was 3D printed. There are things you can do to smooth them — sanding, chemical smoothing, and fillers come to mind. Although this technique technically uses all three, it starts with something very simple.
 In the video after the break, [DaveRig] gets right to the point: baby powder and resin mixed together make a fine smoothing agent when cured. Having read about it online, he decided to give it a try.
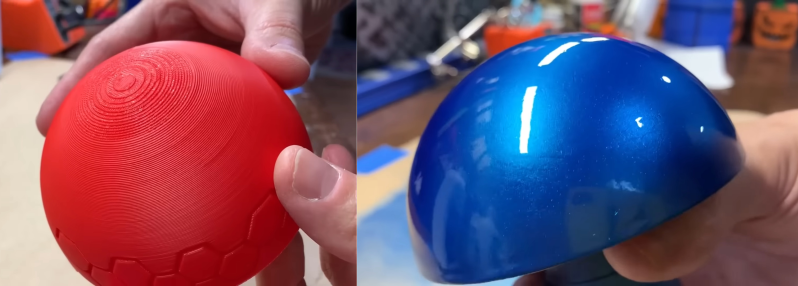
Starting with a half sphere that had admittedly pretty big layer lines, [DaveRig] mixed up enough resin and baby powder to make the consistency of milk or cream. Then he put five coats on, curing and sanding with 120 in between each one.
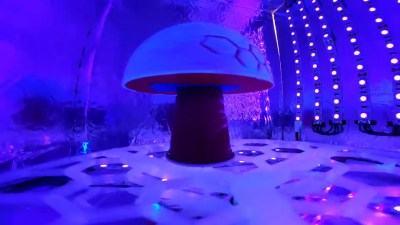
Then it’s on to standard post-processing stuff. You know, wipe it down with alcohol, sand it a little more, wet sand, and then it’s on to the airbrush and clear-coat. The end result looks to be as smooth as your average bowling ball, as you can see in the main photo.
What’s your favorite post-processing method? Have you tried annealing them in salt?
Thanks to [Keith Olson] for the tip!


I had an huge 3D print assembled from 5 parts a while ago. Needed to print it quite coarse because it was so big. “A bit” of sanding and applying plastic filler from the can gets you there too. There’s filler for everything, very runny stuff for light scratches and filler for deep grooves. Other than that there’s filler you apply with a spatula. It is a bit more expensive but gives you repeatable results.
Seems a very labour intensive, but if there is a case where you really really need smoothness like that it’s a useful video I suppose.
Makes you wonder though if they can’t put some sort of smoothing system on the printer itself.
You’d think that at this point something like that would have come around, evolved as a needed feature.
Maybe Apple and Google should stat making printers and then the competition would force some high-paid thinkers to implement things like that.
AFAIK, smaller width nozzles coupled with closer layer lines will achieve the smooth look to an extent. However, it’s at the cost of doubling, possibly quadrupling the printing time, which could lead to bed adhesion issues, clogged nozzle, etc
There are plenty of printers that can achieve smooth results without post processing. Resin stereolithography printers, laser sintered nylon, even the objet which is an ink jet and has been around for more than a decade.
My favorite post processing technique is to alter my aesthetics to embrace layer lines and avoid all that work. Kudos to DaveRig for his hard work and beautiful result.
I don’t wash my car, for the same reason. Embrace the aesthetic!
LOL, dito. After a while it gets a RUSTic, steampunky look ‘n feel to it.
Which was ofc the artistic vision from the get-go
I don’t wash my car so the UV rays strike the dirt not the paint.
+1
I actually washed left half of my CX bike and just bruszrd off big pieces of mud and clear coated the dirt. Showing the dual nature of my road/mud bike
Please spray clear coat over the dust and preserve the art for the posterity.
Yes! printed layer lines show you have a made to order part and cared enough to actually make something than to just talk or draw something! people who dont like layer lines are just to critical!
Lol, the modern version of the arts and crafts movement.
So, this is like runny Bondo(TM) (contains mostly talc), but requires a UV light source to cure.
Lots of people get mirror finishes with automotive finishes. No UV resin or light source needed.
If you want to thin Bondo like this you need to use plain polyester ‘fiberglass’ resin.
Bondo sticks *really* well to PLA. I’ve had good success with ASA too. PETG maybe not so good.
I’ve been trying to use UV-cured resin for a while, and I think I’ll probably go back to car body filler once the current bottle runs out. The filler takes more sanding, but it’s also much easier to work with – resin involves a lot of washing between coats, it’s harder to see what you’re doing (if transparent), and the sticky mess is harder to deal with than dry dust.
My main conclusion about finishing 3D prints, though, is that it’s MUCH better to avoid it in the first place. It’s great on a smooth sphere, but you’ll often have details that are difficult or impossible to finish consistently to a good standard, especially where tolerances matter, like on interference- or friction-fit joints. I wouldn’t even consider doing it unless I was making a mold to be reused many times.
It’s good to know what’s possible, but you get the best value out of a 3D printer by treating it as what it is. Being able to see your reflection in a part is nice, but half the time I end up thinking “this looked better before I did any work on it”.
Of course no-one wants the original article since no-one reads anymore. Video with 2nd hand info is perfectly fine.
I miss the days of written articles. I can read faster than I can listen to someone tell me their life story before they get to any useful info. I hate the everything on YouTube trend.
me too
yeah and why won’t kids stop buying avocado toast instead of houses
“nO oNe ReAdS aNyMoRe”
I would first drop the layer thickness on those upper layers to reduce the step sizes in the plastic and then I’d try adding Ironing of the outer surfaces to let the 3D printer do the time consuming work. Or at least some of it so that the final smoothing doesn’t require so many applications.
What slicer(s) let you specify layer thickness differently for different parts of the print?
Ultimaker Cura for Shure.
Also ideaMaker, Orca, Bambu Studio…
PrusaSlicer.
Prusa Slicer has a variable layer height feature. It’s really nice
If at all possible, I’d avoid curved top surfaces entirely, as that’s where almost all the building up and sanding down is needed, and finer layers don’t help much.
Breaking a large model into, say, 5 parts instead of 2 isn’t much more work in CAD but can make it a lot easier to get good prints – further to my previous ramble, time spent preparing a model is worth so much more than time spent working on every copy of every part after it’s printed.
(Or, for that matter, time spent futzing with Cura’s adaptive layer settings)
I don’t _like_ any postprocessing technique, they are all too much trouble.
But things that work OK are “knifing putty” (also known as “glazing putty” which is confusing because that is also, well, the putty you hold windows in with. The stuff I mean is for fixing scratches in paintwork. It’s a 1-prt filler, or a very thick paint, depending on how you look at it. Look for “3M 05098”
For larger areas, “pattern coat” works. It’s an epoxy paint, basically. made for smoothing the surface of foam or wooden foundry moulds or carbon layup moulds.
https://www.easycomposites.co.uk/composite-pattern-coat-primer
Modern glazing compounds may work, but I’d be surprised if the old school putty did. It was linseed oil and whiting (typically chalk or talc). The linseed oil would absorb into the wood and protect it allowing the putty to harden against the wood, and the skin would dry in the air, sealing it and allowing it to be painted. It would stay soft in the middle for years though. I doubt it’d adhere well to most plastics, or harden enough to paint.
That’s a point I was trying to make. The 3M acrylic filler is labelled “glazing putty” but has nothing in common with the stuff used for windows.
They are using a different sub-definition of “glazing”: https://www.merriam-webster.com/dictionary/glaze
3: to give a smooth glossy surface to
Why nobody use the hundreds years old technique of Gilding?
https://en.wikipedia.org/wiki/Gilding
it simply clay and hide glue and it produces a flat enought surface for leaf gold to shine. And it is natural.
I suspect that you are talking about smoothig with gesso, rather than specifically about gilding with gold leaf?
Gesso would probably work just as well as any of the other goops that have been described.
I have done a fair bit of gold-leaf work (though never on a 3D print) and you don’t typically end up with a metallic glossy finish. I believe that there are techniques to burnish the gold leaf (traditionally with agates) but I have not tried that, or seen the result.
Todays babypowder are mostly corn starch, because the old babypowder with a talcum content, to be more specific the longer talcum fibers works like asbestos in your lungs.
I wonder if i can polish coat with increasing finer sand and clay, like the japanese Dorodango balls.
Like 3d print with clear coat press in mesh 400 sand, let it dry than again clear coat and press in mesh 800 fine sand, let dry…. clear coat mesh 1600 clay dust, clear coat mesh above 2000 clay dust (maybe pigment) and last finish is only clear coat. If this works i get at least 1 mm strong surface. To spraypaint and coat a complicated 3d print is for easier than sanding all the shapes.
In fact a not insignificant part of talc is asbestos because it is difficult to seperate the two at scale.
The baby powder used in the video is corn starch (amidon de maïs).
I’ve trying the coating steps with a old set of telescope mirror making abrasives. Lets see if the last coating produces a shiny surface. The first 3 ruffer grit coatings are really hard.
I’ve found using resin in general is a quick and easy way to hide layer lines. Sands so much better and faster than PLA or filler primer. Interesting idea with the baby powder but probably get the same results with just resin applied in multiple coats.
Too much work. I rather smere on some glazing putty and sand it.
This is great and all – but the real proof is how it hold up. Automotive stuff, if you do everything correctly, will result in a long lasting finish, even if you need to use some filler. But how well does this stand up to impacts, temp changes, humanity? Will the part shrink over time as some of the compounds leave the plastic? Will the finish be flexible enough to deal with that. Showing off a shiny part is great – but let’s see it in 5 years from now.
So the story here is “man invents filler primer”?
https://www.hycote.co.uk/product/filler-primer/
It’s UV-curing filler-primer. Which means that you can brush it out smooth, then cure it.
One problem with Pattern Coat is that once it starts to gel, that’s it. This approach gives you as long as you need.
I just remembered, there is spray-putty which is a bit better than filler primer, it has more body to it.
https://www.amazon.co.uk/gp/product/B015WIEGN6
I sometimes wish Hackaday would do a bit more curating on those posts.
This is just painfully stupid way of shoehorning resin into the process.
Just sand the print a bit, go directly to filler primer, sand a bit more as required and done.
This whole dance of “babypowder” and resin is just pointless.
Hackaday, it\s ok to not post something.
And not everything that has a shiny video is worth spreading.
A bit of off-topic here. I wonder if it’s possible to slice the model so that only the outer shells have thin layers and everything on the inside is printed more coarsely.
yes and no. It is possible to have variable layer heigth, so you can give the crucial few top layers of the dome very low layer heights, but print the rest with larger to be faster.
i *think* it is possible to have inner layers uncoupled from the perimeter layers, but it’s uncommon to do.