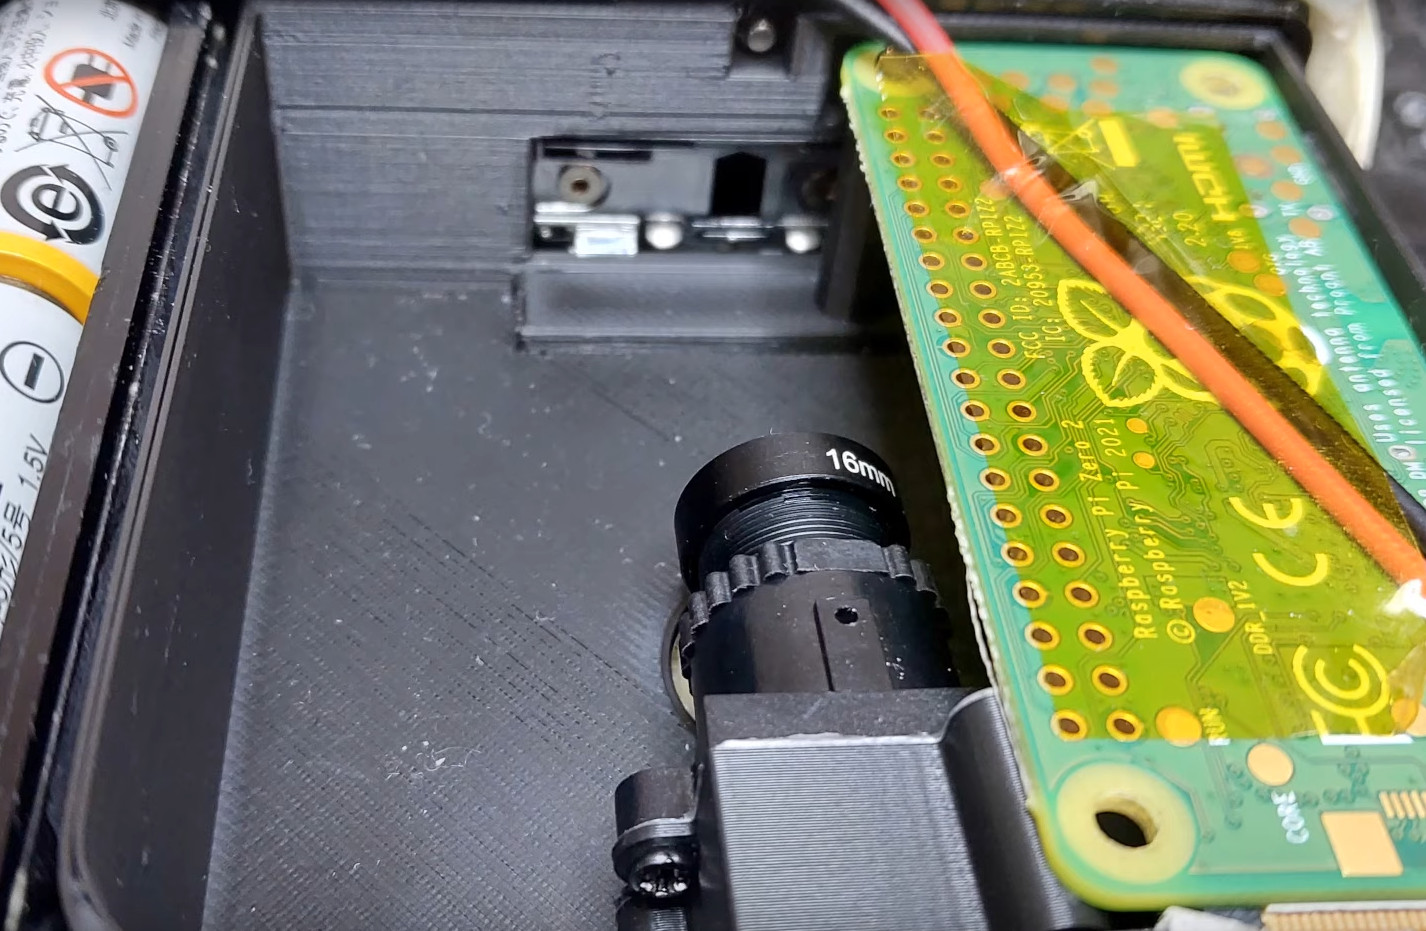
The Raspberry Pi has provided experimenters with many channels of enquiry, and for me perhaps the furthest into uncharted waters it has led me has come through its camera interface. At a superficial level I can plug in one of the ready-made modules with a built-in tiny lens, but as I experiment with the naked sensors of the HD module and a deconstructed Chinese miniature sensor it’s taken me further into camera design than I’d expected.
I’m using them with extra lenses to make full-frame captures of vintage film cameras, in the first instance 8 mm movie cameras but as I experiment more, even 35 mm still cameras. As I’m now channeling the light-gathering ability of a relatively huge area of 1970s glass into a tiny sensor designed for a miniature lens, I’m discovering that maybe too much light is not a good thing. At this point instead of winging it I found it was maybe a good idea to learn a bit about lenses, and that’s how I started to understand what those F-numbers mean.
More Than The Ring You Twiddle To Get The Exposure Right
I’m not a photographer, instead I’m an engineer who likes tinkering with cameras and who takes photographs as part of her work but using the camera as a tool. Thus the f-stop ring has always been for me simply the thing you twiddle when you want to bring the exposure into range, and which has an effect on depth of field.
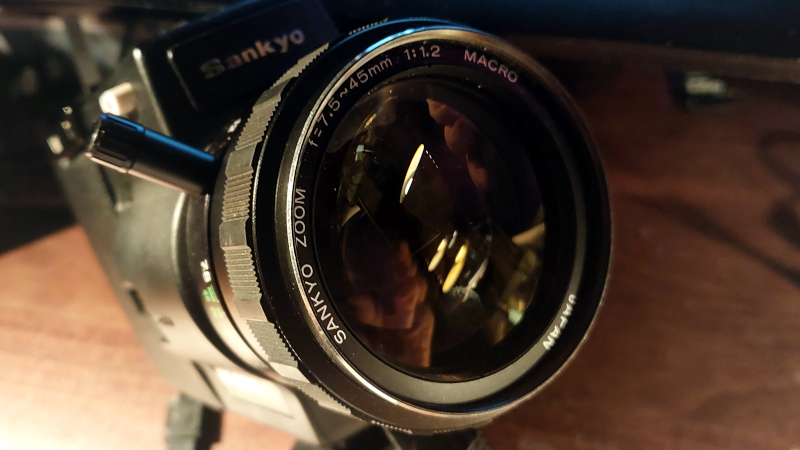
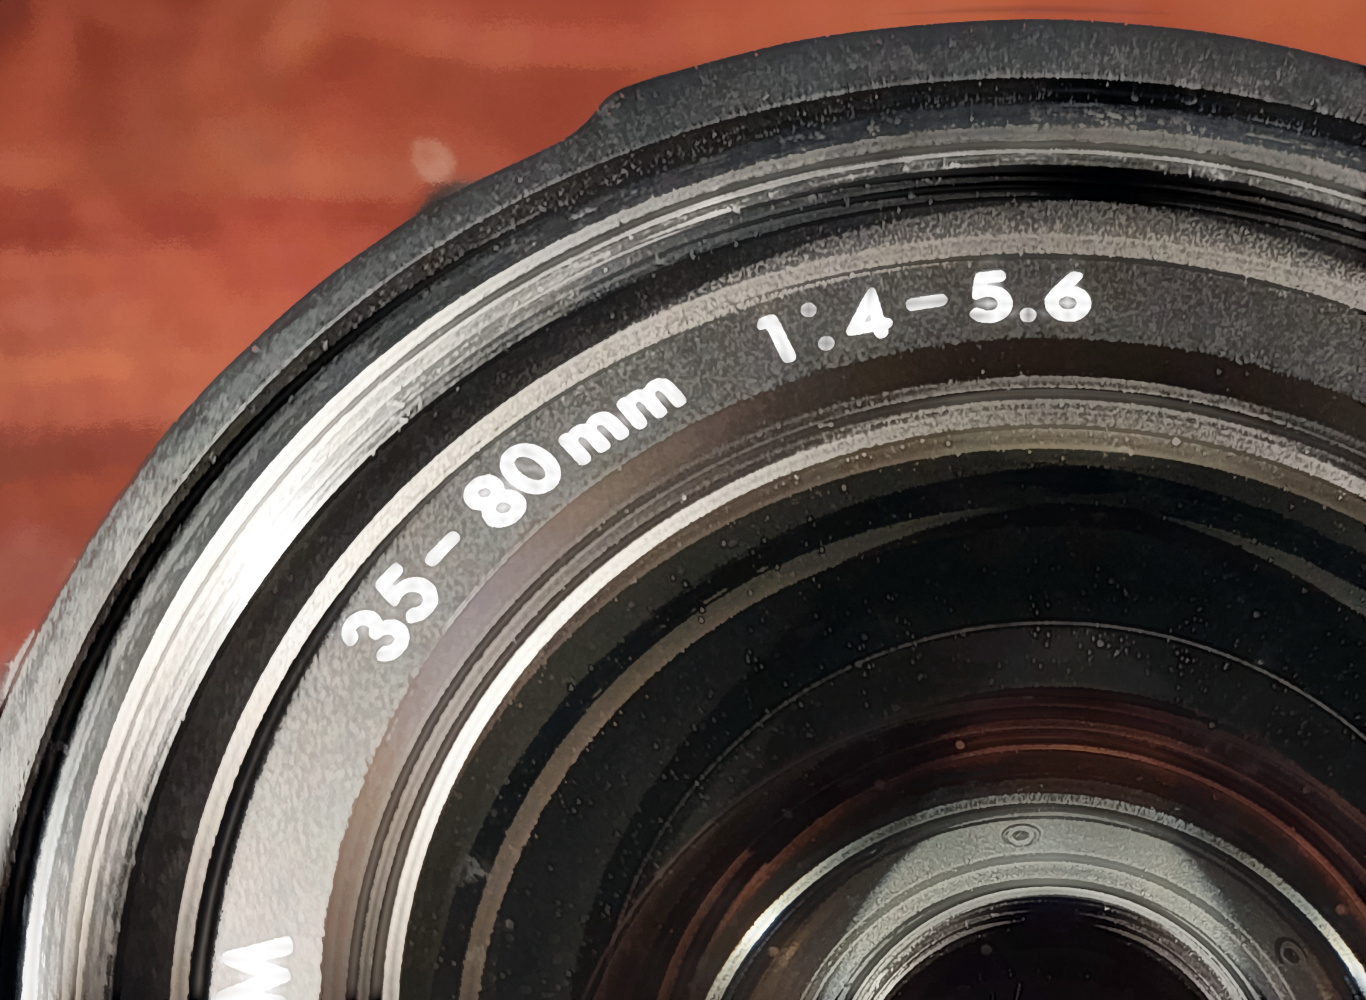
The numbers were always just numbers, until suddenly I had to understand them for my projects to work. So the first number I had to learn about was the F-number of the lens itself. It’s usually printed on the front next to the focal length and expressed as a ratio of the diameter of the light entrance to the lens focal length. Looking around my bench I see numbers ranging from 1:1 for a Canon 8mm camera to 1:2.8 for a 1950s Braun Paxette 35 mm camera, but it seems that around 1:1.2 is where most 8 mm cameras sit and 1:2 is around where I’m seeing 35 mm kit lenses. The F-stop ring controls an adjustable aperture, and the numbers correspond to that ratio. So that 1:2 kit lens is only 1:2 at the F2 setting, and becomes 1:16 at the F16 setting.
Fighting Too Much Light
My problem is that I’m trying to match a CMOS sensor with a very high sensitivity per unit area against lens systems designed for film, which at the relatively low ISO numbers of 8 mm movie film, has a much lower sensitivity per unit area. 8 mm film is a fantastic medium which provides an aesthetic like no other, but even its most diehard adherent wouldn’t disagree that light levels are of huge importance when using it.
I had some failed experiments with putting the CMOS sensor at the focal point of the camera, but in the end found a far more effective technique of using an M12 screw-in lens as a macro lens to focus on the original focal point from behind. This is great, but has the result that all of that extra light intended for an ISO 50 frame of 8 mm movie film instead lands on a Raspberry Pi sensor designed for a much smaller lens. I need to make it deliver equivalent light to that F number being much higher, but I want my digital cartridge to just drop into an unmodified camera, so I can’t mess about with camera apertures. The solution is to apply a neutral density filter, in effect an attenuator, to the front lens ring. Not ideal, but it’s the best I’ve got.
So this has been my journey into the numbers on the front of a camera lens, and also my journey into understanding how they help me in merging old and new cameras on the cheap. If you’re a seasoned photographer you’ll be wondering how it took me so long, but I hope some of you will have learned something new. If one day I can film a Hackaday report on a vintage Super 8 camera with a digital cartridge, it will all have been worthwhile.


So you accidentally reinvented the speedbooster?
Grandpa, the photographer, told me that f meant Factor.
Field of view.
I stumbled upon a great vintage photography book (it describes SLR film cameras as modern!) that explains all the maths behind a lot of the numbers on cameras (including 3 different standardisations on the aperture numbers used) – it came from opticians who chose a simple ratio of f/d (focal length ‘f’ divided by opening area ‘d’) which is why the “f-stops” are normally written as f/2.8, etc – this also makes it clear why f/4 -> f/8 is not half the light but a quarter (as it’s an area)
May you tell us the book’s title? chances are we can find it in internet Archive
I don’t know which book Sheldon means.
The one you want is Ansel Adams ‘The Camera’.
A more modern take on how ISO, shutter speed and aperture work together is “Understanding Exposure” by Bryan Peterson.
I came to say the above. You said it better. 🙂
I taught the photography segment of an astronomy course that met a general science requirement at a small university. The f-numbers are very simple but that can take some time to get comfortable. You start with the unobstructed lens and the focal length. Their ratio is the starting point. Say you have a 200mm focal length and 50mm diameter lens so you get an “f-Ratio” of 4. To let half the light through you must close the lens to use only 1/2 the area, or “1 Stop” less light. Find the new diameter of the for this area and the new f-Ratio is the focal length divided by the new diameter. Do the arithmetic and you get 35mm diameter and a new f-ratio of 5.6. Continue dividing the area in half and you get 8 then and the usual f-numbers or “f-stop numbers”. Early cameras had a sliding strip of metal or a wheel with some holes of the right diameters and these were called “Water-Stops”.
Anyway, the numbering stuck because these are the focal ratios for cutting the light in half or doubling it.
…and the shutter speeds also went in powers of two, more or less—1000 (1/1000th of a second), 500, 250, 125, 60, 30, 15, 8, 4, 2, 1, and B (for “bulb,” where it stays open as long as you hold the button, rather than being timed). It may be slightly different on some cameras. I always referred to these as “stops,” and for a given exposure, you could go down an f-stop (larger aperture) and up a shutter speed “stop,” etc.. Standard daylight for B&W film was f16 and match the shutter speed to the ASA of the film, or a compatible combination, for example f8 and a shutter speed four times the ASA of the film. For color film, it was f11 if the shutter speed was set the same as the ASA of the film. Indoor lighting was typically 10 stops down from standard daylight. We always used light meters, either separate or built into the camera. I made my own. Figuring out the right exposure, and especially if you had to add a flash to the mix and figure the distance to the subject, was a constant mental exercise.
You might also want to check out neutral density filters as a way to reduce exposure without changing depth of field
There’s also T stops, which are similar to F stops but are a measured and not just a best-guess ratio, but you tend to only see these on Cine lenses
I should learn to read better
That’s a new low.
“THE F NUMBER ON A LENS MEANS SOMETHING?”
Well, F me!
TLDR;
‘A hour in the library could have saved her months in the lab.’
Yes I know, Google not library, give an old man a break.
Next she will spend more months in the lab before learning how CCDs control exposure and how that relates to shutter speed and equivalent ISO#. Datasheets are your friend. Generally speaking ‘too much light’ is not an issue.
Just push the CCD closer (if possible) and speed up the exposure. Use a faster scanning CCD if you have to. Use an aperture to gain depth of field, rather than a dark filter.
Please review college physic/optics. You can do better.
Also: F stop: The lenses focal length divided by aperture diameter.
By using a small CCD and shortening the focal length you decrease the F stop while shortening the focus distance.
Decent camcorders etc include built-in selectable neutral density filters in the light path from lens to sensor(s).
3 minutes reading the article saves 5 minutes writing a comment about CCD when raspberry pi cameras are CMOS
Get out pedantic FA reader.
Technology on the chip changes nothing. It could be film and it would change little.
Don’t CMOS cameras tend to have a rolling shutter, while CCDs tend to have a dynamic shutter? Seems like a big change, especially if the author is photographing moving objects.
Is this called a relay lens? I think chains of these are how periscopes work
I enjoy learning more about optics! and good to make more use out of old stuff
I made an easy to understand little video about how to use SLR/DSLR cameras in manual mode, and how shutter speed, ISO, and f-stop effect things, if anyone’s interested:
https://davidblairportfolio.com/daves-dslr-manual-mode-tutorial/
– D
“simply the thing you twiddle” – well I guess you aren’t an actual engineer, or someone who did maths at school.
I would have thought anyone with a SLR and any type of maths/science/photography background would have know what the F was doing…
Not every hacker has a science/math background.
That is true but she says she is an engineer, hence she should have a science and maths background.
Engineer is the most overloaded job title on earth.
Alone it means nothing. Could be train driver or garbage man.
I have two degrees which allow me to call myself an engineer (a legally protected title in 🇳🇱), But I have had very few math or science in one of them.
Me too, not PE though.
In the USA ‘Engineer’ alone isn’t protected. But wrongly call yourself a ‘structural engineer’ and watch out.
Also they made the diploma mills stop giving out ‘engineering’ degrees. If you ever see an American ‘Engineering Technologist’ degree, know you are dealing with a technician who spent too much on school, history of bad judgement.
‘Software Engineer’ is the worst. Just a job title. All the Javascript PFs (Pig F!@#$%) were built by ‘software engineers’.
It seems like pretty elementary stuff; but if the person grew up after film cameras were gone—especially ones that didn’t have computers in them or at least some analog electronics that took some of the load off the photographer—I suppose that could excuse them. I’ve seen videos of kids being given a cassette and a cassette player and they didn’t know how to get music out of it, or shown a dial phone and couldn’t figure out how to make a call, etc.. Then there are record players, slide rules, and other things many of us grew up using, which would also be foreign to youngsters.
Actually, she says it right – the f-stop was devised so artists (the VAST majority of camera users) could take a picture without knowing anything about logrythms or optics. Twiddle the dial and change depth of field. That’s what it does in practice. Turns out the optical scientists at cannon, nikon, zeiss, leicha, et all, just wanted their products to be enjoyed in the moment without a calculator and sheet of paper. Get off your high horse and take some pictures :)
If you think photographers just “twiddle the dial and change depth of field” then I believe you have never taken a photo in your life and definitely never set foot inside an actual photographic studio.
I’ve been working in the corporate world long enough to know if you don’t reply to someone immediately, then you loose. And I don’t feel like loosing to you, because you sound like a a$$ hole. No, I haven’t set foot in a professional studio, even though I know it’s easier to practice a skill in a controlled environment. Also, if you shake a stick, you’ll hit a few wannabe photographers. Fun thing is the lab welder at work used to be a professional photographer. Started welding because it paid better, and he was a sculpture art student, so moral of the story is… don’t bank on making money photographering.
I have taken a few more than one pictures in my life. My first camera was a child’s 110 Kodak camera (decades ago). Shutter bugs run deep in my family. My father and aunt used to develop their own film and prints in the B&W days (dodge, burn, and all that stuff). My Aunt has been published, and only stopped competing because of health issues. I am only now catching up to her fine art photography style (just because i think it’s cool). I no longer worry much about aperture, shutter, and ISO… it’s always been an ingrained knowledge, guess it’s in my genes :) OR… cameras have priority modes. Pick your poison and the camera calculates the rest (you rube). Heck, these days you don’t have to worry about ISO unless you’re a purist, digital cameras can change ISO on the fly.
You’re right, I’m not a professional, I consider myself a happy amateur (and now I can afford fun toys), but I still stand by my original statement. Jenny was right “twiddling” the aperture ring does change the depth of field. Show me an instance where it doesn’t and I’ll believe you have ‘set foot in a studio.’
I’m trying to democratize my hobby. Photography is art for the people. Pick up a thing, push a button, be happy…. or try again. No one should be afraid to try photography because ‘they aren’t good enough.’ It’s easier than painting, drawing, or playing an instrument.
That comes back to my original reply to the OP, and you seem to have jumped on his band wagon. I’ve been through the meat grinder of calc1, 2,and 3. Diff EQ and Linear algebra. Physics 1 & 2. Among other classes.
I like that I can pick up a camera and not have to do math, because it has already been done for me. Now I just have to concentrate on composition, because that’s 90% of a good picture (ya know, with modern technology, and all).
Pick on me all you want, stop picking on Jenny because ‘I just feel like picking on Jenny’
Please tell me more about what aperture does other than change depth of field. I already know you can stop up or down by changing ISO and shutter speed. But it seemed like you had something else to say.
https://drive.google.com/file/d/1×7-yQCvwO1pJaiJbpLiUWh6faahkaeWG/view?usp=drive_link
https://drive.google.com/file/d/13URShaBLC_BvihTkxwUULKhrJW-0vYWf/view?usp=drive_link
For what it’s worth, I might have taken these pictures with my cell phone, just to make you feel bad :)
Whose “picking on Jenny”? You’re the one throwing names around.
I said you sounded like you don’t know what you’re talking about and you still sound like you don’t know what you’re talking about, but that’s no barrier to taking nice looking pictures so knock yourself out, champ.
Btw when you’re bloviating about how smart you are it pays not to mix up “lose” and “loose”
You have to juggle depth of field, exposure, focus, freezing motion, all in view of film speed. Cameras can automate the process to an extent for snapshots; but to refine it the way you want it, you have to understand this stuff, including the math. There’s no way around it.
I agree with everything you said, except the part about the math. The “math’ of photography can get extremely complicated (I mean if you’re designating the lens). The practical part is mostly tables, or anchor on the “Sunny 16” rule, then do your stops around that. 1 stop down in aperture -> 1 stop up in shutter speed, and vice-versa.
I’m just trying to say, all of this stuff has already been figured out for you.
Maybe I have a disagreement on the general consensus of the term ‘math’ in the context of general photography and my understanding of the definition of math. At any rate, I like your style of speaking so i won’t be a butt hole.
I think this is what you were getting at, but it really isn’t math ;) – I mean, not what the people that design your lenses do:
https://www.slrlounge.com/photography-essentials-the-sunny-16-rule/
Maybe there’s a lot of people who think that the dial just adjusts depth of field without changing anything else, but that doesn’t mean their flawed understanding is correct. This article’s author points out that it affects exposure, and that’s a significant point on its own – unless they changed reality while I wasn’t looking, auto-exposure doesn’t mean you can avoid ever thinking about exposure when you’re using manual aperture mode, it just means the camera will do the adjustments for you instead of making you calculate them.
I’ll add to that, if I am in manual aperture mode, it’s because I want to choose an aperture based on how the lens will perform at that setting. Some lenses perform so well wide open that I don’t mind using them that way. Others provide better sharpness and less vignetting if I stop down a little. That comes in even if I have plenty of light and depth of field because e.g. I am taking a picture of a mountain one morning. But if I want to blur a waterfall, I think about whether I want to stop down all the way to lower the light coming in, or if I want to use a setting with less diffraction and a thicker neutral density filter instead.
I’m not entirely sure what’s going on in this one, and that may show through in my rambling below.
Larger-format lenses being used by sticking a small sensor in the focal plane is a popular and valid option. You have to allow some or most of the image to be wasted by cropping since not all of it hits the sensor, but you do get a predictable output. However, often the output you want will only be possible if you use the entire lens, so it’s desirable to find a way to do that if you can’t get a sensor large enough for that. So I see why that was discarded as an idea.
Using the same lenses by focusing them onto a ground glass screen (or similar) and taking a picture of that is understandable too. You can get approximately the appearance you’d get from the original, while still using a different presumably smaller camera to take the capture. It’s a bit like taking a picture of the image of a camera obscura on a wall – you do introduce whatever minor imperfections your secondary camera possesses, but if it’s a good quality modern camera system those are minimal compared to how well you capture the quirks of the original camera. You do lose some light, but if you’re using a decent digital camera instead of an old low-sensitivity film, that’s fine. I expected that to be what was going on here, since there’s a macro lens focused on the focal plane, but the diffuse translucent material is missing. This was actually done in one of the author’s previous posts – https://hackaday.com/2023/09/09/large-format-photos-without-the-large-price-tag/ – and here’s another version from a different person. https://www.cined.com/building-a-large-format-camera-with-35mm-f-0-4-lens-equivalent-diy-perks/
The last thing is what this might be acting like if it’s getting too much brightness. It’s generally known as a speedbooster or focal reducer, and it’s what you get when you use optics to redirect/compress/condense the original image so that it instead forms an image of reduced size. Basically the opposite of a teleconverter. When you compare the option of using a sensor or film of the original size to the option of using a smaller sensor with an appropriate speed booster, it’s loosely correct to say that the speed booster will cancel out the crop so that they’re comparable except for the booster’s light being concentrated over a smaller area. That could result in too high of brightness for your exposure IF the lens and shutter speed can’t be adjusted far enough. You generally don’t go for a speed booster if you’ve got more light than you know what to do with, so that’s a known thing. Speed boosters let you get most of the original capability of the lens including the wide-open performance, until you hit the limits of their optics. Physics says there’s things that glass in air can’t do – such as make a working lens of less than f/0.5. In reality it’s rare to go below f/1.2, and almost nothing beats f/0.9 or so. (You can’t easily push that to extremes without optics right next to the camera sensor, so SLR’s with space for the mirror suffer in that regard.) Speed boosters may cease to have an effect on the f/stop beyond a value which when multiplied by their scaling factor would reach these limits. An example speed booster with a factor of 0.71x may not see much advantage or difference between lenses originally below f/1.25, for example.
It’s probably also worth looking into how to lock any lenses used into stop-down mode if they’re meant for an SLR. It’s not necessarily intuitive that most lenses newer than M42 mount (and many of those) usually operate wide open until just before exposure no matter what you have set on the ring.
Oh, yeah if you notice it’s not actually changing, that’s usually why. Older stuff will have various levels of mechanical automation that’s based on the original camera you aren’t likely using the lens with. If you don’t mind damaging the resale value / original usability, the mechanisms can usually be glued or bent or ground off etc. New stuff may only be able to move the aperture electronically even if it has a ring on the lens, which means for example with EF-mount lenses, you can only get it to hold a non-wide-open setting by holding the dof preview button while you take the lens off. Still, at least it’s not one of the kinds that defaults to fully-closed when unpowered.
Some of the manual focus lenses have a way to turn the stop-down lever into a locked position, or a way to stick blocks onto the lensmount or something to do it if not, and most adapters for a mirrorless systems will turn the lever for you. I think EOS and similar lenses are probably retaining a bit too much value to be worth buying to repurpose. I still see Canon FDs used everywhere.
Yeah, I shouldn’t have implied that it’s always necessary to do any of that; a lot of times everything works fine from the get-go.
As for repurposing EF-mount lenses, a lot of lenses have been superseded by better options for similar or better prices over time and may now be available as junk. They could still perform some optical purpose like making a projection clock, or they could be used by a DIY camera like this. Even then, I agree – unless the EF lens is nearly zero-cost, you’re probably still better off with something with manual aperture instead.
Parabolic reflectors are limited to f/0.5, and that limit can be easily calculated. Lenses that work by refraction do not have that limit, and in 1966 Carl Zeiss showed the Super-Q-Gigantar 40mm f/0.33 as a publicity stunt.
That publicity stunt didn’t require the lens to actually behave as f/0.33, just be geometrically that size. It was meant to be silly, and I don’t know to what extent it actually works. The f/0.5 limit is the f/# equivalent of the maximum numeric aperture possible, and the numeric aperture depends on the relevant refractive index (for air, approximately 1) and the angle of the cone from which light can be accepted, which is taken to max out by approaching parallel / 180 degrees all around.
That’s the field of view of an infinite flat surface (image plane, yada yada, something or other). I don’t know what you can do if you go outside those pretty reasonable assumptions, except that lenses don’t always have to be in air. The way microscope objectives get past this is by changing the refractive index. By using oil immersion, you increase the NA even though you haven’t warped spacetime, because air’s refractive index is no longer a problem. Metamaterials and evanescent waves are even more annoying, so let’s just ignore them from a safe distance.
Here’s one for the mathematicians:
each full-stop increment is the previous stop multiplied (and rounded-off) by the square root of 2:
2
2.8 2.828427125
4 3.959797975
5.6 5.656854249
8 7.919595949
11 11.3137085
16 15.55634919
22 22.627417
So each full stop is a doubling (or halving) of the amount of light being passed, but the effective diameter of the aperture is a function of the square root of 2.
Next up are f32 and f45; but most cameras back in the day stopped at f22.
Maybe I’m missing the irony here, but I always thought that sqrt(2)^4 equals 4 not 3.959797975, sqrt(2)^6 equals 8 not 7.919595949 and sqrt(2)^8 equals 16 not 15.55634919. But hey, I’m no mathematician.
The idea of a raspberry pi cartridge for S8 cameras is awesome!
Well, the author figured out that they make digital lenses for a reason; that’s good!
I knew what fstop meant for a few minutes long ago.
” If one day I can film a Hackaday report on a vintage Super 8 camera with a digital cartridge” I hope you *film* that!
Next week: a rounded object with curvature equal to the reciprocal of its radius revolutionizes the transportation industry!
The lower that f-stop number, the more expensive the lens.
It shouldn’t be called F-number or anything with an uppercase F. This is a lowercase f, because f is the symbol commonly used for the focal length. This also explains the very correct notation like f/5.6, because this is directly the diameter of the aperture. If you have a 50mm lens, f=50mm, the diameter is 50mm/5.6 = 8.9mm. This makes it easier to keep the exposure correct when changing the focal length.
This also explains why many zoom lens have a varying f-number for the maximum aperture. If you keep the actual diameter constant but change the focal length, the f-number changes.
Besides, the f-number is misleading when comparing systems with different sensor size. f/4 is not the same on a full format sensor (35mm) and on an APS-C sensor (crop factor 1.6). This becomes evident when looking at the depth of focus. If you want to compare those, do it by the absolute aperture size. The reason is that the focal length has to change if you want to achieve the same angle of view. If I approximate the APS-C crop factor with sqrt(2) = 1.41, the difference is one stop. So the APS-C system with a 35mm lens at f/2.8 is approximately equivalent to a full format system with 50mm at f/4. Of course the ISO speed has to change by 1 stop as well, so an ISO speed of 400 of the APS-C system is equivalent to the ISO speed of 800 of the full format system. If you do it like that, you will even achieve a similar noise level. You will also quickly notice that the APS-C system is no longer that much more compact (you need a similar amount of glass to carry around).
Just want to point out that there are constant aperture lenses. I know you used the qualifier “many” but I feel like adding to your explanation. I got one with my new camera and was a bit confused that it says ‘1:2.8’ … and I thought “shouldn’t there be more to it”?
Turns out, no… I accidentally got a constant aperture lens, and I would recommend it without hesitation. I mean, if the budget allows
Should have said it’s a zoom lens, not a prime.
https://www.mcfade.co.uk/blog/why-constant-aperture-zoom-lenses-are-the-best/
Cheaper lenses don’t generally have it, and cheaper lenses aren’t usually as good, but that’s a correlation with exceptions. There’s some variable aperture lenses that have been good; On Sony there’s a 100-400 which I think is considered to be very good but does vary between f/4.5 and f/5.6. It is probably significantly more compact than it would otherwise be, and perhaps if you want something compact that zooms a lot, you don’t mind if it does not have quite so thin a depth of focus at longer distances as the other options. I also seem to remember some everyday lenses which were approximately 24-105 f2.8-f5.6, as an alternative to the common 24-70 f2.8 and 24-105 f4 options. The variable aperture, depending on the specifics, may let you have the best of both worlds, to an extent. I guess what I’m saying is, check whether the values are a problem for you, or if giving up one thing can give you something better in other respects.
I agree, there are trade offs. I didn’t say you must buy a constant aperture lens, just that I’d recommend one if it’s in your budget. I’ve only recently discovered the existence of the constant aperture lens because I picked a kit from B&H that had a 28-75 and it took a while for me to learn (you know, over the years)…. if you want to take good pictures, get close to your subject. Better detail, more emotion, etcetera – you know, all the stuff good photography is supposed to be. The standard kit lens was a 28-200 variable aperture (something to something – I don’t remember). Not to your point, or to refute it either, but I have a selection of vintage glass my brother bought and discarded upon me. When I shot a D200 I used to love the prime 50 and 35, and I still do. Both low f numbers, near 1 – I mean, you can open them up and the housing just isn’t there. I really got spoiled by high end vintage lenses and wanted my next camera to be similar to that. At any rate, when I put them in front of my new body I just realized any benefit wasn’t worth the trouble, ya’ know – unless I have hours to waste making a good picture, and the modern lens had more clarity. Maybe I’ll try them in the future when I want to capture that ’80s look, which isn’t bad. Perfect clarity is becoming old-hat and imperfections are getting to be artsy. Get this, I hear the artists are trying to resurrect film :) Maybe i should roll up some of my brother’s grainy Ilford 150 B&W to carry along side my digital camera :) I can proof shots with immediate feedback then go shoot something that has ‘nostalgia effect’ :)
Having said all that, I have a custom setting that defaults to f/5.6 just so I have a good anchor point that is likely to take a good picture on the fly. Then I’ll adjust from there if I have time :)
I ended up with lenses mostly between f/1.8 and f/2.8 because I got better quality and often image stabilization that way, where for the same price if I went any wider on aperture it’d probably be a fully manual lens and still only half a stop brighter sometimes. I would like some wider apertures; some of the mirrorless stuff has been making f/0.95 available, but I’m using a full frame DSLR without stabilization, so the tradeoffs have steered me away so far.
Changing the shutter speed allows you to control how much or little motion is recorded on the sensor, longer exposures, 1” for example, for moving subjects will give you a blurry result, shorter exposures will give you less visible movement of the same subject under the same circumstances.
Each shutter speed varies from the one next to it by approximately a factor of 2: 1/125, 1/250, 1/500.
Even though the f/numbers don’t seem to bear any relation to each other, they actually do, but they are related by the SQUARE of the number, because they actually relate to the size of the AREA of each f/stop opening.
1.4, 2, 4, 5.6, 8, 11, 16.
If you square 1.4, you get “2”.
If you square 2 you get “4”
If you square 4, you get “16”
If you square 5.6, you get approx “32” (31.36)
If you square 8, you get “64”
If you square 11, you get“121” approx 128
If you square 16, you get “256”
So depending which way you adjust the aperture, you double or half the amount of light going to the sensor.
Since shutter speeds change by a ratio of 2, and apertures change the amount of light the pass, you can compensate for a change in shutter speed by moving the aperture in the opposite direction.
In this way, you can control either depth of field (how much is in acceptably sharp focus), or how much motion you record.
Set your camera to the “A” setting, automatic aperture adjust, and ISO setting (manually) at 400, a well lit outdoor setting.
Have someone stand in front of the camera and wave their arms at a moderate speed, then shoot on 1/15” to 1/500”.
Look at the images, the burring of the arms will gradually decrease, and the area in your photo from front to back will get greater as the lens closes down.
But the exposures will look about the same since the amount of light passing through the lens to the sensor is essentially identical shot to shot.
YOU DON’T EVEN NEED A LIGHT METER FOR A LOT OF PHOTOGRAPHY.
Caveat: in order for this to work, you need a sunny day, subject in sunlight, but it can serve as a starting point for some photo fun.
Set your ISO at 400 (you can pick any number you want for the ISO, but this simplifies the experiment to start).
MANUALLY set you aperture at 16.
Set your shutter speed at 1/250 or 1/500 (the 2 closest shutter speeds to the ISO number of 400.
Take a picture, I can virtually guarantee the shot will acceptable if not very nicely exposed.
The “ISO” of films is determined exactly this way.
1). Light a subject with roughly the same light level as the sun on a clear day.
2). Set your aperture at 16.
3). Make exposures at a range of shutter speeds, and pick the one which seems to the best overall exposure, darks and lights.
4). Whatever that shutter speed is becomes the ISO number for the film (back in the old days), when the ‘speed’ of the film was fixed.
So an ISO of 50 requires 1/50” @ f/16, ISO 200 requires a shutter speed of 1/200″ @ f/16, etc.
Extremely simple and logical.
Note: This setup takes into account that film had what is called latitude, which meant it could be a little over- or under-exposed and still produce a usable and printable negative.
some films had a bit larger ‘slop factor’ than others.
Maybe this is more toward using a camera, but I have found ‘Fred Parker’s Ultimate Exposure Computer’ to be a good reference for understanding exposure and EV (Exposure Values), which relates f-stop, shutter speed, and film speed (sensitivity). Not quite on topic, but a nice read none the less. I’m mentioning it only because I haven’t seen anyone else bring it up. Find the download link on this redit page:
https://www.reddit.com/r/AnalogCommunity/comments/t2bi0y/fred_parkers_ultimate_exposure_computer/