If necessity is the mother of invention, nostalgia must be its stepmother, or its aunt at the very least. The desire to recreate long-obsolete devices simply because they existed while we were growing up is a curious trait, but one that’s powerful enough to drive entire categories of hardware hacking — looking at you, retrocomputing buffs.
Hardware nostalgia isn’t all about 6502s and Z80s, though. Even more basic were the electronic toys of the 1970s, such as the Radio Shack 65-in-1 kit that [Tom Thoen] is currently recreating. The 65-in-1 was a breadboarding kit aimed at the budding electrical engineer, with components mounted to colorful cardboard by spring terminals. The included “lab manual” had circuits that could be quickly assembled using a handful of jumper wires. It was an endlessly fascinating toy that undoubtedly launched many careers, present company included.

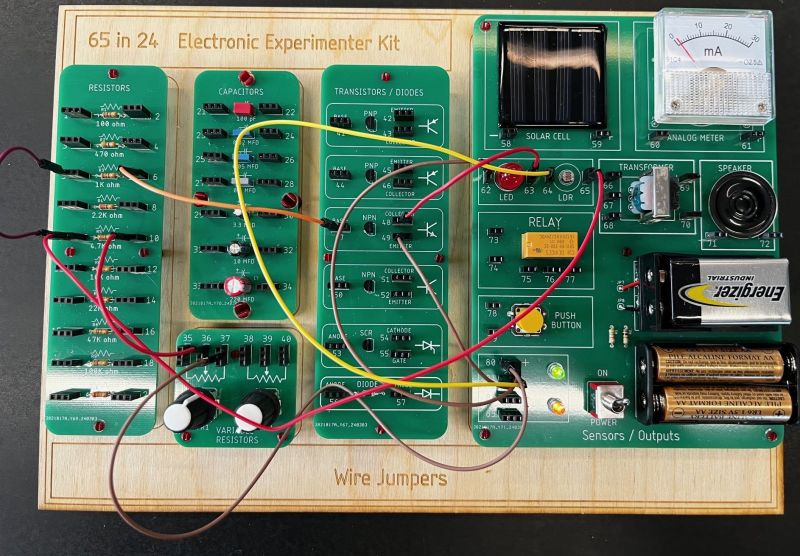
While the passage of time may not have dulled [Tom]’s memories of his original 65-in-1, technology has marched on, meaning that certain allowances had to be made to create a modern version. He wisely eschews the cardboard for PCBs, one for each of the major component blocks provided in the original, and uses female header connectors in place of the springs. Component choice is tailored for the times; gone are the ferrite rod antenna and variable capacitor of the original, as well as the incandescent lamp, which is replaced by an LED that would have been a significant fraction of the kit’s $21.95 price back in 1976. There’s no BOM yet, so we can’t say for sure if any of the transistors are germanium, but it’s clear that there aren’t any of the old TO-1 cans. But dismay not, originalists, for the meter, relay, CdS photocell, and “solar battery” all made the final cut.
[Tom] has done some beautiful work here, with more to come. We imagine that 3D printing could be used to recreate some details like the original Morse key and speaker grille. We love the laser-engraved backing board, too, as it captures some of the charm of the original’s wooden box. This isn’t the only love for the “Science Fair” brand we’ve seen lately, either; the nostalgia seems to be contagious.


I had one from RS. However it also had either a 555 chip or a 741. Can’t remember. I loved making the LED blink circuit.
Mine was a 555 as I recall
I had a 2 in 1, with vacuum tubes……yuk yuk
Aerospace electronics, 50 years.
I have trouble imagining that the 350V plate voltage for vacuum tubes was made available on spring terminals, LOL.
As much as I’d love to do a vacuum tube version I think there might be some practical limitations :-)
Maybe for fun when I have more time…
Tubes are still viable at low plate voltages (12-48v). Power is limited, but still good for learning the basic principles. Use tubes with directly heated filaments (1T4, 3V4 etc), and they won’t even get too hot to touch.
I have a tube breadboard sold by DeVry / Bell & Howell in the 1960’s. See https://www.retrotechnology.com/restore/breadbd.html near the bottom of the page.
My 1950s Boy Scout One-Tube regenerative breadboard Radio Kit my engineer brother-in-law gave me used 22.5v for B+ and 1.5v for A+. Many of the tinkering projects i did later used one 45v B-battery & it all connected with fanstock (sp?) spring clips. No problem.
As much as I’d love to do a vacuum tube version I think there might be some practical limitations :-)
Maybe for fun when I have more time…
I think I’ll save the 555 for the next iteration of boards with SSI and MSI digital logic ICs. I’m surprised at how much I can do with this w/o any digital logic – latching circuits / flashers / etc.
“200 in 1” kits seem to be going for $20 to $50 on ebay.
I always liked the spring terminals. Used the idea myself on several shop projects.
I hated the spring terminals. They made really bad connections, maybe because mine were tarnished. I would end-up wrapping the wire around the spring and even that did not always work.
If memory serves those kits came with stranded. Spring terminals did better with solid.
My beloved childhood 50-in-1 kit (yes with germanium transistors and diode) had the spring terminals and stranded jumper wires, but the wires all had tinned ends, which mostly helped.
But I prefer the later X-in-1 kits with controls and displays built-in and a protoboard in the center, and most small components were loose. I still have one around, modified to heck, as a prototyping bench.
Respect to [Tom Thoen] for that build! He has the best of both approaches.
I had a love/hate relationship with the springs – it was really more a problem with the stranded wires, but the springs on the one I bought on eBay were very oxidized (no surprise)! It will be interesting to see how the header pins and F/F jumpers work in comparison…
I always had a love/hate relationship with the spring terminals – they worked pretty well, but the tinned & stranded wires tended to break after regular use. The springs on the one I bought on eBay were pretty oxidized too! Hopefully the header pins and F/F jumper wires will work well…
It seems to be a very durable (sweet job Tom). I had the 100-in-1 and it counts among the most important things I had in my then youthful hands of 13 years in 1974. Much later, my third son received the 300-in-1 (2005). We used it together a few times back then, but it’s been part of my workbench for the nearly twenty years since.
I had a similar one from radio shack but it couldn’t have been so expensive. 40-in-1? One of the circuits let you be a radio DJ by setting a radio to a static station then tuning the circuit till you heard a tiny click. Then you could talk on the radio! It was at an age I had no idea what was going on but could follow the instructions.
Later did radio in college and now do some ham stuff. So maybe not rubbed off now that I think about it!
A while ago, I was pondering how one would make these kits better. https://phpc.social/@ellisgl/111635563033171446
Got a 150 in 1 when I was very young. Ended up getting an electrical engineering degree and had a solid 30 year career. And way too many hobbies!
Me too! It’s great to see how many people on these posts attribute their EE career starts to the experiences they had with these kits. I hope I can create something that is appealing to the younger generations!
Great work! He needs to replicate the storage box at the right side of the kit. That was one of the best things about it – everything was in one place so you could take it from kitchen table to bedroom and your mom wouldn’t yell at you. :-)
Or you could take it in the car .. until you built the ‘electronic siren’ project in the back seat on the way to Grandma’s house. Good times.
That’s the goal! Actually on the bottom, you can see the laser cut outline that will eventually be a box. I really liked so many things about the original design – from the great manual to the compact self-contained design.
I couldn’t afford one so I made my own version out of scrap plywood bits, it had a sloping front with screw terminals instead of springs (I couldn’t get/afford springs). The front hinged up so I could keep all the bits inside, old school desk style. I think I was 12 and my next project was building a rabbit hutch out of asbestos sheet, it was cold so I shut the garage door while I sawed up the sheet 😬
I personally started in electronics here is Brazil with a monthly magazine spring-connection kit, back in 2002, very nostalgic.
I remember the Radio Shack CB Radio Receiver Kit. At the time, we could hear the internal paging system at the local hospital as well as the local CB guys/girls broadcasting. Fun times!
I hated their radio receiver kits. Most of them the actual radio circuit was prebuilt on a small PCB under the board you were just doing simple wiring on those kits. Gave you no ability to easily experiment with the radio portion of it. Perhaps they had to do it that way to pass FCC cert? But doesnt make sense cause most of their xxx in one kits you were able to build radio receiver and transmitter circuits at the component level.
The modern interpretation is brilliant! It would also make a cool kickstarter project, though that would be a lot of work if it’s too successful!
I might work as a kickstarter, I can see parents buying it for their kids and themselves.
Yes – I’ve thought about this a bit – from a nostalgic older-guy standpoint I want to think every kid with a technical inclination would want one; not sure if there’s a market or not. I will post board files and boms eventually, but imagine there would be people who would just want to purchase it assembled…we’ll see!
My 65 in 1 was absolutely my favorite and most used toy, at least of the middle school years, early years were traditional Lego blocks. I spent countless hours assembling the designs from the manual, then tweaking them to try things or expand their capability. Beautiful build, thanks for sharing it.
Thank you! Me too – when I saw these on eBay I couldn’t resist, but it was pretty shot as far as the corrosion on the springs. We’ll see how practical I can make it!
I had the 20-in-1 kit which was billed as being modular – each component was on it’s own plastic ‘podium’ (for want of a better word), you could fasten the podiums together with plastic clips. I had hours of fun with it. I love the build shown here, it’s obviously a labour of love.
There was a similar, but a bit more rugged version of what you’re describing for high school electronics classes. Every resistor, cap, etc was on a half-size popsicle stick pcb with stands that snapped on a grid below, and banana plug sockets on top. It worked well for its purpose since it essentially turned components into lego bricks.
I had a 60-in-1 which had a AM antenna and a code key and three transistors. But the manual was not quite basic enough for me because I was so young. So I could only make the circuits that included a wiring diagram. There were about two dozen other projects that only included schematics and I never made the connection (hah) of how to use the schematics with the components in the kit.
Please sell these, it’s a nice execution
Thanks!
I had the Heathkit version of this when I was about ten years old. As you’d expect of Heathkit, the lab board had to be assembled before any projects could be built. The end result was similar to the Radio Shack Science Fair lab kits, complete with spring terminals. As is traditional for Heathkits, the hardware was accompanied by a very thick wonderfully illustrated yellow-covered manual.
RIP Rat Shack…
RadioShack, “What? Wait! I’m not dead yet!”
I never had one of those as a kid. I made my own to follow the TeachIn 76 series: https://worldradiohistory.com/UK/Everyday-Electronics/70s/Everyday-Electronics-1975-10.pdf
Tom I have a few different germanium transistors if you want them.
I’m planning on using Silicon transistors for availability; I’ve been able to get most of the projects I’m focusing on working with ‘3904’s and ‘3906’s. That being said I’m always up for adding some other semis to my collection!! :-)
How would we connect? I’m in Canada
Hi John,
You can email me at profthoen@gmail.com. We can figure out a way for me to cover shipping. Thanks!
I had one of those when I was a kid in the 70’s. I learned a lot about electronics and was able to make some different applications, like a mouse trap alarm that would let you know when it was triggered.
The larger version of this kit (125 in 1 maybe?) is what got me interested in electronics back in the early 90s. I got it for Christmas and it was one of my favorite things to play with. I got the even bigger radioshack version with the bread board as a teenager. It’s cool to see people recreating them.
I had the 200-in-1 which came with a NAND gate chip and a flip-flop chip as well as fancy things like an LED digital display.
So one of the reasons I’m making this modular is to be able to swap out the PCBs. My next goal / phase is to add a number of digital logic boards (both SSI and MSI) to do some more advanced digital projects. The challenge of all this is developing good project documentation – I really like the idea of a printed manual which the company did a fantastic job with. Today so many people depend on pdfs and online manuals, but I really hope to get younger students specifically to do this w/o phones or laptops…we’ll see where that goes :-)
I had the 200 in one kit for Christmas…definitely started me on my career in electronics engineering…thank you Dad!
This is great. Well done!
I’m in the planning plane of my 160-in-one homage, and you’ve given me some things to think about.
and then there was Libe kit logic circuits…
Hi!
I too had one of those kit Science Fair/RadioShack. It was the late version of 200-in-1 Electronic Project Kit, I was 12 or so… I also shifted my career towards electronics after that and am almost very happy with that. The only trick I have is that, it appears FPGA designers and SW engineers make more money than HW designers and I can’t find peace with that.
Anyways, back to those kits, I would love to make one and maybe upgrade it with features that are not present in the original one so that I can do so many designs. I like the concept of the one exposed in this article with multiple headers for the pins of each component. What I would love to have on it are some specific components like the transformers or the ferrite bead, but I can’t find rhe part numbers… maybe they are custom made. If so, I guess I will need to either fall back to different parts commonly sold on the market or discard them at all.
Now, with the ridiculous manufacturing cost of PCBs, it would be so easy to make kits like that.
Thanks in advance to anyone who can share information about how to get the specific parts of the kit.
I will be adding a BOM at some point when everything is proofed out. The meter and transformer are a bit challenging to find, although I think I did get the txf from Mouser. Hard to find smaller meters like the one I have in the US at a reasonable price…
Hi all! Thanks for all the comments! Sounds like there is a lot of interest, which is great! Please follow the project and continue to make suggestions – I’d really like to get something out there for the middle school – Junior high age kids to have a chance to discover electronics. It’s hard to create a full electronics lab in a school from ground zero (I did this at Pasadena City College – it was a labor of love!), but maybe this would be a way for interested teachers / hobbyists to get a start. Cheers!
– Tom
The real challenge with these X-in-1 kits is in the manual and projects. Most of the commercial ones had really lame projects that didn’t hold my imagination for long. Yet they didn’t teach enough theory so I could design my own projects.
I suppose that economics limited how many parts they could supply, and how many projects they bothered to document.
But today, we have the internet. If some breadboard like this could get a toehold, you could have thousands of people dreaming up projects to build with it, and pointing out sources for parts to expand it!
I think my goal with this project is to as you said “get a toehold.” For me the theory part is challenging, especially with my target of middle-school / junior high students. In my mind, if the projects grab the kids interest enough they will find more advanced sources to learn more. I remember as a kid not getting a lot of the theoretical concepts (how do you explain a BJT in a few sentences!!), but maybe there will be enough here to get them started…
Documentation is the big challenge – easy to come up with complex circuits, but hopefully as I said it’s a starting point.
So very much true!!! Some of the concepts illustrated and blocks of circuits exposed in the manuals cruelly lack of explanations! I mean, as a HW born in the ’80s, with job experience, I had a hard time to understand the operating of some of the blocks designed by engineers of ’60s and ’70s. I can’t possibly imagine for a teen or even a 8 year-old kid. Actually, I can because I was that kid.
(nobody tell him about Snap Circuits 🤫)
Who else tore theirs apart for components once they got old enough to use a soldering iron?
Mine was a 1968 edition of the RS 50-in-1. I still have parts of it. The wood enclosure houses a TMS 9900 eval board which I also still have.
I’ve picked up variations of these at tag/garage/yard sales over the years.
The intent was to get my daughter interested in Electronics, but she didn’t.
So, I have about 6 of them, some missing components, or instructions.
Our church has a lot of children being home-schooled, so I should see if interest lies there. There are certainly enough spare parts in the shop to resupply the kits, and Horowitz and Hill could supply circuit ideas.
Oh what a joy to see! I built a little oscillator using the 2SB56 germanium transistor and wanted to make a standalone but the local TV repair shop couldn’t source one so provided me with an AC128 instead.
And ***ty years later in sitting here drinking Chateau de Chasselei with a ‘play room’ awash with Arduino kit and ESP32 variants.
They don’t know they’re born!