As the debate rages on about the value of AI-generated art, [Chris Borge] printed his own version of another technology that’s been the subject of debate about what constitutes real art. Meet the camera lucida.
Developed in the early part of the nineteenth century by [William Hyde Wollaston], the camera lucida is a seemingly simple device. Using a prism or a mirror and piece of glass, it allows a person to see the world overlaid onto their drawing surface. This moves details like proportions and shading directly to the paper instead of requiring an intermediary step in the artist’s memory. Of course, nothing is a substitute for practice and skill. [Professor Pablo Garcia] relates a story in the video about how [Henry Fox Talbot] was unsatisfied with his drawings made using the device, and how this experience was instrumental in his later photographic experiments.
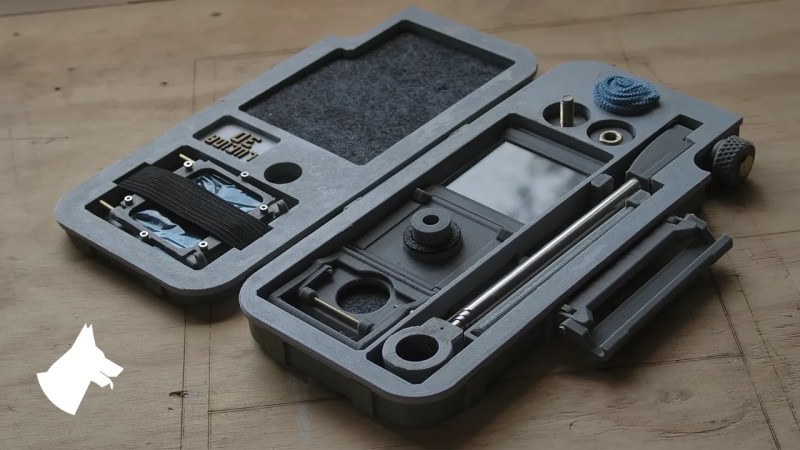
[Borge]’s own contribution to the camera lucida is a portable version that you can print yourself and assemble for about $20. Featuring a snazzy case that holds all the components nice and snug on laser cut felt, he wanted a version that could go in the field and not require a table. The case also acts as a stand for the camera to sit at an appropriate height so he can sketch landscapes in his lap while out and about.
Interested in more drawing-related hacks? How about this sand drawing bot or some Truly Terrible Dimensioned Drawings?


Had access as a child to one of such devices.
It didn’t improve my lack of free hand drawing skills.
Yet, if you got the eye and pencil handling trained, I believe it helps a lot as you don’t need to aproximate distances, sizes and proportions.
The box is very well thought, very well designed !
Cool tool I did not know about, now I do, so I’ve learned something, thank you Hackaday.
Today one loads in a image, overlays a layer, and starts drawing.
I got one of the original Neolucidas from their kickstarter a decade ago, and then the XL version a few years later. I’m delighted to see this new spin on the design.
One issue with the camera lucida is that, even though the image of the scene is overlaid on your paper, they are at different focal distances, and your eye must change focus to (literally) focus on the drawing vs. the scene.
Though this change in focus can be helpful in the drawing process, it’s quite tiring. And as my eyeballs age, it’s getting harder to do. I find one additional element that helps: a lens between the camera lucida and the paper: a +2 or +3 diopter reading glasses lens is about right.
That’s interesting: I was thinking of the opposite solution to the difference in distances: putting a -2 or -3 diopter lens between the subject and the mirror!
There’s a similar problem with military heads-up displays, and I’m pretty sure they use your solution, effectively putting the computer display at infinite distance, although they use a concave mirror rather than a lens.
-2D lenses are a lot harder to find at the corner drug store!
Eyeglasses with negative diopter lenses are now available on Amazon. I’m wearing a pair of -3.00 right now. Yeah, it was a surprise to me as well. I used to spend over $100 for eyeglasses. These were about $10.
Cool documentary to watch on this subject is Tim’s Vermeer. Even if you’re not into art or an artist, any maker will dig this project of his.
https://en.wikipedia.org/wiki/Tim%27s_Vermeer
Tim’s Vermeer is one of the best hacker movies out there. He is obsessed with the subject and spend a decade solving a problem no-one else really cares for. I believe he found the solution and makes a great case by paining a Vermeer himself.
I’ve found it to be quite difficult to replicate the technique myself. The biggest problem are parallax errors. Your head position and viewing angle can make a big difference. I couldn’t find a comfortable position and stopped playing after a few hours. It was good fun, though.
You know, I wondered why the “toy” camera lucida (we had one similar to that at home in the ’60s) had both a vertical mirror and a 45 degree half-silvered mirror. Duh – the image would be inverted if it only had the 45.
So you mean I can draw more than stick figures now? Neat!
This is what I’ve wanted for a long time. Sadly there’s only part of a BOM (the glas/lenses part are the main issue as they have no links). I might have to design my own in the future to get around this (unlikely to happen, knowing my schedule). Too bad as the rest is very nicely made.
50*50mm square 1.2mm thick glass.
50*23mm square thin mirror (around 1mm)
A “first surface mirror” and “semi silvered glass” are the ideal choice here but greatly up the cost. Build guide will discuss this when it is complete.
The 50*50 1.2mm appears to be cover glass for microscopes. I found one source in that size but I payed less for a car so that’s not an option. I wasn’t able to find a source for the mirror. And the first surface mirror /semi silvered glass appears to be those see through cop movie mirrors. Appears to be unobtanium in that thickness.
Last update was a year ago so I don’t expect any update. The guide says he’ll show a build guide when it’s done. Too bad, I’d love to use this as I’m practicing drawing and this could greatly help to focus more on techniques. Something like this that I can transport would be amazing.
Don’t want to engineer or build your own? Then run to https://neolucida.com/ They are in stock, and less expensive than trying to build a one-of from purchased parts. I will say you probably don’t want the smallest cheapest option: Though the optics are great and the thing is very portable, you need good precision in holding your eyeball in the right location, and that’s a bit frustrating. The XL is nicer for that.
I might actually do that. I hoped to build it myself though. It’s like half the fun. But it has to be affordable.
Also, that XL comes with 3 actual blackwing pencils. That is impressive.