Displays are crucial to modern life; they are literally everywhere. But modern flat-panel LCDs and cheap 7-segment LED displays are, well, a bit boring. When we hackers want to display the progress of time, we want something more interesting, hence the plethora of projects using Nixie tubes and various incantations of edge-lit segmented units. Here is [upir] with their take on the simple edge-lit acrylic 7-segment design, with a great video explanation of all the steps involved.
The idea behind this concept is not new. Older displays of this type used tiny tungsten filament bulbs and complex light paths to direct light to the front of the display. The modern version, however, uses edge-lit panels with a grid of small LEDs beneath each segment, which are concealed within a casing. This design relies on the principle of total internal reflection, created by the contrast in refractive indices of acrylic and air. Light entering the panel from below at an angle greater than 42 degrees from normal is entirely reflected inside the panel. Fortunately, tiny LEDs have a wide dispersion angle, so if they are positioned close enough to the edge, they can guide sufficient light into the panel. Once this setup is in place, the surface can be etched or engraved using a CNC machine or a laser cutter. A rough surface texture is vital for this process, as it disrupts some of the light paths, scattering and directing some of it sideways to the viewer. Finally, to create your display, design enough parallel-stacked sheets for each segment of the display—seven in this case, but you could add more, such as an eighth for a decimal point.
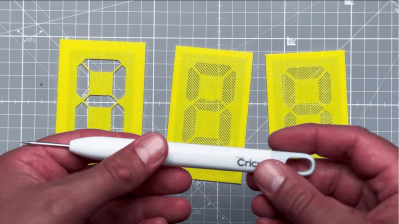
How you arrange your lighting is up to you, but [upir] uses an off-the-shelf ESP32-S3 addressable LED array. This design has a few shortcomings, but it is a great start—if a little overkill for a single digit! Using some straightforward Arduino code, one display row is set to white to guide light into a single-segment sheet. To form a complete digital, you illuminate the appropriate combination of sheets. To engrave the sheets, [upir] wanted to use a laser cutter but was put off by the cost. A CNC 3018 was considered, but the choice was bewildering, so they just went with a hand-engraving pick, using a couple of 3D printed stencils as a guide. A sheet holder and light masking arrangement were created in Fusion 360, which was extended into a box to enclose the LED array, which could then be 3D printed.
If you fancy an edge-lit clock (you know you do) check out this one. If wearables are more your thing, there’s also this one. Finally, etched acrylic isn’t anywhere near as good as glass, so if you’ve got a vinyl cutter to hand, this simple method is an option.


Isn’t this a slightly different take on the faux Nixie tube display featured here some years ago ? Except back then the individual plates held a single, whole digit (0 – 9).
Yep, and that in turn was a slightly different take on 1960s/1970s displays. There’s nothing new in the world, just when people discover it.
I’ve come up with a set of rules that describe our reactions to technologies:
1. Anything that is in the world when you’re born is normal and ordinary and is just a natural part of the way the world works.
2. Anything that’s invented between when you’re fifteen and thirty-five is new and exciting and revolutionary and you can probably get a career in it.
3. Anything invented after you’re thirty-five is against the natural order of things.
– Douglas Adams
Lots of things have been invented since I was thirty-five and most of them are pretty cool.
Just remember to pack a towel and thanks for all the fish.
Ha he’s very good at what he does
“Did” RIP Douglas Adams
There are very occasionally new things, but they are the work of great genius. Something out of reach to most. The ability to truly think a new thought is marvelously rare.. Tesla received the design of his AC generator in a divine flash from outside himself after reciting lines from Goethe’s Faust in the forest. I think that’s how it usually goes—entire teams of competent men could toil for lifetimes and never once get close to it.
I think the idea goes back to the 1930’s, with the first number display in the ’50’s. IIRC the first product was some sort of Russian meter, I remember seeing photos.
Here’s the article that I was recalling above.
https://hackaday.com/2016/12/22/light-pipes-and-leds-team-up-for-a-modern-take-on-the-nixie-tube/
The ESP32-S3 8×8 RGB Matrix module can support a maximim of 8 segments (for digits zero through nine that would be seven segments plus one for the decimal point). The problem with that approach is the digits must be viewed from the front directly or there will be a parallax effect. An arguably better approach is to use one edge-lit acrylic sheet per whole digit, this dramatically reduces the effect of parallax but the one digit per sheet approach makes it harder to see the digits at the rear-most of the stack of sheets. Plus you need ten rows of edge-lit leds, not eight.
That ESP32-S3 8×8 RGB Matrix module costs $10.80 each before tax & shipping on AliExpress:
https://www.aliexpress.us/item/3256806740133807.html
The ESP32-S3 8×8 RGB Matrix module has a Chinese QST QMI8658C Low Noise, Wide Bandwidth 6D Inertial Measurement Unit (IMU) with Motion Co-Processor and Sensor Fusion on board. The datasheet (in english) for the QMI8658C can be found here:
https://www.lcsc.com/products/Attitude-Sensor-Gyroscope_588.html?keyword=QMI8658C
Has anyone ever 3D printed cover templates for 7 or 14 segment displays which use discrete LEDs? The areas intended to be backlit would be very thin and the areas to block light would be thick.
It’s VERY LARGE 7 or 14 segment displays I’m referring to.
Not 7-segment, but yes.
Appearance depends a bit on the filament type. Plain (un-dyed) HIPS works well.
However, you need to engineer in light blockers to stop bleed into adjacent segments.
Have a look at https://www.youtube.com/watch?v=M3jyMX8EXAQ. In her case she left the segments open but at the 5:00 mark talks about plastic choices, hers were either too translucent or not enough.
She painted the insides to scatter the light a bit better, you could go the other way and paint to block light instead.
Something I haven’t seen in practice but wondered about is using very much thinner sheets for the layers. At what thinness does it become impractical to get light into the sheet?
Depends. How bright do you want it to be, and what’s the étendue and power of your light source?
With a laser source you could make it just a few microns thick. Then your issue might be simply “how do you hold it without the light leaking out” Since it probably would be too thin to be self-supporting, and any clamps would be a place where the total internal reflection is frustrated, and the light will get absorbed.
You fix light bleed by bending the panels backwards so the light sources can be far apart. That’s how all the old time incandescent bulb ones worked.
I’ve done 1mm acrylic, wide angle LEDs help heaps.
You don’t really gain all that much and it’s a bit of a pain to build. I put LEDs top & bottom as it made arranging them without having light bleeding on other panels easier. These days I’d try the really tiny LEDs.
I had an 8-track player that displayed the track number with edge lit slices of clear plastic.