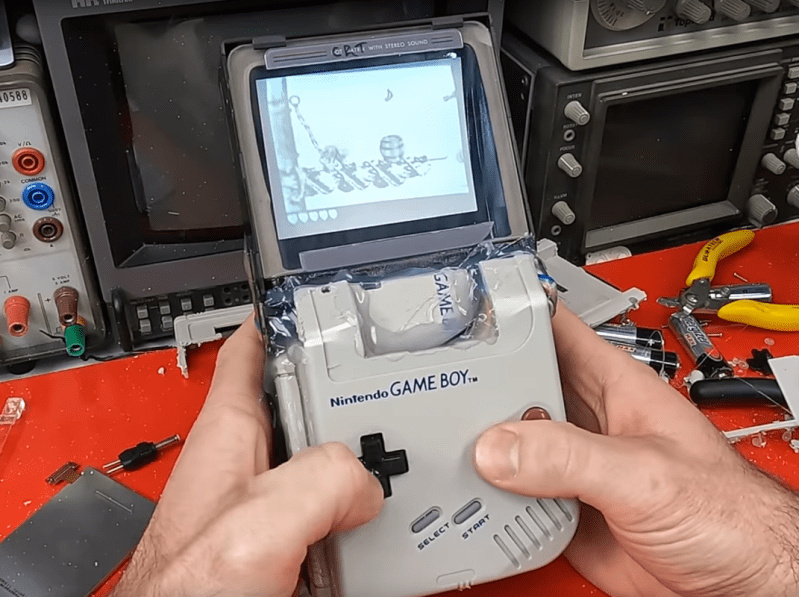
Before LCD and LED screens were ubiquitous, there was a time when the cathode ray tube (CRT) was essentially the only game in town. Even into the early 2000s, CRTs were everywhere and continuously getting upgrades, with the last consumer displays even having a semi-flat option. Their size and weight was still a major problem, though, but for a long time they were cutting edge. Wanting to go back to this time with their original Game Boy, [James Channel] went about replacing their Game Boy screen with a CRT.
The CRT itself is salvaged from an old video conferencing system and while it’s never been used before, it wasn’t recently made. To get the proper video inputs for this old display, the Game Boy needed to be converted to LCD first, as some of these modules have video output that can be fed to other displays. Providing the display with power was another challenge, requiring a separate boost converter to get 12V from the Game Boy’s 6V supply. After getting everything wired up a few adjustments needed to be made, and with that the CRT is up and running.
Unfortunately, there was a major speed bump in this process when [James Channel]’s method of automatically switching the display to the CRT let the magic smoke out of the Game Boy’s processor. But he was able to grab a replacement CPU from a Super Game Boy, hack together a case, and fix the problem with the automatic video switcher. Everything now is in working order for a near-perfect retro display upgrade. If you’d like to do this without harming any original hardware, we’ve seen a similar build based on the ESP32 instead.
Thanks to [Lurch] for the tip!


“Even into the early 2000s, CRTs were everywhere and continuously getting upgrades, with the last consumer displays even having a semi-flat option.”
That seems right, though I got my first pocket TV with a color LC display a bit earlier in ca. 1995.
It was a Roadstar or Casio model, I think. I fondly remember how it had an OSD, an on‐screen‐display.
That was an overlay graphics, essentially, which showed things like volume level or the channel number.
Mine even had a progress bar (in green color) that served as an visual orientation were the select channel was on spectrum.
Auto scanning for TV channels was also such a cool new feature at the time, esspecially on longer car or train travels.
If you came from a b/w portable TV, a camping TV, background before these little things felt so futuristic.
Destroys $1500 retro Gameboy for junk mod is more like it. Buy a Game Gear ding-dong…
How dare he modify his own property!
DMGs cost like $30 what do you mean “$1500” Gameboy?
James featured!
My favorite mod of his is probably the NES cartridge that is a Famiclone, still works as a NES game, and can play itself.
Look how they massacred my gameboy.
Article has many weird misinformations. The CRT is from/meant for an intercom, Gameboys have always been LCD but they used a modern replacement kit
Early pocket TVs had such CRT screens, too.
https://www.guenthoer.de/e-history.htm
It’s disappointing that there’s some kind of reflector arrangement, rather than just looking straight at the face of the tube for the full effect.
But I do enjoy the brutal approach to fit and finish. I was half expecting to find out at the end that it was a How To Basic video all along.
That’s not a reflector – these TVs have phosphors on the inside of the tube and you’re looking at that inside.
Without compensation, the viewport is extremely trapezoidal.
It’s not really a reflector per se, it’s a sony tube that places the electron guns sort of in line with the viewable screen (as opposed to behind it in conventional crts). You are still directly viewing the phosphor “screen”, it’s just that instead of being excited from the rear it’s excited from the bottom and you are viewing the curved surface on which the phosphor sits. This method requires calibration to minimize distortions from the non-linear scan of the surface. Similar to the portable tv sinclair put out (though iirc those were electrostatic while this tube is electromagnetic).
yes, what you see are the phosphore and the electron gun is perpanticular to view direction, firing from the bottom. you can check the picture on the following shop link:
https://fr.aliexpress.com/item/1005006305410889.html
Damn you! Don’t show me that I can buy this part, it will just give me more projects…
I call this a side scan TV.
It was the tech that proceeded the progressive scan TV.
Is this very different from this project from 2019 which uses a flat CRT from a video door phone?
https://hackaday.com/2018/11/13/unique-flat-screen-display-put-to-use-in-crt-game-boy/
AAH i’m at the point he lifted the pin.
I hope he realises he just needs to drive it high to turn it on.
I knew that too.