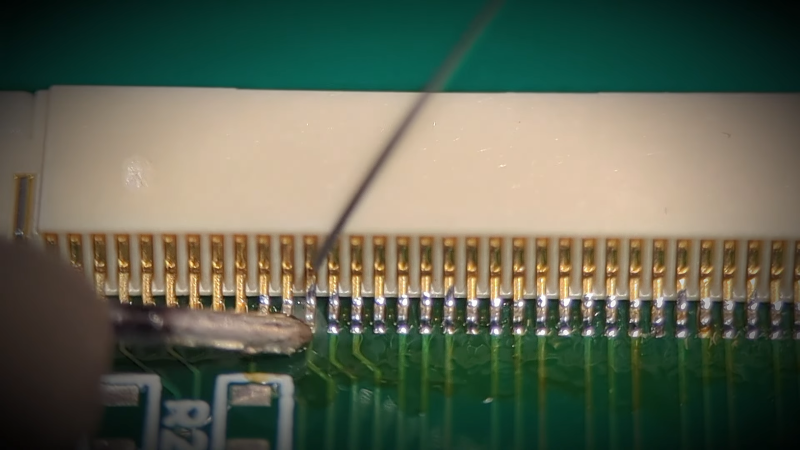
You have some fine pitch soldering to do, but all you have on hand is a big soldering iron. What do you do? There are a few possible answers, but [Mr SolderFix] likes to pull a strand from a large wire, file the point down, and coil it around the soldering iron. This gives you a very tiny hot tip. Sure, the wire won’t last forever, but who cares? When it gives up, you can simply make another one.
Many people have done things like this before — we are guilty — but we really liked [Mr Solder Fix’s] presentation over two videos that you can see below. He coils his wire over a form. In his case, he’s using a screwdriver handle and some tape to get to the right size. We’ve been known to use the shanks of drill bits for that purpose, since it is easy to get different sizes.
Truthfully, while sometimes you do really need a tiny tip, we prefer having a tip with some thermal mass. If you use something shaped like a slotted screwdriver blade, you can get contact area when you need it, or rotate the iron 90 degrees and get a very narrow profile.
But the copper coil method does work well, as you can see. This will work with nearly any iron. The first examples with fairly large resistors work predictably well. But we were really impressed with some of the very fine pitch connectors in part 2.
Of course, a fine tip is only part of the equation. It doesn’t hurt that he has a microscope and thin solder. If you want to up your SMD game, Oregon State University can help. We find it amusing that many products today are smaller than the components we used to use.


I prefer the T12-K tip for (all)most of my soldering. It does 0402 to dragsoldering pinheaders, even large thermal sucking pads. Sometimes it is too big to solder in thight spaces, but thinking about the order in which you solder helps. I got most available tips but this one is my goto.
For plumbing I got a larger soldering iron with massive tip ;)
Ha. me too. I seldom change to another point. but a very sharp and aligned tweezers is essential. removing 0603 is even very easy by just heating both pads at the same time. and flux, use flux, especially if you solder with lead free, as i do for new stuff.
I keep my grandfather’s old chunky Weller he used for soldering gutters whenever I get a chunky heatsink pin on a large ground fill.
I’ll give it a go. I rarely change my tip anymore, just leave the general purpose bevel tip on, it does the business
What helps infinitely more are generous dollops of gel type flux
I tried this some 30 years ago and it does work, but it does not last. The copper dissolves into the solder and the tip looses it’s shape quite quickly. I forgot how long it lasted but probably somewhere between 10 minutes and half an hour. But still, that is enough for “emergency situations” or occasional use. If you’re soldering more, you’re likely to already have better equipment and a bunch of tips in different sizes.
“The copper dissolves into the solder and the tip looses it’s shape quite quickly.”
Reminds me of the 24k gold plated Ungar tips that I never got to test the life of because my soldering tool box was “lost” during a move many years ago, so I don’t know if their lifespan was any longer than normally plated tips. If it was, it seems like that would have been a foolish business choice by Ungar.
I would have been interested to know as well. I know that many jewellers abhor lead solder and won’t let the stuff anywhere near their tools or work, because it contaminates other metals. Especially gold, because it binds with that metal so deeply and – short of really drastic measures – irreversibly. Apparently, with time it also makes the gold brittle. The comments on this Reddit thread are interesting and relevant: https://www.reddit.com/r/jewelers/comments/1csq1nr/lead_solder_on_gold_completely_irreparable/
I too have never used a fine tip. If your tip is too fine, then the heat dose not transfer well. My soldering iron tip only gets changed when it wears out, and I’ve been commercially assembling SMT boards for the last 30+ years. It is a bit of a mistake to use a very fine tip in my opinion. The secret is good thermal transfer and FLUX!
Yeah, pictures of fine pitch parts with huge amounts of space around them are exactly the sort of situation that inexperienced solderers think require fine tips when it’s actually the reverse.
The only time you really need a truly fine tip is when you physically can’t get a blunt tip to reach – so boards with high density part placement or awkward tall packages right next to each other where there’s little to no room between them.
Can be handy to deal with that one or two fiddly bridged pin/pads in the fine stuff even when you have decent access – the big tip just remelts too large a zone and gets in the way of applying the fresh solder so actually removing the excess and/or bringing in the right amount of new solder in the right place is just not as easy – though definitely possible with the larger tip still. Also depends on just how large your standard tip is – my iron is pretty old with a default tip size that is actually quite huge compared to the seemingly most common size now (but the smallest tip my iron has is closer if still large).
See my method at http://forum.6502.org/viewtopic.php?p=48875#p48875 . A picture of the results is two posts above that. I use a tip that covers three leads at once, and bridge the whole side, then hold the board vertically and go down the row, top to bottom, re-melting, and all the excess solder comes off on the iron, leaving a perfect soldering job, even with no extra flux. I had more pictures on another forum which seems to be down now.
A royal we have been using blunt objects to solder much finer things than soic (as in second picture) since the 80’s… you need practice not finer tips
Many years ago I’d solder fine pitch stuff the “recommended” way – opposite corners and then pin by pin with the smaller tip you could find.
Then I saw a video of a Chinese (Taiwan? Hong Kong?) board factory where a bunch of teenage girls wielding irons that looked like the one I made stained glass windows with were doing in 5 seconds what was taking me 5 minutes.
Swipe swipe swipe swipe done. A quick look for bridges that were cleared with another swipe or braid. I’m still nowhere that good, they were FAST!
That’s about how I do it. http://forum.6502.org/viewtopic.php?p=48875#p48875 (and picture is two posts above that)
This is getting ridiculous – kids these days need two videos to show them how to wrap a bit of wire round a shaft?
I do not think it’s the kids that need it… The “this is genius” and “it’s magical” says enough about the person who put it online and about their expectations of the world (or how they think they can exploit it).
I’m looking to improve my soldering skill set. Anyone have recommendations for 00105 components and BGA reballing?
I currently use a pinecil v2 with its short fine tip set and a Yihua 853AA hot air rework station.
Cheers!
Hardware wise you’re fine
You need to gain experience with different types of flux. Basically the surface tension of the flux could be high for climbing up wires and up through hole legs but then it moves components and bga balls. Or the flux could be thin with low surface tension which doesn’t move components as much but tends to evaporate quickly so you might have to reapply. For the application of heat, you want to preheat the board or have a hotplate that you do rework on so that you only need a small amount of heat either with the iron or air to actually get the solder to melt and the copper isn’t sucking heat away from the joint because the rest of the board is cold. With proper flux and preheating, hot air can do pretty much everything because modern smt boards are soldered in a reflow oven which is technically hot air.
Just drag solder it and clean up with wick.
Seconded.
That was my thought as well, and it’s what I’ve always done. But there are times when other components are close enough that drag soldering is a drag – pun intended – or just not feasible. So I’m glad to have this trick in my arsenal, and embarrassed that I never thought of it.
When watching the video I found myself wondering why he didn’t clean the tip underneath the coiled wire first, and then add a bit of solder to the area. It would have increased the heat transfer to the copper wire, and probably would have made the temperature at the end of the wire more stable – not to mention a bit higher.
Clean up with a swipe of a HOT iron and plenty of flux.
This hack is making me feel like a fool. I use a fine tip that is half-corroded (i can only wet half of it). I never do fine work, so i just live with pressing the one good part of the tip up against my joint. I own a never-before-used chisel tip which would be perfect for my purposes, but i never installed it. I’ve tried sal ammoniac and tip tinner – no dice. I don’t know if the tip is ruined by leaving the iron on through the whole session (because i still think heating up takes a long time, even though it’s really only about 10 seconds), or if i should blame the copper wool, or my lead-free solder, or what.
And i read this article and i think “instead of installing the perfectly good tip that meets my needs more thoroughly, i could wrap a bit of single-use copper wire around the tip”. Like i said, a fool
I got some “Tip Activator” from Weller for my tips that have become corroded. Apparently you’re not supposed to use it often because it can wear away the finish of the tip, but it’s a really easy way to clean up a tip. Then you can properly wet and use your whole tip. (Smells nasty though)
A pro working in Guangzhou, 2011. https://youtu.be/w-a2MluuURk
Cool – too bad we don’t get to see her removing all the excess solder that’s bridging the pins.
I’ve done rework that way. One favourite trick is to have some aluminum duct tape handy. (It’s the kind that pros use to seal ducts, not the fabric stuff that crafters use to make wallets and bags). When I get the solder mostly melted on both rows of pins, I dab the strategically-wadded tape firmly onto the top of the package, then lift the chip off. (The wadding is necessary to protect your fingers, as the aluminum heats quickly and will burn you if you just press a flat piece onto the IC).
When I have enough clearance, I’ve also been known to tip the board and give the edge a sharp rap on the table to throw excess solder off after drag soldering. For some boards it’s not a suitable technique, and you have to be careful not to get the molten solder into or under nearby components. It’s not an elegant technique, but sometimes there’s a place for the ‘brute force and ignorance’ approach.
Thats the neat part – you DID. When she tilts the board and makes the last swipe thats when excess solder is taken off with the iron tip itself. There were no bridges left because she was quick and decisive enough to make it before all the flux vaporized.
She is picking it up with the iron. The “bang” is her knocking it on the rim of a tin can to fling the solder off the iron. She runs a hot tool. There were three girls working this custom upgrade job. The boards are FriendlyARM Mini2440.
Warming folks up for the soldering challenge at Supercon, Al?
A bent bevel tip ~2mm cover 99.9% of all smd. It’s rare to need anything smaller as long as it’s clean and has a corner.
Sadly this post/video gives bad, perhaps outdated advice? It teaches doing things slowly and inefficiently.
This specific knowledge that small things should be soldered with small tips seems to be old as time, universal and bad. Its the source of all the cheap Chinese soldering irons bundled with useless needle shaped sharp conical tips. Small tip means minimal surface for heat transfer ending in struggles and bad joints.
As other commenters already pointed out big flat chisel tip is all you need provided understanding of solder (all liquids) physics (Marangoni effect) and flux. Like in metal welding Solder doesnt randomly flow in all directions, and once you learn what to expect you can direct it with heat, flux and simple decisive moves of the iron.
tldr without being a smart ass: Big tip + flux = excess solder will flow towards the tip while big contact surface of the tip ensures proper heat transfer for healthy joint.