Setting up access to a headless Raspberry Pi is one of those tasks that should take a few minutes, but for some reason always seems to take much longer. The most common method is to configure Wi-Fi access and an SSH service on the Pi before starting it, which can go wrong in many different ways. This author, for example, recently spent a few hours failing to set up a headless Pi on a network secured with Protected EAP, and was eventually driven to using SSH over Bluetooth. This could thankfully soon be a thing of the past, as [Paul Oberosler] developed a package for SSH over USB, which is included in the latest versions of Raspberry Pi OS.
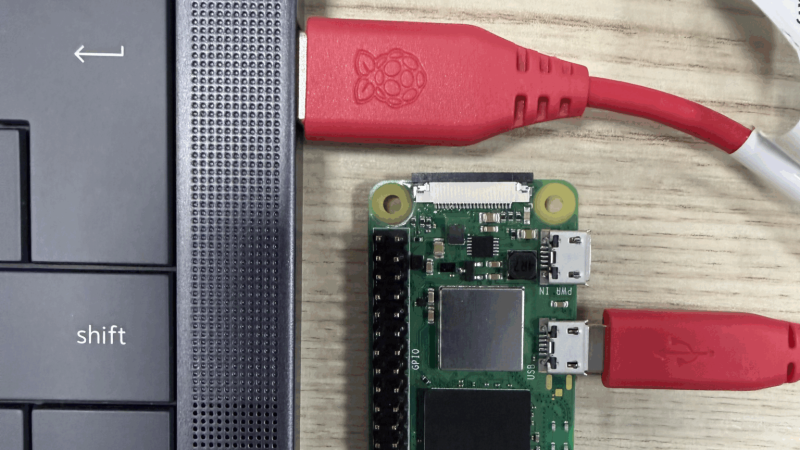
The idea behind rpi-usb-gadget is that a Raspberry Pi in gadget mode can be plugged into a host machine, which recognizes it as a network adapter. The Pi itself is presented as a host on that network, and the host machine can then SSH into it. Additionally, using Internet Connection Sharing (ICS), the Pi can use the host machine’s internet access. Gadget mode can be enabled and configured from the Raspberry Pi Imager. Setting up ICS is less plug-and-play, since an extra driver needs to be installed on Windows machines. Enabling gadget mode only lets the selected USB port work as a power input and USB network port, not as a host port for other peripherals.
An older way to get USB terminal access is using OTG mode, which we’ve seen used to simplify the configuration of a Pi as a simultaneous AP and client. If you want to set up headless access to Raspberry Pi desktop, we have a guide for that.
Thanks to [Gregg Levine] for the tip!


I don’t want to diminish the possibilities of this feature. But the problem the author describes here hasn’t happened to me since I began using the Raspberry Pi Imager. It automatically adds wifi credentials, my personal login credentials as well as enables services like SSH by default.
Don’t use the RPI imager. So this may be useful. We’ll see… I use etcher to copy the PI OS image to the SD card, SSD Drive, or PCIe SSD. After the image is laid down, then connect drive to RPI. Now I have to hook up a monitor, keyboard to setup the initial user and make static IP connections to the network(s). Once that is done, then go back to headless access with ssh and change hostname, and other settings. It was so much easier with an initial user pi … But so it goes.
And I am the lucky individual who submitted the tip. And sadly Andrew I agree with you on the Imager. I downgraded to the much older version I am now using because of similar issues. Oddly enough all connected with the zany issue I tipped the site about.
Most off the shelf IOT devices use bluetooth for the initial wifi configuration. There are several phone apps to do this, such as BLEHero and nRF connect. Maybe that could be another alternative?
Bluetooth could be used in serial port mode. It can provide a console just like the UART header. Another option would be to switch the WiFi to AP mode and host a configuration page if it fails to connect to a network.
It definitely shouldn’t use anything that requires an app though.
I just wanted to mention that this is the way it works out of the box with the Beaglebone Black since 13 years (192.168.7.2 anyone?). I always thought that was a nifty feature and wondered why RPi didn’t do the same.
Because the Pi is supposed to be an educational tool (aside from all the ones that got gobbled up by corporations for embedded applications). You’ve got to remember the target demographic. These are people of the land. The common clay of the new West.
Obviously, anything educational has to have all the complexity removed from it. Heaven forfend a person might actually learn something. Hence NOOBS, PINN, and Imager.
+10 for Blazing Saddles reference.
There are no prizes for doing things the unnecessarily hard way.
If you are learning you need to know what the hard way is, so that when the helpful tool which was doing it all for you breaks you know what to do. Not only that, if you know what the hard way is you’ll be able to see whether the tool is doing it right.
Case in point – imager breaks and clueless noobs have no idea what to do next.
I looked into doing this but ultimately ended up using usb to 3.3v serial adapter. In my case it was a gizmo for work and our computers are super locked down and the end device wouldn’t be on my machine anyway so I didnt want to muck around with getting it to setup some random machines or machines and blah blah blah
Curious about the “ssh over Bluetooth” comment. Care to share more details of that, OP?
I was curious myself, so i asked gemini to detail the steps for me
https://g.co/gemini/share/f4608fab9ad4
I basically followed this tutorial: https://www.youtube.com/watch?v=zumnEOAk9aI
It isn’t a perfect solution, since it requires a desktop environment and I would have preferred something headless, but it was quick to get working and I don’t absolutely need performance. It essentially creates a Bluetooth network-sharing tether, and I can SSH over that.
Ah, nice, thank you.
A possible alternative is to use a JDY-31 bluetooth-UART module (available on Ali for about $0.50). Unfortunately, the pin mapping on the JDY-31 doesn’t correspond nicely to the Raspberry Pi 40-pin header pinout, but a short cable should do the trick.
That gives you a cheap(!), low power, always available way to access the serial console, regardless of how you have mis-configured your actual installation (so long as you have not disabled the getty on the console, of course!). And it should fit easily into most Pi cases to boot.
Yet another alternative might be to use an ESP32 to relay UART to WiFi (potentially over SSH), but it would be higher power draw at the very least.
isn’t ssh over usb basically terminal over serial usb?
It depends on whether it’s a USB serial device or a USB network device.
Why not using NCM? MS is telling that RNDIS is out of date. NCM works also on Linux and Mac out of the box. Also on the Windows 10 / 11. So no different configurations are needed.
Why the custom signed driver rubish for Windows? If you know wat to do windows can use the build in Driver vor NCM or RNDIS. You only have to tell Windows with a String descriptor what to do. See compatible_id on linux.
Also the network segments are wrong. 169.254 should be the correct one for things like that.
Why?
I mean, it can be configured to act as a usb serial port. And you could set it up to put a login prompt on the pi end of the port. No encryption I guess but who is spying on your usb wire?
Because you can’t “apt update” over a serial port?
Depends. Is the device a Pi Zero W? (Headers factory installed optional)? Then yes you can. And I have.
I presume you mean, using the serial port to configure the WiFi interface, and then doing “apt update” from the serial port, with the data downloaded over WiFi? That’s not what I mean when saying ‘doing “apt update” over the serial port’.