
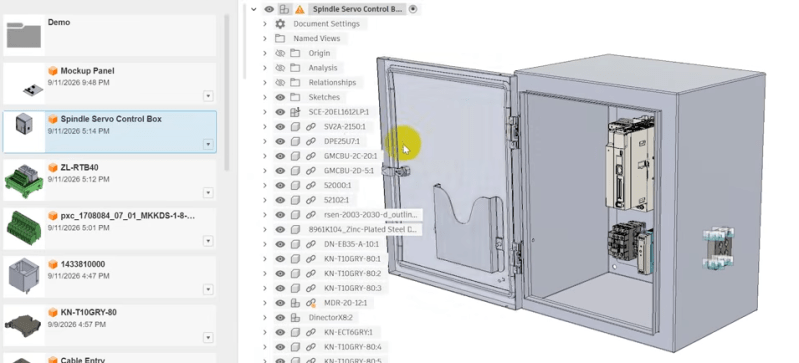
[Clough42] has started a new CNC control cabinet build, and uses it as an opportunity to demonstrate why he models the whole thing out in CAD before ordering parts or physically building anything. One may wonder why to bother, and the simple answer is to ensure there are no surprises or waste. [Clough42] has built plenty of these cabinets and there’s always something that isn’t as expected.
Modeling out an entire cabinet sounds like it should be easy, because today one can obtain 3D models for components from industrial suppliers with ease. In practice, it’s a process fraught with little gotchas.
For example, a STEP file of a component can lack convenient geometric snap points. An enclosure will be a single entity, without a separate door (and certainly not articulated at the hinge). [Clough42] shows ways to deal with all of these, and more, in Fusion 360. With a few simple techniques laying out an entire cabinet in CAD can be easy.
Planning before buying or building is a form of prototyping, and prototyping helps surface problems so they can be avoided before they become costly. This concept extents to design work as well; model everything out to avoid simple goofs like a screwdriver handle trapped by its surrounding bits.












tl;dr a standardized metal cabinet fitted with standardized DIN rail brakes.
To do it in detail with CAD is a total yak shaving. The same could be achieved with a rough draft on paper but hey, artistic people doing artistic things.
This video/cabinet is more of a demonstration of the process; he’s got other projects on the channel with much more densely-packed cabinets, which I’d say do a better job of justifying the effort of this sort of layout planning. When you’re dealing with bulky connectors and switch assemblies coming in from multiple sides, rather than just basic wire glands, etc, the 3d modeling does have advantages over basic paper layout; for this cab, I think he’d probably agree that graph paper would be plenty enough for most people.
There’s also the fact that his shop is supported by his YouTube channel and Patreon — all of his projects, more or less, exist to be documented, and having a 3d model he can pull apart does make for better clarity in his presentations, and he even posts these types of models for his patrons, so there’s further reason for him to do it, whereas most of us don’t have those externalities.
PLC/automation hardware should have free air space around it for ventilation – how much is usually specified in the documentation – so you should leave an inch or two all around. You shouldn’t stuff the box full. That’s why, you actually take the back plate inside the box and design your stuff to fit in that area. That also makes sure you can assemble all your stuff while it’s outside of the cabinet, and then simply drop the whole thing in.
That means you never need to model the cabinet. You only need to model the hardware mounting plate, or indeed just draw a bunch of rectangles in Inkscape or something to check that everything fits, then pick a cabinet that fits the mounting plate.
Having done multiple deployments in boxes exactly like this, yes!
The removable back plate is designed to be easy to mount things to, and typically gives adequate air space.
In a nutshell: model based engineering. Takes a bit more time up front but for complex systems is saves a TON of time and headache down the road (ask me how I know).
Many manufacturers/distributors of electrical gear provide design tools for wiring cabinets that can do more than just CAD, like this one: https://www.schrack.at/tools/schrack-design
Usually limited to the vendor’s product portfolio, but most components are standardized and can be replaced with other brands.
For me the surprise is always that I run out of knockouts for the wiring.
I have built several PLC cabinets, and I’ve got say; this level of detail is overkill. After cad modeling for decades, I’ve learned that more detail is not always better. Detailed models take longer, render slower, and the level of detail can give a false impression of how accurate the model dimensions are. A much more practical approach is to sketch out each component with a minimal level of detail needed for the assembly. For example for you might simplify a power supply as a rectangular block with the right exterior dimensions, plus mounting holes and a green boss representing the terminal blocks. You can bang out an entire cabinet design this way in like 1 hr, and the resulting cabinet will be just as good as if you spent a whole day making a photo-realistic cabinet in CAD. I also find that downloaded models often have an excessive level of detail, which bogs down my PC when working on an assembly with dozens of such components.
YOu can download HD models and use Nanite to tweak their resolution not to k*ll the GPU.