World’s Smallest Cordless Power Tools, 3D Printed Of Course

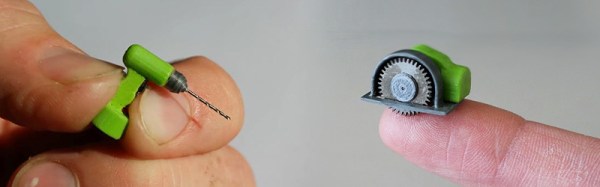
What is this?  A circular saw for ants?!

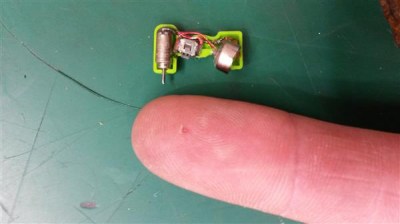
There isn’t much information we could find on this one (sorry, no source files that we know of), but this little hack is so playful and fun, we just had to share it with you. [Lance Abernethy] has built both a working cordless drill, and circular saw using nothing more than a 3D printer, what seems to be a pager-type vibration motor, a tactile switch and a coin cell battery – you can see them both working in the video after the break.

drillinside

[Lance] used an Ultimaker 2, running a 0.25mm nozzle, and printing at a 0.04mm layer height in PLA. As you would expect, the 0.25mm nozzle is needed for such small parts – it’s also close to the limit of what extruder can still squeeze plastic through. it greatly increases the chance of blocked or clogged nozzles.

[Lance] admits that the saw can’t quite cut anything just yet, but he does say that he has plans to make more miniature cordless tools.  We can’t wait to see how he might manage the mechanism for a jig-saw.

[VIA adafruitdaily.com newsletter]

Continue reading “World’s Smallest Cordless Power Tools, 3D Printed Of Course”

Pimped Out 70’s Home Intercom System, Now With More Pi

If you own a house that was built in the 1970’s, you might still have the remnants of a home intercom system on the walls of each room. They were consider the end-all-be-all of “home automation” back in the day. Now, they look dated and out of place (but still kind of retro-cool at the same time).  [Cpostier] decided that he wanted to keep his old intercom system, but give it an update with a Rasperry Pi and a 7 inch touch screen, and the results are totally groovy, man.

The original unit served two functions, as an intercom system, and also as a whole house music player.  [Cpostier] wasn’t interested in the intercom feature, and so he started with the traditional gutting of the 70’s dried up electronics. Each room received a new $7 speaker (from Amazon), and the main control panel was fitted with a Pi, TFT touch screen, and new amplifier. The Pi is running Kodi (formerly know as XBMC) and along with it being a great media player, it can also show weather data, or what ever else you would like.

Something magical happens when you blend new tech with old tech – we totally dig it.

Let’s Play…Wheel Of Solder!

Solder is solder right? Just spin the wheel and whatever comes up will work fine. Well, not so fast. If you’re new to electronics, or are looking at getting started, there is a bit to learn first. [Mr Carlson] has the info you need with this youtube video you can watch after the break.

He begins with a discussion of solder diameter. For most through hole work, something around 0.03 inch is pretty universal. When your ready to step up to SMD work, we find 0.02″ inch to be a much better match to the smaller pad sizes. [Mr Carlson] goes on to talk about the types of flux used inside the solder. Rosin(R), Rosin-Midly-Activated(RMA) and Rosin Activated(RA) in order of least to most aggressive.

He rounds out the video with information and a warning about using “organic” core solder. If you’re new to the world of solder, this video is a good jumping off point. TLDR; If you’re just starting out, a 0.03″ RMA solder would be a good place to start – but if you want to learn a bit more, the 20 minute video is worth the watch for those of you just getting your feet iron tip wet. It’ll serve you well at least until solderless metal glue becomes affordable.

Continue reading “Let’s Play…Wheel Of Solder!”

Desolder DIP Packages Like A Pro

Looking for a quick way to desolder those pesky DIP chips? Check out this handy little tip in the video after the break. [Clay Cowgill] shows you the easy way to do it.

Normally, before you desolder a Dual In-line Package (DIP) chip, you have a decision to make: Are you interested in saving the chip or the PCB? The repeated cycles of heating and reheating the PCB while using solder wick, or even a “solder sucker”, can cause a real problem for the PCB. You run the risk of delamination of the PCB traces. Some phenolic based PCBs can barely handle one extra heat cycle, while as a top-quality PCB might be fine with 4 or even 6 rework attempts – but we’ve lifted off tracks with less. And all that thermal stress isn’t exactly the best thing for the chip itself.  You risk ending up with a dud.

The other trick commonly used is to cut the pins of the DIP and then you can treat each pin as a single through hole part – and that is generally less aggressive to the PCB, there by saving your board, but destroying the chip.

In the video [Clay Cowgill] is using a Hakko 850 hot air rework station to desolder parts from an Atari 130EX motherboard. He’s able to effortlessly remove the chips, and save the PCB, all without applying and re-applying heat over and over again. That’s something we’ve seen before – the interesting part is where he then uses the air flow to blow the through hole openings clean – making for some of the fastest and cleanest DIP removal we’ve ever seen without using a dedicated desoldering gun.

[Thanks [wblock] via Eevblog]

Continue reading “Desolder DIP Packages Like A Pro”

3D Printed Computer Case Brings Sexy Back

We know what you’re thinking – case modding is so 2004. You can forget all the silly paint jobs, windows, and lighted spinning fans that’s you’ve seen in the past. That all seems like child’s play compared to what [Complx] has created over on the overclock.net forum.

Using a mixture of 3D-printed plastic corners and a laser-cut acrylic top, bottom and sides, [Complx] was able to create a very pleasing design. He didn’t have access to a 3D printer large enough that would make the parts, though, so he decided to outsource that task. His first set of parts were printed on a Makerbot Replicator, but came out too coarse and so he set out to find a better printing method. After getting quotes of $2000 or more, he was about to call it quits when he found someone with Stratasys Fotus 250 who was willing to work with him on the price, but still provide a quality print.

The guts of the machine aren’t too shabby either. We know everyone loves a parts list so here you go:  It’s an ASUS Z97I-Plus and a i7-4790K, running a GTX 970 with a 600 Watt power supply, 8GB RAM and a couple of SSD drives.

We have to commend [Complx] on his documentation, photos and videos.  It really makes this build shine. You can watch an 3d animation of the build after the break.

Continue reading “3D Printed Computer Case Brings Sexy Back”

The Return Of The Screen Savers

If you were lucky enough to have cable TV back in 1998, you may remember a fledgling channel called “TechTV.” The crown jewel of the network was a show called “The Screen Savers.” Well, recently the TWiT Network has relaunched the show (without the partnership or permission from the old producers) as “The New Screen Savers” – and it’s almost exactly as we remembered it. The show features tech news, tip and tricks – starring the lovable [Leo Laporte] as the main host.

We’ll assume that most Hackaday readers are at a level of knowledge above what’s generally presented in the show, but we have to admit that we almost always find some little tech tip or software review that we didn’t know about. And if you know someone who is starting to take an interest in all things tech, this might be a great way for them to start learning quickly – and to gain exposure to a wide variety of topics.

If you’re looking for a bit of nostalgia, many of the co-hosts of the old show return regularly. People like [Kevin Rose], [Patrick Norton] and [Sarah Lane]. You can watch the show on the TWiT site or on YouTube. We’ve included the first episode after the break.

Continue reading “The Return Of The Screen Savers”

Homemade Internal Combustion Engine – Sans Machine Shop

We’ve got a question for you:  If you were stuck in a basement, with nothing too much more than some copper pipe, solder, JB-Weld, and a few hand tools, do you think you could make a working 2-stroke motor? Well, [Makerj101] did just that, and the results are fan-freaking-tastic.

[Makerj101] began his journey like most of us do – with a full face-plant type failure. His first attempted at building an internal combustion engine wouldn’t run, due to a low compression ratio, and too small port sizes. So he did what most of us would do, and tore apart a small gas-power weed-whacker motor to see what he was doing wrong.

The type of engine he’s making is a 2-stroke. That makes the design much simpler as there are no mechanically controlled valves a like 4-stroke motor. The piston (along with the cylinder wall) does double duty by also directing the intake and exhaust gasses – along with a simple flap-type check valve.

For now, the ignition system is run off of mains power, but he has plans to change that – creating a self contained engine. We’re amazed that the entire build is made with such simple tools. Even the the piston is cast out of “JB Weld” epoxy putty. After seeing this, we think that the kid who took apart a clock is going to have to up his game a bit.

We’ve included all 6 parts after the break.

Continue reading “Homemade Internal Combustion Engine – Sans Machine Shop”