Mechanical Clock Designed For A CNC Router Gets New Life Using A 3D Printer

[Madis Kaasik] designed a clock a while back using Solid Edge (3D CAD) — but never got a chance to build it — until he became an exchange student at a university in Norway with access to a big industrial 3D printer!

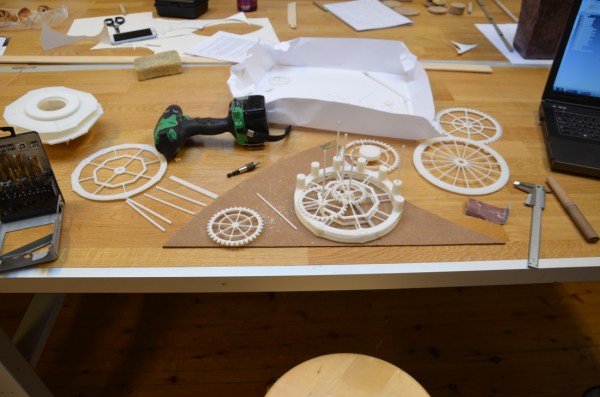
He had originally intended for it to be cut out using a CNC router or with a laser cutter, but when discovered he could use the university’s 3D printer he decided to give it a shot — it’s actually the very first thing he’s ever printed! The designs had to be modified a little bit for 3D printing, but now that it’s done he’s also uploaded them to Thingiverse for anyone to use.

It took quite a bit of fine tuning with the pendulum, weights, and gears to get it ticking properly, but what [Madis] enjoyed most about this project was the realization of just how vast the possibilities of 3D printing are — he’s excited to begin his next big 3D printing endeavor!

Continue reading “Mechanical Clock Designed For A CNC Router Gets New Life Using A 3D Printer”

Hacking A MagSafe Connector For Your IPhone

maglock

The MagSafe power connector for Apple MacBooks is probably one of the handiest features they developed — we’re not too sure why it hasn’t been integrated onto iPhones yet. [Tony Hoang] isn’t sure either, but that didn’t stop him making his very own!

Due to the size of the MagSafe adapter, it’s simply not possible to integrate it directly into an iPhone, so [Tony] took his trusty Otter-box case and modified it instead. He’s using a Qi wireless charging receiver on the inside of the case, because it has a very slim ribbon cable to the USB. Modifying that he was able to solder on the MagSafe adapter directly to the ribbon cable. In order for it to fit nicely through the case, he 3D printed an adapter bracket for it to stay nice and secure.

From there it was just a matter of soldering the MagSafe power cable onto a 5V USB power brick, and boom-bada-bing, he’s got a MagSafe compatible iPhone. Previously he’s done this mod to a Samsung Note II, and plenty of other people have added it to laptops and ultrabooks!

Printable Lamp Assembles Itself

Printable-Self-Assembling-Lamp

With the advent of 3D printers, printable circuits, and other “one-machine-to-rule-them-all” automated systems, printing fully functional items is fast becoming a reality. The lamp seen above starts out as a flat piece of cardboard with circuits printed onto it — apply some electricity and it will fold itself up, creating a lamp — it even has a capacitive touch sensor for turning it on!

This ingenuity comes straight from Harvard researchers who presented the project “Self-assembling Sensors for Printable Machines” at the IEEE International Conference on Robotics and Automation (ICRA) just last Tuesday in Hong Kong. It’s not fully printable (wires and the LED had to be soldered in by hand) but it’s an amazing proof of concept — there’s also an Arduino off-screen taking care of controlling it.

The cardboard is a sandwich of shape-memory polymers which are triggered by heat, generated by running electricity through thin layers of copper trace. It takes a long time to assemble so the following video has been sped up 32x speed.

Continue reading “Printable Lamp Assembles Itself”

Three-Phase Submersible Thruster Is Open Source And Awesome

submerged_mellon_assembly_v8

Have you ever considered building some kind of underwater vehicle? It’s rather ambitious but [Dane] of Transistor-Man has designed and built a working submersible 3-phase electric thruster — and he’s released the plans online for all to share!

He decided to make this for his 3D printed canoe (another awesome project) which is possible due to his massive SCARA robot 3D printer. The thruster makes use of readily available off the shelf components, but with 3D printed cones for decreased water resistance and other manufactured parts. The housing is water-jet cut, and the poly-carbonate tube had grooves for seals made using a lathe.  The amount of detail in his build logs is incredible — he’s fully modeled all parts in what looks like SolidWorks and uploaded detailed images and designs of all the parts.

The trickiest part of the build was making it water-tight. His first test was to submerge it in a water bath for 8 minutes, and once that was proven, he filled the inside with 5W-20 oil to make sure it wouldn’t leak the other way as well. One of his project goals is for this thruster to work 1 meter underwater without losing more than 10ml of the coolant (oil) per hour.

Continue reading “Three-Phase Submersible Thruster Is Open Source And Awesome”

Micro-Robots Made At Home, Who Needs DARPA Funding?

We love it when this happens. Sometimes we post about cool technology that companies are developing which might start an outcry of “not a hack” — but then, just sometimes, it still inspires a few readers. [Jeroen Domburg] — who everyone knows as [Sprite_TM] and is a judge for The Hackaday Prize] — saw a recent video about micro robots, a project funded by DARPA, and decided to try making his own.

We shared the original story a few months ago about these replicator like micro-robots, which can quite literally swarm over surfaces, use tools, and manufacture micro-sized parts. The robots themselves are actually just dumb little magnets — the magic is in the surface underneath them.

This sparked an interest in several people, and [Mike] made a very simple version of it, capable of 1-dimensional movement. This inspired [Sprite_TM] to step it up a notch, with his own 2-dimensional version. He’s designed his own PCB that allows him to run current in various directions through the traces of the board — this effectively allows him to control a small neodymium magnet to go whichever way he wants.

Continue reading “Micro-Robots Made At Home, Who Needs DARPA Funding?”

How A Maker Proposes

proposal

[Sefi Attias] just sent us a heartwarming little video of how he proposed to his girlfriend [Tania] — using a little help from technology and other makers.

As a maker, [Sefi] was always building things which impressed [Tania], so he thought it was only fitting to make the proposal a one-of-a-kind maker experience.

He started by designing the engagement ring himself, to be 3D printed. It’s an amazingly complex little thing made up of the repeating words of the quote “I will betroth you to me forever”. It was almost too complex in order to print — but they managed to do it in wax, which allowed them to create a mold and then cast the final part in white gold. Once complete, they set a diamond in place to cap it all off.

The second step was the proposal, which was made possible using a quadrotor, a strip of RGB LEDs, and a long camera exposure. To show it off in real-time to [Tania] they setup a projector and screen on the side of the street, providing a surreal window into the park behind them. It was all made possible with the help from over 20 people from the XLN Makerspace and SkyLens (the quadrotor people).

Oh yeah, and she said yes.

Continue reading “How A Maker Proposes”

Industrial Light Painting Steps It Up A Few

industrial light painting

What would you do if you had access to an industrial ABB IRB 6640 robot? We’d probably make a giant 3D printer, but if you’re [Jeff Crossman] and [Kevyn McPhail], you’d make one of the most advanced light painting setups we’ve ever seen.

The setup itself is really quite simple — a single RGB LED is connected to a Teensy microcontroller on a tool-head for the robot — controlling the robot is the hard (fun?) part. To create the images, [Jeff] had several students come in to have their photographs taken using a Microsoft Kinect. This allowed him to create an RGB point cloud for the robot to recreate.

Using Rhino he created the tool paths required for the robot to build up a floating 3D image of the students for the camera taking the long exposure. Each demonstration made use of ~5000 points, which takes the robot arm about 25 minutes to place.

It’s a fascinating video, and yes it does seem like a bit of overkill, but hey — why not?

Continue reading “Industrial Light Painting Steps It Up A Few”