Printable Lamp Assembles Itself

Printable-Self-Assembling-Lamp

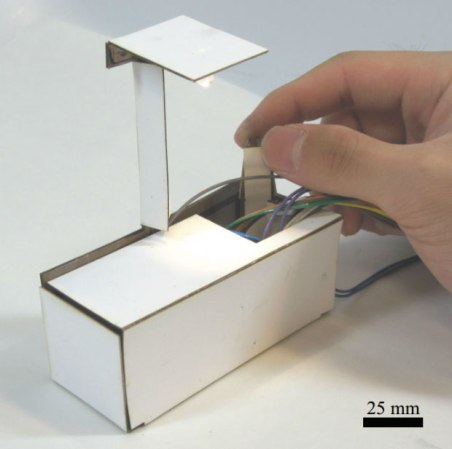
With the advent of 3D printers, printable circuits, and other “one-machine-to-rule-them-all” automated systems, printing fully functional items is fast becoming a reality. The lamp seen above starts out as a flat piece of cardboard with circuits printed onto it — apply some electricity and it will fold itself up, creating a lamp — it even has a capacitive touch sensor for turning it on!

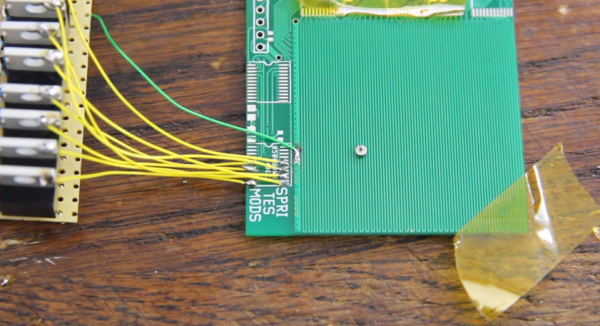
This ingenuity comes straight from Harvard researchers who presented the project “Self-assembling Sensors for Printable Machines” at the IEEE International Conference on Robotics and Automation (ICRA) just last Tuesday in Hong Kong. It’s not fully printable (wires and the LED had to be soldered in by hand) but it’s an amazing proof of concept — there’s also an Arduino off-screen taking care of controlling it.

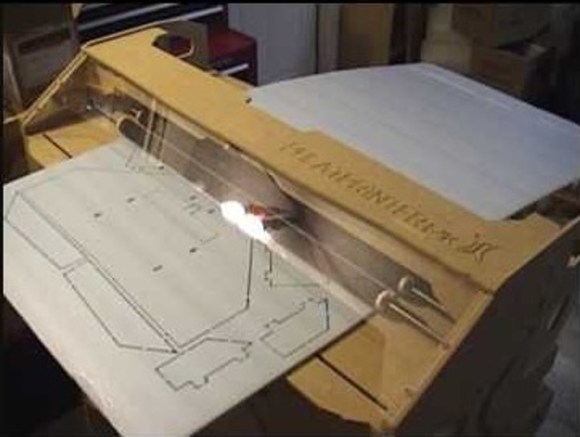
The cardboard is a sandwich of shape-memory polymers which are triggered by heat, generated by running electricity through thin layers of copper trace. It takes a long time to assemble so the following video has been sped up 32x speed.

Continue reading “Printable Lamp Assembles Itself”

Customized IPad LCD Screen Clips Onto Macbook As A Slick Second Screen

Macbook with iPad second screen

Last year, [Ben] found a good deal on iPad 3 LCD screens. He couldn’t resist buying a couple to play around with. It didn’t take him long to figure out that it’s actually quite simple to use these LCD screens with any computer. This is because the LCD panels have built-in Apple Display port interfaces. This means that you can add your own Display Port connector to the end of the LCD’s ribbon connector and just plug it into a computer. You’ll also need to hook up a back light driver, which [Ben] was able to find pre-made for around $35.

The hack doesn’t stop there, though. [Ben] wanted to have a nice, finished product. He laser cut an acrylic bezel for the LCD screen that was a perfect fit. He then milled out a space for the LCD to fit into. The acrylic was thick enough to accommodate the screen and all of the cables. To cover up the back, [Ben] chose to use the side panel of a PowerMac G5 computer case. He chose this mainly for aesthetics. He just couldn’t resist the nice brushed aluminum look with the giant Apple logo. It would be a perfect match to his Macbook.

Once the LCD panel was looking nice, [Ben] still needed a way to securely fasten it in the right place. He knew he’d want it next to his Macbook, so why not attach it directly to the Macbook? [Ben] got to work with his 3D printer and printed up some small plastic clips. The clips are glued to the iPad screen’s acrylic bezel and can be easily clipped on and off of the Macbook screen in seconds. This way his laptop is still portable, but he has the extra screen real estate when he needs it. [Ben] also printed up a plastic clip that turns the iPad’s USB power connector and the Display Port connector into one single connector. While this is obviously not required, it does effectively turn two separate plugs into one and makes the whole project that much more slick.

Three-Phase Submersible Thruster Is Open Source And Awesome

submerged_mellon_assembly_v8

Have you ever considered building some kind of underwater vehicle? It’s rather ambitious but [Dane] of Transistor-Man has designed and built a working submersible 3-phase electric thruster — and he’s released the plans online for all to share!

He decided to make this for his 3D printed canoe (another awesome project) which is possible due to his massive SCARA robot 3D printer. The thruster makes use of readily available off the shelf components, but with 3D printed cones for decreased water resistance and other manufactured parts. The housing is water-jet cut, and the poly-carbonate tube had grooves for seals made using a lathe.  The amount of detail in his build logs is incredible — he’s fully modeled all parts in what looks like SolidWorks and uploaded detailed images and designs of all the parts.

The trickiest part of the build was making it water-tight. His first test was to submerge it in a water bath for 8 minutes, and once that was proven, he filled the inside with 5W-20 oil to make sure it wouldn’t leak the other way as well. One of his project goals is for this thruster to work 1 meter underwater without losing more than 10ml of the coolant (oil) per hour.

Continue reading “Three-Phase Submersible Thruster Is Open Source And Awesome”

Track Your Dog With This DIY GPS Harness

GPS-dog-harness

Have you ever wondered how far your dog actually runs when you take it to the park? You could be a standard consumer and purchase a GPS tracking collar for $100 or more, or you could follow [Becky Stern’s] lead and build your own simple but effective GPS tracking harness.

[Becky] used two FLORA modules for this project; The FLORA main board, and the FLORA GPS module. The FLORA main board is essentially a small, sewable Arduino board. The GPS module obviously provides the tracking capabilities, but also has built-in data logging functionality. This means that [Becky] didn’t need to add complexity with any special logging circuit. The GPS coordinates are logged in a raw format, but they can easily be pasted into Google Maps for viewing as demonstrated by [Becky] in the video after the break. The system uses the built-in LED on the FLORA main board to notify the user when the GPS has received a lock and that the program is running.

The whole system runs off of three AAA batteries which, according to [Becky], can provide several hours of tracking. She also installed a small coin cell battery for the GPS module. This provides reserve power for the GPS module so it can remember its previous location. This is not necessary, but it provides a benefit in that the GPS module can remember it’s most recent location and therefore discover its location much faster. Continue reading “Track Your Dog With This DIY GPS Harness”

How To Upgrade Jasper’s Voice Recognition With AT&T’s Speech-to-Text API

Jarvis upgrade

Jasper is an open-source platform for developing always-on voice-controlled applications — you talk and your electronics listen! It’s designed to run on a Raspberry Pi. [Zach] has been playing around with it and wasn’t satisfied with Jasper’s built-in speech-to-text recognition system. He decided to take the advice of the Jasper development team and modify the system to use AT&T’s speech-to-text engine.

The built-in system works, but it has limitations. Mainly, you have to specify exactly which keywords you want Jasper to look out for. This can be problematic if you aren’t sure what the user is going to say. It can also cause problems when there are many possibilities of what the user might say. For example if the user is going to say a number between one and one hundred, you don’t want to have to type out all one hundred numbers into the voice recognition system in order to make it work.

The Jasper FAQ does recommend using the AT&T’s speech-to-text engine in this situation but this has its own downsides. You are limited to only one request per second and it’s also slower to recognize the speech. [Zach] was just fine with these restrictions but he couldn’t find much information online about how to modify Jasper to make the AT&T engine work. Now that he’s gotten it functional, he shared his work to make it easier for others.

The modification first requires that you have at AT&T developer account. Once that’s setup, you need to make some changes to Jasper’s mic.py module. That’s the only part of Jasper’s core that must be changed, and it’s only a few lines of code. Outside of that, there are a couple of other Python scripts that need to be added. We won’t go into the finer details here since [Zach] goes into great detail on his own page, including the complete scripts. If you are interested in using the AT&T module with your Jasper installation, be sure to check out [Zach’s] work. He will likely save you a lot of time.


Not Having The Room Isn’t A Good Reason To Not Have A CNC Router Anymore

PhlatPrinter CNC Machine

Typically, CNC Machines take up a larger footprint than that of the raw material it is cutting. The size of such a machine may have prevented interested makers/hackers from buying or building one for themselves. If you are one of those people then you’d be interested in [Fly3DMon’s] series of CNC Router projects called PhlatPrinter.

A typical CNC Router has a bed that the work piece is mounted to and that work piece stays stationary. The tool then moves in 3 axes, removing material, leaving behind a finished part. The PhlatPrinter works more like a large format plotter, where the work piece is moved back and forth via rollers while the tool only moves in 2 directions. What this allows is a CNC Machine that takes up very little floor space when not in use that can handle any length of material!

Continue reading “Not Having The Room Isn’t A Good Reason To Not Have A CNC Router Anymore”

Micro-Robots Made At Home, Who Needs DARPA Funding?

We love it when this happens. Sometimes we post about cool technology that companies are developing which might start an outcry of “not a hack” — but then, just sometimes, it still inspires a few readers. [Jeroen Domburg] — who everyone knows as [Sprite_TM] and is a judge for The Hackaday Prize] — saw a recent video about micro robots, a project funded by DARPA, and decided to try making his own.

We shared the original story a few months ago about these replicator like micro-robots, which can quite literally swarm over surfaces, use tools, and manufacture micro-sized parts. The robots themselves are actually just dumb little magnets — the magic is in the surface underneath them.

This sparked an interest in several people, and [Mike] made a very simple version of it, capable of 1-dimensional movement. This inspired [Sprite_TM] to step it up a notch, with his own 2-dimensional version. He’s designed his own PCB that allows him to run current in various directions through the traces of the board — this effectively allows him to control a small neodymium magnet to go whichever way he wants.

Continue reading “Micro-Robots Made At Home, Who Needs DARPA Funding?”