PACCAM: Interactive 2D Part Packing

capture

Do you have a laser cutter or CNC router? How much material do you waste from project to project due to inefficient part packing? Enter PACCAM, a software interface designed by [Daniel Saakes] to aid in efficient 2D part packing.

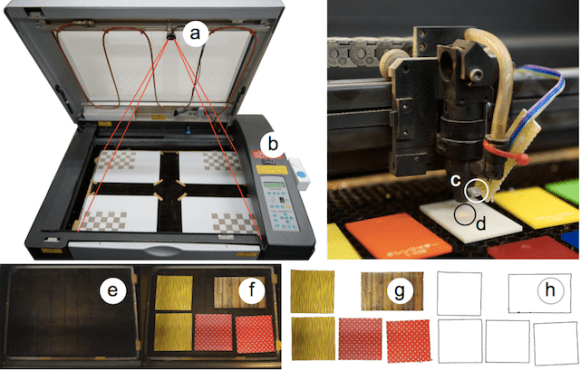
Using a cheap webcam, it is possible to capture the outline of used material, exactly where it is located in the CNC machine. The software then can limit your workspace to the material available in the machine. New parts can then be dragged into place, automatically avoiding interferences — certain algorithms also exist to utilize the remaining material most efficiently.

Looking to engrave custom items? The software can do that too by showing you the material (or in this case, object), you can simply drag your design onto the material available, without having to worry about aligning your object inside the CNC machine!

In the video after the break, [Daniel] shows just how powerful and useful the software is by putting a crooked, cookie-cutter riddled piece of material in the machine, and then using the software to cut new parts out of what would be scrap material in any other shop.

Continue reading “PACCAM: Interactive 2D Part Packing”

3D Printer Made From E-waste In Africa

We throw away millions of tons of e-waste every year and barely manage to recycle more than 15-20%. [Kodjo Afate Gnikou] is a 33-year old African who has just finished off a 3D printer built almost entirely out of e-waste.

He started the project months ago on Ulule, a European crowdfunding site, and had raised more than €4,000 to develop the idea. It was designed and built in WoeLab, which is the first hackerspace in western Africa. The printer is based on the classic Prusa Mendel, which they had available in the hackerspace.

The goal of the project was to create a 3D printer that is very easy to reproduce using a majority of recycled components. In the end, they succeeded and it only cost $100 to manufacture — while it doesn’t say what the purchased components are, it’s safe to assume they would have to be the main driver boards — everything else could have been made from scraps.

His vision in the future is to send e-waste to Mars to create homes for future inhabitants — far fetched? Maybe. But he did get into the NASA International Space Apps Challenge!

See it all explained in the video after the break.

Continue reading “3D Printer Made From E-waste In Africa”

Raspberry Pi Garage Door Automation

Like many of us, [Felix] sometimes wonders if he actually closed the garage door. I know I’m always double-checking my car locks! So, he decided to automate his garage door to give him some peace of mind!

He’s been working on a pretty big Raspberry Pi home automation series, and in this final segment he shows off his new GarageMote board which, as you can guess, lets him wirelessly control the door. It’s a very simple board complete with a small relay, a diode, and 2 resistors. The 8 pin header provides connection to two hall effect sensors that detect the status of the garage door, and the original door opener. He then connects this to an open-source wireless Arduino clone of his own design, dubbed the Moteino. A pair of these communicate to the Raspberry Pi which acts as his secure home automation gateway server.

The whole project is extremely slick, and very well documented – so if you’re looking at automating your home, [Felix] has a wealth of knowledge to share — well at least if you want to use is Raspberry Pi!

Stick around after the break to see the web-server controlled garage door in action.

Continue reading “Raspberry Pi Garage Door Automation”

RepRap Wally Can Print Larger Versions Of Itself

SCARA based 3D printers seem to be all the rage these days, and with good reason. This RepRap Wally doesn’t use any linear rods or timing belts — in fact, it can even print larger versions of itself with each iteration! Well, minus the electronics of course.

It was first spotted out in the wild at the NYC Makerfaire, and looks to be a pretty slick design. Using fully 3D printed limbs, the steppers move the arms using a fishing line. To reduce the load on the joints, a bowden extruder is also used. The really cool part of this is the z-axis, it uses a 4-bar linkage to stay level, but because of this, it also moves along an arc in the y-axis as it raises or lowers. This is accounted for in the firmware — otherwise you’d have some rather interesting curved prints!

Stick around after the break to see it in action, it’s a nice change to watch from the standard gantry style printers.

Continue reading “RepRap Wally Can Print Larger Versions Of Itself”

European Hackerspace Tour

Eurotrip

Wow! What a response we received on our Calling European Hackerspaces post! First off, thank you for such a warm welcoming to your hackerspaces. It looks like HaD is going to have to be way more active in touring and profiling hackerspaces!

Now unfortunately we’re just not going to have time to visit all of the ones suggested, but we’ve outlined a few of the ones we definitely want to check out!

We created a Google spreadsheet to help do this, so if your hackerspace has been mentioned, OR if it happens to be very close to the others and you really want us to come, please fill out some contact info on the spreadsheet so we can setup a time to visit! If you don’t want to put contact info in a shared document, send an email to the tips line instead with the subject [European Hackerspace Tour]. Because its unlikely our trip will coincide with any open nights, we’d love (need) to have someone to show us the space at potentially odd hours!

I will be writing an individual post for each hackerspace tour with lots of photos and details on all the juicy projects you guys are working on. And if we have time, we might even film the tour!

Once again, thank you for the amazing response and we can’t wait to meet all of you in person!

DIY HHO Mini Torch

Fascinated by hydrolysis apparatuses? Me too. Here’s a cool how-to that might convince you to make one! It’s a very simple and easy to build HHO torch using plumbing parts from the hardware store.

The entire build uses almost all standard readily available parts — except for the nozzle assembly. It’s an easy modification though, under the copper pipe endcap is a brass M6 nut that has been soldered in place – this allows you to switch out the MIG welding tips at any time.

[Peter] also shows off another useful tip that allows you to reduce the orifice size of the MIG welding tip – simply hammer a ball bearing into it. Seriously, check out the Instructable and see for yourself! This allows him to reduce the orifice size down to non-standard sizes which in turn allows him to increase the intensity of his HHO flame.

Now all you need is a source of HHO — but don’t worry, we’ve covered that before too!

[via Reddit]

Light Up Earrings

light up earrings

Unfortunately [ch00f’s] been too busy to write for Hack a Day lately, but he has finished off an awesome little project — Christmas LED earrings!

As with all his projects, there is a brilliant write up that covers everything — even for the stuff that didn’t work. But what we really have to admire about this project in particular is the scale at which he was working. The tiny battery squished in between the two boards? A mere 19mAh. Which is actually enough to power the earrings for a few hours, but is only the size and thickness of a few microSD cards!

The second thing that really popped out at us was the boards themselves, there’s just no room for a programming header! To work around this [ch00f] actually made the PCBs in 3 segments, programmed it, and then cut off the programming header section! If that’s not enough ingenuity, how about this – He also included hall effect sensors on-board to turn them off while charging! Not to mention an intricate wood box to charge them in…

Stick around after the break to see the great demo video, it even has some classy music from the 1930’s which really sets the mood.

Continue reading “Light Up Earrings”